Bulk fermentation is the “first rise” of your sourdough. During this time the yeast is inflating the dough with carbon dioxide and the lactic acid bacteria is building flavor.
However, the longer the dough ferments (and especially at warm temperatures), the lactic acid bacteria stimulates something called the “protease enzyme.” The protease enzyme eats gluten and starts to deteriorate your loaf. This is what causes overproofing.
Bulk fermentation is all about timing your dough perfect to get sufficient fermentation and rise in the dough and before the dough becomes too acidic and starts deteriorating.
This is the art of sourdough baking. Mastering the timing of bulk fermentation is the essential skill for sourdough bakers to master.
The Two Methods (Warm and Cool) Bulk Fermentation
Ther are two general methods of bulk fermenting dough: 1) Warm Bulk Fermentation, and 2) Cooler Bulk Fermentation.
These temperatures refer to the dough temperature during bulk fermentation.
If you are fermenting your dough at 78-82F/26-28C, you are doing warm bulk fermentation. The popular “Tartine Method,” by Chad Robertson, uses this temperature range. For this range, use the Bulk-o-Matic tools featured in the contents and videos below.
If you are fermenting your dough at 54-74F/12F-23C, this is considered to be cooler bulk fermentation For this method you can measure the exact dough temperature and percentage rise to determine when bulk fermentation is done. This method is described in my video, “Post-Pandemic Sourdough for Busy People – The Low and Slow Method.” It also uses this chart show in this article — “The Mystery of Percentage Rise in Bulk Fermentation.”
Download the Updated Version Here
For dough temperatures between 74-78F/23-26C, you can use either method with slight modifications.
The answer to this question is the Holy Grail for sourdough bakers and the question that beginning bakers struggle with the most.
I’ve devoted the vast majority of my videos and content on this website to helping answer that question. It is not simple, but there are many tools available, and it is a learnable skill.
See the videos and tools below.
I invented the Bulk-O-Matic system to provide a tool for sourdough bakers to determine when bulk fermentation is done. It is a one-of-a-kind tool and has proven to help beginning bakers master the art of bulk fermentation faster than with any other method.
The tool is introduced in the video, “When is Bulk Fermentation Done: Episode 3 – The Bulk-O-Matic System,” and the accompanying tool, “Bulk-O-Matic Guide” can be downloaded and printed.
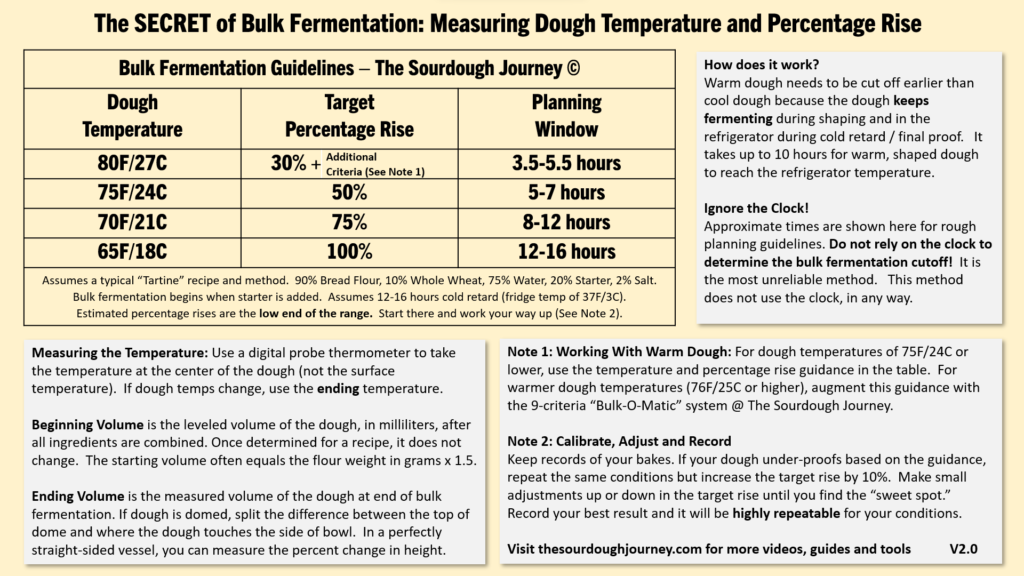
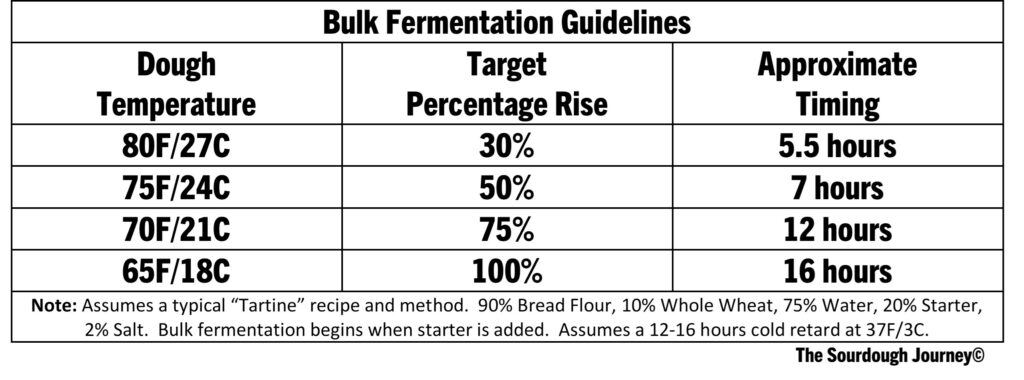
Bulk fermentation times are highly correlated with dough temperature. Cool dough ferments more slowly. Warm dough ferments more quickly.
A general rule of thumb is that for every 15F/8C change in dough temperature the fermentation time doubles (for increases) and halves (for decreases). This rule is generally accurate, in my experience.
The following video clip is a summary of my experiments in the video “Bulk Fermentation – Mastering Temperature and Time.”
No. The refrigerator is too cool for bulk fermentation. However, if you begin bulk fermentation at room temperature it is possible to move your dough into the refrigerator for the last hour or so of bulk fermentation. The dough will keep fermenting in the refrigerator until the dough temperature gets down to refrigerator temperature.
If you are early in bulk fermentation, you can move your dough into the refrigerator, and it will slow down the fermentation. You can then take it back out the next day, bring it back up to room temperature and restart the bulk fermentation process.
Moving your dough to the refrigerator slows down the fermentation process to accommodate your schedule, but it not generally recommended because it is very difficult to predict the effects of the temperature changes.
The “Proof” setting on most ovens is too hot for sourdough bulk fermentation or final proofing. For example, I have two different ovens with proof settings that reach approximately 105F/45C.
You never want your dough temperature to reach a dough temperature above 90F/32C or it will rapidly begin to overproof.
No! This is a controversial topic with many different opinions, but my answer is unequivocal.
The percentage rise in the dough in bulk fermentation is dependent upon the temperature of the dough. Cooler dough (70F/21C) can tolerate a higher percentage rise in the dough. Warmer dough temperatures (80F/27C) usually call for a lower percentage rise.
There are two reasons for this. 1) Warmer dough is more relaxed. While it is fermenting it just does not rise as much as cooler dough. 2) The target cutoff for bulk fermentation must anticipate the downstream steps. At warmer temperatures, the dough keeps rapidly fermenting during preshaping, bench resting and final shaping. So, an earlier cutoff (30% rise) is required to accommodate the time the dough keeps fermmeting before it goes into the refrigerator for cold retard, for example. With cooler dough, the fermentation moves much more slowly in the downstream steps so the dough must be more fully fermented at the end of bulk fermentation.
That all being said, in my experience, my dough usually overproofs when I let it double. With warm dough I usually shoot for a 35% rise in the dough. With cool dough I usually target a 55-60% rise.
Many recipes will say, “wait for your dough to double.” This is the single biggest reason so many people struggle and quit sourdough baking. I don’t know how or why so many recipes say this. I suspect that few people actually measure the percentage rise and they are just eyeballing the dough. When it puffs up, they say, “it looks like it doubled,” but many experienced bakers are looking at many other variables (the smell, the stiffness or looseness of the dough, the sheen on the dough, etc.) but they don’t explain to beginners how to do this assessment. Check out Bulk-o-Matic video and tool below to learn these skills like an expert baker in a very short time.
After read all of this, some people may say, “but so many recipes say the dough should double?” I have baked hundreds of loaves of sourdough bread and my best loaves have never been produced by letting the dough double. And some of my worst loaves have.
The percentage rise in the dough during bulk fermentation cannot be looked at in isolation because the dough keeps fermenting after the cutoff of bulk fermentation. The recommended dough temperatures and percentage rise in the dough are specific to each recipe. This is another reason the “doubling” rule of thumb does not work as a general rule. It may theoretically apply to some very specific cases (e.g., very cool bulk fermentation with high protein flour and a very short final proofing), but I have never actually seen such a recipe.
There are many ways to create a makeshift proofing chamber in your kitchen but in every case you must monitor the temperature in the proofing chamber, and monitor your dough temperature.
Common ways to create a proofing chamber (without buying a proofing box) are:
- Turn on the light in your oven. Monitor the temperature. If the oven or dough temperature is too warm, crack open the oven door to reduce the temperature
- Boil 1 quart or 1 liter of water and put that vessel of boiling water in an enclosed space with your dough. This will usually raise the air temperature in the enclosed space by about 8F/4C. You may need to refresh the water every few hours.
- Purchase a seed warming mat or a reptile warming mat. Put your dough on these mats to raise the dough temperature a few degrees. Monitor the dough temperature with a probe thermometer. Some of these mats can get very warm and will overheat the bottom of the dough. In these cases, put the dough on a cooling rack so it is not touching the warming mat and put a box or cooler over both the mat and the dough vessel.
- You can also put a dimmable light bulb in an enclosed space with your dough. Use a thermometer to measure the temperature. Be careful that you do not create a fire hazard. Some light bulbs will get hot enough to ignite flammable materials (e.g., a cardboard box).
Most bakers think about raising the temperature above room temperature when creating a proofing chamber, but sometimes it also makes sense to use a proofing chamber to reduce your temperature — for example, in the middle of summer.
You can use ice packs in any enclosed space (your oven, a cooler, a plastic storage box) with your dough to keep your dough temperature below your room temperature.
The following clip describing proofing chambers is from the video “Bulk Fermentation – Mastering Temperature and Time.”
Check out the video, “How to Read a Sourdough Crumb: Overproofed or Underproofed,” and download the tool, “How to Read a Sourdough Crumb Guide.” These are the best tools available for sourdough bakers to learn this essential skill of how to read a sourdough crumb.
When measuring the percentage rise in the dough, you need to know your starting volume of mixed dough in milliliters. This is your starting volume. Then measure the percentage change in volume, in milliliters. For example, if your mixed dough is 1,500 milliliters and it rises to 2,000 milliliters, that is a 33% rise.
(2,000 – 1,500) / 1,500 = 33% rise
If you start with 1,500 milliliters of mixed dough, and the dough rises to 3,000 milliliters, this is a 100% rise, or a doubling in the volume of the dough.
It is important to accurately measure the percentage rise. It is impossible to accurately “eyeball” the percentage change in volume, especially if your dough is in a bowl.
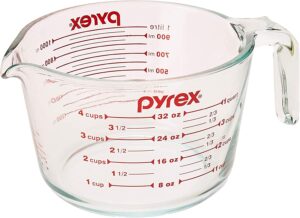
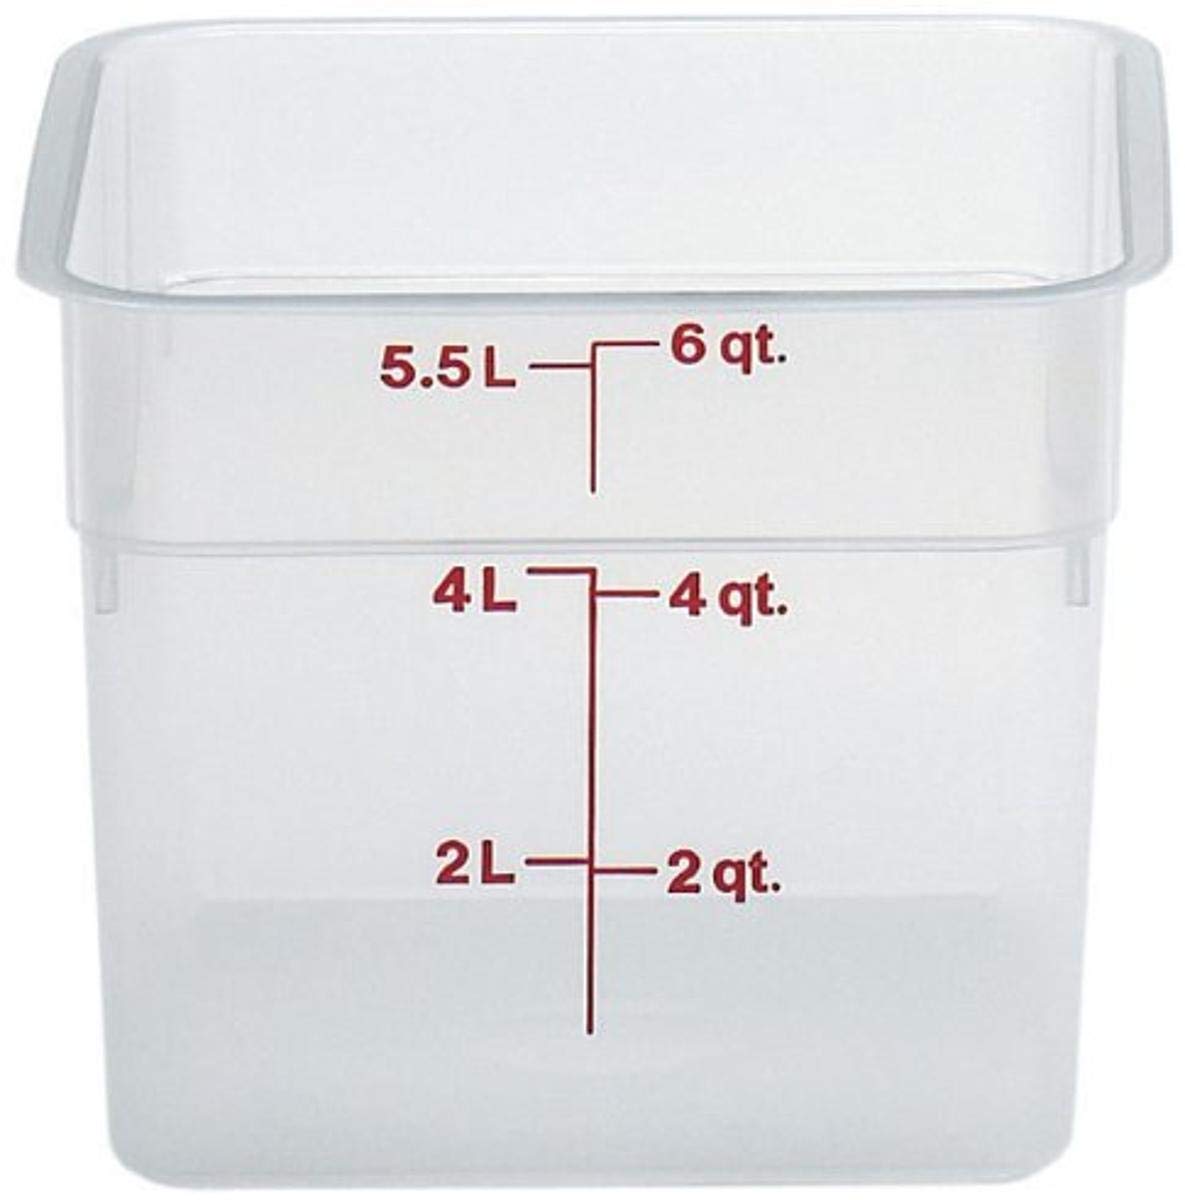
The best vessels for measuring the percentage rise are straight-walled vessels with milliliter markers. If you do not have a straight-walled vessel, you can use an irregular shaped vessel as long as it has millilter markers on it.
If you have an irregular shaped vessel without milliliter markers on it, you can make your own by pouring measured increments of water into the vessel and measuring the level line of the water. Mark your vessel in 100 ml or 250 ml increments.
If you leave your bulk fermentation at room temperature overnight it will likely overproof. You can put your dough in the refrigerator to slow things down until morning. Be aware the putting the dough in the refrigerator is not exactly the same as “hitting the pause button.” The dough will keep fermenting until it reaches refrigerator temperature.
When you take the dough out in the morning it will not restart fermenting until the dough starts to come back up to room temperature.
In all cases, it is best to measure the percentage rise in the dough, not the bulk fermentation time. Total bulk fermentation time is unreliable when refrigerating the dough in the middle of the process.
The aliquot method is another method of measuring the percentage rise in the dough. It is done by taking a small sample of the mixed dough and putting it in a small straight-walled vessel (e.g., a small jar or bottle). Instead of measuring the percentage rise in the main batch of dough, you measure the percentage rise of the aliquot sample.
There are some known issues with this method. First, the temperature of the sample jar will often not be exactly the same as the temperature of the dough. The sample will equalize to room temperature much more quickly than the dough. Try to keep your aliquot jar and your batch of dough at exactly the same temperature throughout the process for best results.
Secondly, fermented dough is exothermic, which means that it generates its own heat. The large batch of dough will create heat more quickly than the aliquot sample. Therefore, the larger batch of dough may ferment more quickly than the sample.
Many bakers have success with this technique, but it takes some experience to get a feel for possible differences between the aliquot sample and the main batch of dough.
The best proofing container is a vessel with milliliter markers, and a vessel that is large enough for you to handle the dough for things like stretch and folds.
Your proofing container needs to allow enough headroom for your dough to increase in volume during bulk fermentation, without overflowing.
I use this simple rule of thumb for calculating the correct size:
- Multiply the flour weight of your recipe (in grams) by 1.5. This will give you the approximate starting volume in milliliters of your mixed dough. For example, a 1,000g flour-weight recipe mixes up to about 1,500 milliliters of starting dough volume.
- Estimate how much you typically expect your dough to increase during bulk fermentation and multiply the starting volume times 1 plus that multiple. For example, for a 50% rise, you would multiply by 1.5. If want my dough to increase by 50%, I would need a 2,250ml vessel. For a doubling of the dough (or 100% rise), you would multiply by 2. If I want my 1,500 ml dough to double it will need 3,000 ml capacity.
- Take the resulting quantity in milliliters and convert to liters (divide by 1000) to calculate liters, which is roughly equal to quarts in the US.
Here are a few more examples:
500g flour weight recipe – doubling in volume
500g x 1.5 = 750ml initial mixed volume
750ml x 2 = 1,500ml doubled volume
1.5 liter / 1.5 quart vessel is required
2,000g flour-weight recipe rising 40%
2,000g x 1.5 = 3,000ml initial mixed volume
3,000 ml x 1.4 = 4,200ml for 40% increase
4.2 liter / 4.2 quart vessel is required
There is great variability among recipes in how they define the start and end of bulk fermentation time.
For clarity, the best definition of the start of bulk fermentation is the time when the starter is added to the flour and water. This is when the fermentation process begins. The end of bulk fermentation is when the dough is divided and/or pre-shaped. Or if the dough is not divided –as in a single loaf batch – bulk fermentation would end when the dough is shaped.
When the dough is divided and pre-shaped, this is the end of bulk fermentation, but the dough does not stop fermenting! “Bulk fermentation” may be over, but “fermentation” carries on until you bake the loaf!
Always be aware that the dough keeps fermenting during preshaping, bench rest, final shaping, final proofing, scoring and even in the first few minutes of baking.
The cutoff of bulk fermentation is a somewhat demarcation in the “total fermentation” process.
The percent rise is always measured from the point when all ingredients are mixed, in my opinion.
The dough doesn’t typically rise much in the first few hours, so some people start measuring after the stretch and folds because it’s usually not much different. But technically it should be measured from the starting dough volume.
Tip: If you always make the same recipe. Get a good measurement one time when you mix all the ingredients (e.g., the Tartine recipe mixes up to 1,500 ml), then you always know the starting point for that recipe. Always try to use a straight sided vessel, or a vessel with milliliter markers on it. Cambro brand food containers are a popular choice.
Recipes which call for doubling of the dough are usually recommended bulk fermentation at low temperatures, such as 70F/21C or lower. At lower temperatures, the dough can tolerate a higher percentage rise. Recipes which call for less than doubling (e.g., Tartine at 30% target rise) are usually recommending warmer bulk fermentation temperatures (e.g., 80F/27C in Tartine).
At warmer temperatures, the dough does not stand up as tall because the gluten starts to relax. And at warmer temperatures, an early cutoff of bulk fermentation is required to account for the continued fermentation in the downstream steps of pre-shaping, bench rest, final shaping and final proofing. Even if the dough is going into the refrigerator for a cold retard, the dough keeps fermenting until it reaches refrigerator temperatures of approximately 40F/4C which can take up to 10 hours.
In this video clip I demonstrate why warmer temperature dough does not rise as tall as cooler dough.
Also, see this post for more information on this topic, “The Mystery of Percentage Rise in Bulk Fermentation.”
High starter quantities speed up fermentation and lower quantities slow down fermentation. For example, a recipe with 20% starter may finish bulk fermentation in 5 hours and at 10% starter, it may take 8 hours.
See the videos below for experiments and details on this topic.
The “windowpane test” is a test of sufficient gluten development. It is typically done during bulk fermentation.
To perform a windowpane test, stretch up a small piece of dough as thinly as possible. If you can stretch it into a strong, thin, translucent membrane, this would “pass” the windowpane test. If the dough is thick and you cannot see through it, it needs more gluten development. If the dough is thin and breaking up in your hands, it has gone too far and is starting to overproof.
There is much confusion around the role of the windowpane test in determining if bulk fermentation is done. Many bakers say you should “bulk ferment the dough until you can pull a windowpane.” This is often interpreted to mean that bulk fermentation is done when you can pull a windowpane. What it actually means is that one of the minimum requirements of bulk fermentation has been met (i.e., gluten development) when you can pull a windowpane.
A sufficient windowpane is an indication that bulk fermentation may be done, but it must meet the other criteria such as the target percentage rise, etc.
See the “Bulk-O-Matic Guide” for more detail on how to determine when bulk fermentation is done.
The protease enzyme is the “uninvited party guest” in your sourdough starter and dough. It is stimulated at high temperatures and acidic dough and it eats gluten. The protease enzyme is the primary contributor to the gluten deterioration that leads to overproofing.
You can control the protease enzyme, to some extent by managing dough temperature and dough acidity. Being aware of and managing the protease enzyme is a critical skill for sourdough bakers to develop.
As a general rule, the protease enzyme is hyper-stimulated as dough temperatures approach 90F/32C. Always keep your starter and dough below that temperature, and as your dough approaches that temperature, be aware that you are nearing the “danger zone” for gluten deterioration and overproofing. Also, if your starter or dough are very acidic, this accelerates the impact of the protease enzyme. Low acid starters and dough are more manageable and less likely to overproof prematurely.
The following video clip describes the behavior of the protease enzyme at different temperatures.
In the video, “Bulk Fermentation – Mastering Temperature and Time,” I bake 4 loaves with different bulk fermentation temperatures and times. I cut off the bulk fermentation rise at the same point (25% rise) and compared the loaves. The crumb was virtually identical. Check out this video clip for the summary of the experiment:
Good question. It depends largely on the dough temperature. Most recipes that call for 100% are fermenting below 70F/21C. Tartine calls for 30% rise because the dough temp is 80F/27C. When you are bulk fermenting at warmer temps, you need to cut off bulk fermentation early (30%) because the dough keeps rapidly fermenting during preshape, bench rest, final shape, and the first few hours in the fridge until the dough reaches fridge temp. When bulk fermenting at warm temps you need to “hit the brakes” earlier.
Warm dough, also doesn’t show the percent rise the same way as cooler dough. Cooler dough just stands up a little taller in the vessel.
And lastly, 100% rise is almost always too much rise in my experience. I think a lot of people say “let the dough double in size” but they’re not actually measuring the percent rise they are just eyeballing it. If you accurately measure the percent rise in the dough, I’ve found 60% rise is about as high as I can go (at 70F/21C) but it also depends somewhat on your recipe, flour and starter strength.
See this post for more information, “The Mystery of Percentage Rise in Bulk Fermentation.”
If your dough is not rising, the best solution is always to be patient and give it more time. Also you can try warming up your dough, but be careful that you do not warm it too much. As your dough temperature approaches 90F/32C, it will become very acidic and the acid will start to break down the gluten, causing premature overproofing.
If you are worried about a slow-rising dough, I always recommend doing a windowpane test on the dough. If the dough is still strong and you can pull a windowpane, there is nothing to worry about. Give it more time. If the dough starts breaking down and will not support a windowpane then it may be heading towards overproofing.
In that case, there are not a lot of great options. If your dough appears to be overproofing and has not risen, I recommend doing a strong pre-shape, a short bench rest and a very strong final shape.
Depending how the dough feels when shaping, you can either put it into the refrigerator for a cold retard (if it is still holding some structure while shaping). If it is very loose and not holding shape, pre-heat the oven, put the dough in a loaf pan, and bake it immediately. Overproofed dough does not improve with time!
You can add measurement markers to any transparent vessel with a digital scale, some tape and a marker.
- Add a strip of tape vertically the outside of the bowl, from top to bottom,
- Place the bowl on your scale,
- Calculate the approximate starting point of your recipe volume. I use 1.5x the flour weight as a good approximation. For example, for a 1,000g flour-weight recipe, I would start with my bottom measurement at 1,500ml,
- Pour 1,500ml into your bowl (the scale will read 1,500g because for when measuring water, grams equal milliliters),
- Mark the 1,500 ml level on your tape,
- Add 250ml more water and mark that level as 1,750ml on your tape,
- Add 250ml more water and measure 2,000ml on your tape, etc.
- After mixing all of the ingredients, level it in the bowl and determine your starting level (for example, 1,600ml) and mark your bowl,
- If you are looking for a 30% rise, mark a target line at 1,600 x 1.3 = 2,080 on your bowl.
Many bakers will say that their dough ferments faster when the humidity is higher. But humidity does not directly impact bulk fermentation. It impacts it indirectly by transferring heat from the air temperature to the dough. Let’s explore this in more detail.
Your dough is so highly hydrated (75%+) that it cannot be impacted directly by the humidity in the air. The humidity of your environment does not change the hydration of your dough.
However, humid air transfers heat more effectively than dry air. In a humid environment, your dough will equalize with room temperature more quickly than in a dry environment.
When bakers say the dough is fermenting faster due to humidity, really what is happening is the dough temperature is rising (assuming room temperature is higher than dough temperature) more quickly in a humid environment.
Once the dough temperature and room temperature equalize, there is no impact – direct or indirect – on fermentation due to humidity. 80F/28C dough in an 80F/28C kitchen will ferment exactly the same way if the humidity is 20% or 70%. The dough doesn’t know or care about the humidity of the air, only the temperature.
No. Bulk fermentation requires the dough to be at room temperature to activate the fermentation process.
I will try an experiment some time to prove or disprove this, but I’m guessing, if it did work, it would take one to two weeks in the refrigerator to properly ferment, if it works at all.
It depends. It is tricky. This method only works if you’ve started the bulk fermentation at room temperature and the bulk fermentation is very far along.
If the bulk fermentation is nearly finished at room temperature (e.g., one or two hours to go), you could theoretically put that dough in the fridge and in the time it takes for the dough to get down to fridge temperature, it will continue fermenting (depending, of course, on the dough temperature before it goes into the fridge).
I have not proven this through experimentation, but I would guess that the last 2 hours of bulk fermentation at room temperature would be the equivalent of 8-12 hours in the refrigerator.
Once the dough gets down to refrigerator temperature, the fermentation will largely stop (or proceed very slowly), so the difference between 12 hours and 14 or 16 or 18 hours in the refrigerator is not materially different, in my experience.
This method is very difficult to execute and even more difficult to predict.
There is a method featured in a video below, “Sourdough Breakthrough: Two-Stage Bulk Fermentation.” In this method popularized by Michael Kalanty, you can finish your bulk fermentation in the refrigerator, but it depends on a specific dough temperature and timing during the first phase. See video for more details.
Sometimes people leave their dough on the countertop overnight, and if your kitchen is too warm the dough will overproof. With overproofed dough, the gluten is breaking down, the dough will not hold structure and it is beginning to turn into a big batch of starter. If this happens you have a few options:
- If it will still hold any shape at all, shape it and bake it ASAP.
- If it holds a little shape but flattens out quickly, pour it into a baking tin and bake it ASAP.
- If it is really soft (but not quite liquified like a starter), spread it in a baking sheet, add some oil and herbs and bake it like a focaccia.
People ask if they can recover it by adding more flour. This doesn’t work. Once gluten is gone, it is gone and there is no way to recover it. Adding more flour is a futile effort.
Any time you leave your dough out overnight, always consider the room temperature and dough temperature. If you cannot keep the dough temperature below 70F/21C, it will likely overproof overnight.
You can bulk ferment at any temperature from 60F to 90F, but you need to adjust the target percentage rise based on the dough temperature. Warm dough needs a lower percentage rise (e.g., 30% rise at 80F/27C) and cooler dough needs a higher percentage rise (75% rise at 70F/21C).
See this recent post for more details The Mystery of Percentage Rise in Bulk Fermentation | The Sourdough Journey


