Recipe Test Drive: Ben Starr’s “10-Minute SIMPLER Sourdough (for Lazy People)”
By Tom Cucuzza, The Sourdough Journey, November 2023
Ben Starr recently published a follow-up to his popular video and recipe “Sourdough for Lazy People (YouTube 2020).” The method is a minimalist approach to sourdough baking that eschews baking aesthetics, and it goes for the simplest possible method with the least hands-on time.
I am always trying to find new ways to make sourdough more accessible to busy people (versus the pejorative “lazy” people), and I applaud Starr’s efforts in this space. His new method eliminates even more steps from his 2020 video, and it simplifies the method even more.
The Basics
The method uses three basic steps:
- Mix all ingredients at once
- Let the dough bulk ferment at “room temperature” (first rise) for 24 hours
- Shape, final proof at room temperature, and bake on Day 2
Unique features of the recipe include, no autolyse, no stretch and folds, no pre-shaping, no banneton, and no pre-heating of the oven. The unique elements of this method include:
- All-Purpose Flour: The recipe uses all-purpose flour,
- Low Hydration: The recipe is 60% hydration compared to typical 75% hydration sourdough recipes;
- Unfed Starter: Starr uses an unorthodox method leaving his starter in the refrigerator, unfed for several months, and
- High Salt Percentage: The recipe calls for 3.5% salt, which is almost double the normal salt content.
Does it work?
The method produces an edible loaf of sourdough bread with absolute minimum effort. I don’t believe you could eliminate any more steps than what Starr has done here.
However, it produces a salty, dense loaf with a spongy texture. And it takes closer to 20-minutes of hands on time versus the 10-minutes purported in the title (i.e., who is washing the dishes and cleaning the flour off the counter in the video)?
THE DETAILS
I watched the video multiple times and attempted to follow it as closely as possible. Starr also gives adjustments and options to modify from the “standard” method. I carefully considered these as well, but I tried to follow his method, with two exceptions:
- For the flour, I used King Arthur Bread Flour (more detail about this below), and
- For my “unfed” starter I combined two unfed, refrigerated starters, 70g of a refrigerated starter that hadn’t been fed for about one week, and 43g of refrigerated starter that had not been fed for five weeks.
INGREDIENTS
Flour: 567g King Arthur Bread Flour
Water: 364g Filtered water (60% of flour weight)
Starter: 113g unfed starter from refrigerator (20% of flour weight)
Salt: 20g Morton’s kosher salt (3.5% of flour weight)
“All-Purpose Flour”
In the video, Starr says you can make this recipe with all-purpose flour, and he uses Costco’s branded AP flour. However, that flour is actually a very high-quality “bread flour” (Central Milling Company, Artisan Baker’s Craft – Plus, private-labeled for Costco as “All-Purpose). This is quite misleading because the flour used in the video is actually quite different, and better than most other “all-purpose” flours. I’m not sure if this was a mistake or by design, but this should have been disclosed.
I chose to use King Arthur Bread Flour to approximate the Costco All-Purpose flour. I had the option to use Gold Medal All-Purpose flour, but I did not want to sabotage the process with a weaker AP flour right from the start.
“Unfed Starter”
Starr also uses an incredibly liquified, months-old, unfed starter from the refrigerator. He never discards and does not feed his refrigerated starter for months at a time. I’ve never quite seen anything like this, and it is his most radical departure from standard sourdough methods.
By using a “starving,” acidic starter, he claims it slows down the fermentation process which builds more flavor. I don’t know a lot of home bakers who keep this type of starter. Why not just use a smaller quantity of active starter to achieve the same result? The recipe is difficult to adapt to those who keep an active starter, as you will see in my findings.
Salt
The salt is almost two times the normal amount of salt used in most sourdough recipes. Again, Starr claims this slows the fermentation process (which could be achieved by using less starter), and says if you find the bread too salty, then you likely have something wrong with your palate. (Seriously?)
MAKING THE BREAD
Mixing
Starr mixes all the ingredients (i.e., no autolyse, fermentolyse, or delayed salt), and in the video, he mixes everything with a spoon, then by hand for about 25 seconds. I found the initial mix to be so incredibly dry that it took a few minutes of hand mixing to get the dry flour to take up into the mix. His dough mixed more easily, I assume, due to the very acidic starter, which improves the viscosity of the initially mixed dough. I believe the acidic starter and low hydration of this recipe actually work hand-in-hand to produce the end result.
Once the dough is mixed, there are no additional handling steps until final shaping. Elimination of stretch-and-folds, and other handling steps is an interesting simplification with this approach.
Bulk Fermentation
After the initial mixing, Starr says to let the dough rise at room temperature “for 24 hours” or “until at least doubled.” He does not disclose his room temperature or dough temperature which makes the method impossible to accurately replicate.
In the video, Starr lets his dough rise in a bowl (and a second batch in a sealed ziploc bag) and he eyeballs the percentage rise after 24 hours. He does not measure the actual percentage rise (e.g., using a straight sided vessel, or a vessel with milliliters). I moved my dough to a measuring vessel, so I could clearly measure “at least doubling” in volume. My overnight dough temperature was a constant 73F/22C. Starr’s room temperature is unknown.
The unfed starter and high salt content are supposed to slow down the rise to 24 hours “at room temperature.” My “unfed” starter was more recently fed than Starr’s and my dough predictably rose faster than the prescribed 24 hours. My dough started rising at the 3-hour mark and it rose 150% in 15 hours.
The high salt content alone did not materially slow down the rise. My normal rise time for 20% inoculation dough at 73F/22C is 10.5 hours to reach a 100% rise. My dough doubled in volume in 12 hours, even using an unfed starter and the higher salt content. By the 15-hour mark, my dough was on its way to tripling, so I cut off bulk fermentation at a 150% rise. Predicting fermentation times can be notoriously difficult, but I can’t imagine any scenario where this dough would have taken 24 hours to double in volume (per the guidance in the video).
Shaping
When bulk fermentation was finished, I turned the dough out onto the countertop. The dough was tall, full of air, and showed weakening gluten strands pulling away from the sidewalls of the vessel. I final shaped a boule following the exact method shown in the video. My dough looked nearly identical to Starr’s dough in the video (See photos below).
There is no pre-shaping with this method. Starr goes directly to final shaping. He does not do any “folds” in his final shaping. He simply uses the “turning and dragging” method on the countertop to build shape and surface tension (about 10-20 turns, until the top is smooth and has tension).
After shaping, he does not use a banneton or shaping basket. He sprays his 4.5-5qt round Dutch oven with non-stick cooking spray and moves the shaped dough into the Dutch oven, on the countertop for the second rise / final proof. I did not spray my vessel, I used a silicone mat under the dough, to somewhat limit the spread of the dough in the vessel. This was a modification from Starr’s method.
Final Proofing
The dough is left to rise in the Dutch oven for 90 minutes at “room temperature.” “Fast rising” dough should be cut off earlier per the video, but I let it go the full 90 minutes. It did not appear to be overproofing.
Scoring and Baking
After 90 minutes of final proofing, the dough slightly increased in size and spread in the Dutch oven. In this method, the oven is not preheated. It uses the “cold start” method. I moved the Dutch oven into the oven and set the temperature at 425F/220C with the lid on for 45 minutes.
After 45 minutes, I removed the lid and baked for another 15 minutes. His baking temperature is lower than usual.
The “cold start” method, popularized by Elaine Boddy (and unattributed in the video), does not save a lot of oven time in my experience you are basically preheating the oven with the dough in the oven. It works well for many people but the outcome is variable based on your specific baking vessel and oven
My baked loaf looked almost identical to Starr’s loaf in the video. It had the exact same shape, ear, and blisters, but his loaf baked somewhat darker than mine, possibly due to his longer fermentation time which results in more sugars migrating to the surface of the loaf and caramelizing, or the different flours used.
Final Assessment
Effort
This method makes a basic, edible loaf of sourdough bread with minimal effort. The “hands-on” time is closer to 20-minutes versus the purported 10-minutes. And, when the loaf is baking, it cannot be left entirely unattended. This method creatively challenges and eliminates many steps from the “standard” process.
Flavor and Texture
I sliced and tasted the loaf. The crust was somewhat crackly, but I found the crumb to be dense and “spongy.” The loaf had a closed crumb (due to the lower hydration) and did not appear to be under or overproofed. Even with the long bulk fermentation time (15 hours in my case), the loaf had a very mild sour flavor. In my experience, complex sour flavors come from cold retarding the dough in the refrigerator, which this method does not employ.
And, the saltiness – oh my – this is a very salty loaf, to my palate.
Lastly, using all-purpose flour or basic bread flour delivers a clean, uninteresting flavor.
Aesthetics
My loaf looked almost identical, inside and out, to Starr’s loaf in the video. This method produces a flatter loaf with a more dense crumb. The crust baked up blond, like an underproofed loaf, with some blistering. The scoring produced an ear, and the boule shape was fairly uniform. The loaf felt heavy and dense in the hand, which I found surprising for a 60% hydration loaf — perhaps due to the low baking temperature (425F/220C).
Summary
As Albert Einstein said, “Make everything as simple as possible, but no simpler.” In my opinion, I feel this recipe goes too far in sacrificing quality for efficiency. But everyone’s situation is different and the tradeoff between time and value is ultimately a deeply personal decision. Is 10 extra minutes of time worth an aesthetically pleasing loaf? Perhaps for some, but not for all.
The unique aspects of this recipe are the high salt content and the unfed starter. These two factors presumably slow down the fermentation process with the payoff of better flavor. I did not find this to be the case. The “fermented flavor” was unremarkable and overpowered by too much salt
The basic premise of slowing down fermentation by using an unfed starter and high salt percentage did not comport with my findings. It feels like a “manufactured uniqueness” to differentiate this recipe from others, but it did not have a meaningful impact in the end. The overly salty flavor plus the spongy crumb did not agree with my palate or preferred mouthfeel. I cubed the loaf and used it in my Thanksgiving stuffing, where the saltiness was still too much, but the texture worked.
Based on my review of the video and my test, I believe this method relies on the “months-old, unfed” starter from the refrigerator. But is uncommon to find such a starter in most home-baker’s kitchens. The outcome shown in the video is largely dependent upon an unorthodox technique.
Would the approach work with an active starter? It is very unclear based on my test. Would the approach work with the unfed starter and 70% hydration? I don’t believe so. The combination of unfed starter and 60% hydration work hand-in-hand. And I believe the 3.5% salt is a (very salty) red herring.
I also wonder if this method is simply some kind of absurdist test, like a golf pro trying to prove that you can play golf with two golf clubs, a 5-iron and a putter. Is it possible? Yes. Does it make sense? No.
Perhaps in the future, I’ll test this method again with a months-old unfed, refrigerated starter, and the Costco All-Purpose flour. I always give new methods the benefit of the doubt and perhaps I missed something.
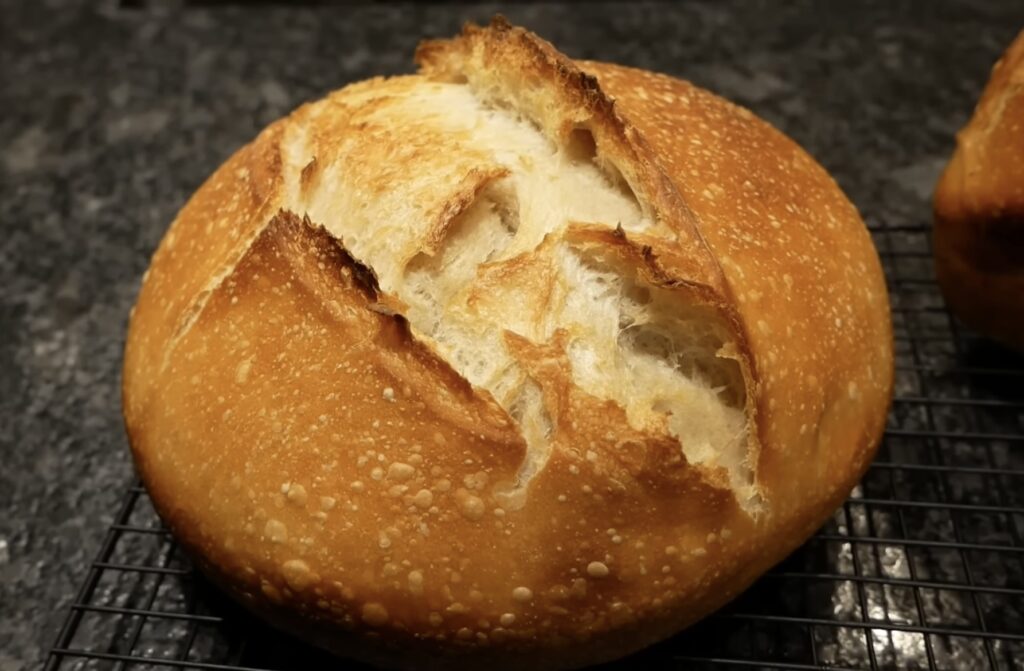
Starr Loaf

My Loaf
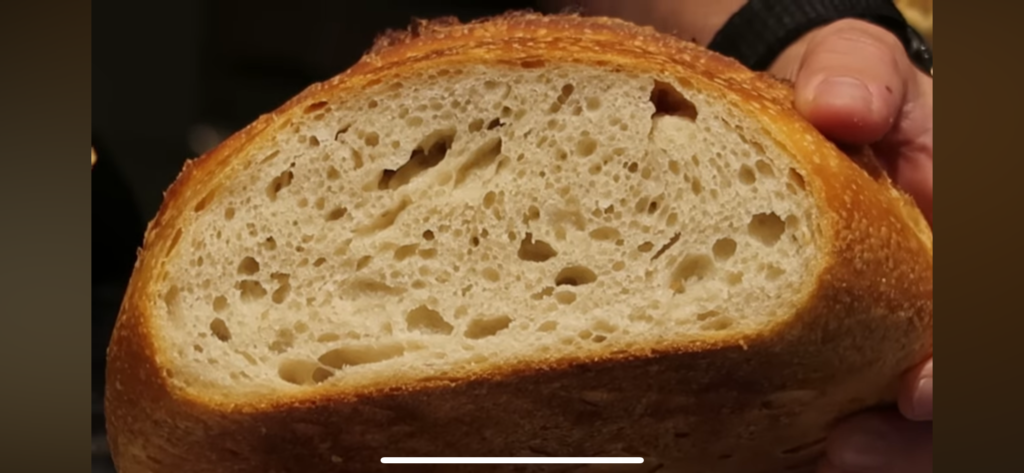
Starr Crumb
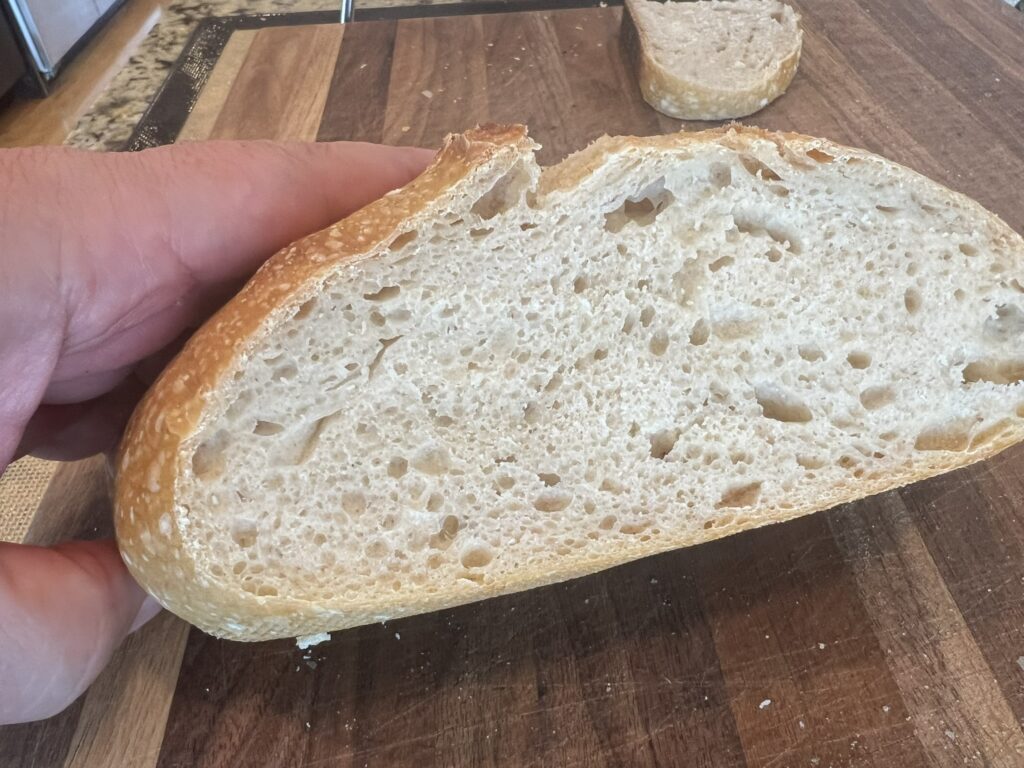
My Crumb

Tom Cucuzza
Share:
Related Posts

Review: Sourdough Proofers and Temperature Control Devices (2025 Update)
What are the best sourdough temperature control devices?
2025 Gift Guide for Sourdough Bakers
Looking for gift ideas for a special sourdough baker? Check out my 2025 gift guide!

Sourdough Starter: Refrigeration Maintenance Methods
How can I maintain my sourdough starter in the refrigerator instead of at room temperature?
The ULTIMATE Sourdough Bulk Fermentation Guide
When is sourdough bulk fermentation finished?

Dough Temping for PERFECT Sourdough Fermentation
What is sourdough “dough temping,” and how does it work?