The Secrets of Great Ovenspring
By Tom Cucuzza, April 2022
This article is an excerpt from my video “The Secrets of Ovenspring and Baking Temperatures.”
Ovenspring is the cumulative result of all of the steps that happen prior to and including baking. There are ten essential steps to get great ovenspring:
-
High Protein Flour
-
High Hydration
-
Strong Starter
-
Strong Gluten Development
-
Perfect Bulk Fermentation
-
Strong Shaping
-
Perfect Final Proofing
-
Scoring
-
Baking with Steam
-
Baking at Proper Temperature
1. High Protein Flour – Great ovenspring starts with high protein flour. I typically use 12.5% protein bread flour or higher (up to about 14% protein). Some whole wheat flours are high protein, but they will generally produce a dense loaf. For optimal ovenspring, a refined flour like “bread flour” or “strong flour” is best. In the US, the strongest gluten is found in “hard red spring wheat.” Most “bread flours” are made with this type of wheat.
2. High Hydration – The tallest loaves with open crumb are usually high hydration loaves. When using bread flour, high hydration is usually defined as 75-85%. However, the hydration of a recipe is relative to the flour you are using. Some flours are thirstier than others. You may need to experiment with your flour to determine the optimal hydration level. And too much hydration will push the flour past the saturation point causing a flatter loaf. Finding the optimal hydration for your flour may take some trial and error.
3. Strong Starter – A strong sourdough starter is essential to get properly fermented dough which contributes to great ovenspring. A “strong” starter is somewhat of a misnomer because I view a “strong” starter more as a non-acidic starter. Very acidic starters can impede the CO2 producing capabilites of the yeast, and an acidic starter can lead to premature overproofing.
4. Strong Gluten Development – Strong gluten development is essential for achieving optimal ovenspring. You should think about gluten development as having two components: 1) strong gluten strands, and 2) many layers in the gluten matrix. Strong gluten strands are developed by handling and stretching the dough. Common techniques for strong gluten development include hand mixing, the slap and fold method and/or the Rubaud method. By stretching and manipulating the dough you help develop strong gluten. To develop layers in your gluten matrix, you need to fold the dough on itself. Common methods include stretch and folds, coil folds and lamination. The most common methods typically include four or five rounds of folds during the first 2.5 hours of bulk fermentation.
5. Perfect Bulk Fermentation – I have published many videos describing how to determine when bulk fermentation is done. There are many indicators but the most reliable is to accurately measure the percentage rise in the dough. However, in my experience, the percent rise is temperature dependent. When bulk fermenting at a dough temperature of 80F/28C, I look for a 30-35% rise in the dough. The dough keeps rapidly fermenting in the downstream steps so it is important to “hit the brakes” with a slightly lower rise with warm dough. If I am bulk fermenting a dough temperature of 70F/21C, I look for a rise of 55-60%. There is much less risk of overproofing at cooler temperatures. Many recipes suggest waiting for the dough to “double” in bulk fermentation. I have never had success with this method. Doubling in volume is a certain recipe for overproofing in my experience.
6. Strong Shaping – Shaping is critically important to achieving optimal ovenspring. There are many vidoes and techniques on “structural shaping.” I recommend Chad Robertson’s shaping method from Tartine Bread. Many bakers use this technique and it works. The technique involves an “envelope fold” and a rollup. If the dough is slack you can also do “stitching.”
7. Perfect Final Proofing – For final proofing you can do a warm, countertop final proof, using the “poke test” to determine when it is ready for baking. Or, you can refrigerate your shaped loaves for a 12+ hour “cold retard.” The cold retard generally produces better ovenspring in my experience, but people have success with both methods. There is much less risk of overproofing your loaf when using the cold retard method and it give much more flexibility with baking times. Once a cold retarded loaf reaches refrigerator temperature (after about 8-12 hours) the microbial activity significantly slows. You can keep your dough in the refrigerator for 3 or more days and bake it when it is convenient. You will see some continued proofing and gluten deterioration as the time elongates, but the loaves remain surprisingly stable at 37F/3C.
8. Scoring – Scoring is important for ovenspring because you need to “tell the loaf” where you want it to open up by scoring it. Otherwise, the loaf will explode at the weakest point. Some bakers put great emphasis on the exact depth, angle and path of the scoring line. However, you can get great ovenspring by simply scoring a straight line down the middle of the loaf. Many scoring cuts, such as those used in decorative scoring, can somewhat impede ovesnspring.
9. Baking With Steam – Baking with steam is essential for achieving ovenspring. Your loaf must be in a steamy environment and the loaf surface must remain pliable until the loaf has fully sprung – approximately 15-20 minutes after loading the dough. Dutch ovens create their own steam, but if you are doing an open bake, you will need to add steam to your oven. There are many methods available. In the absence of steam, the crust will begin to form too quickly and will limit the ovenspring of the loaf. If you remove the lid of your Dutch oven before the loaf has fully sprung, you will release the steam and the loaf may not fully spring to its potential.
10. Baking at “Hot, But Not Too Hot” Temperatures – One of the common myths of sourdough baking is that hotter temperatures always produce better ovenspring. Many bakers recommend preheating your oven and Dutch oven to the highest possible temperature for one hour to achieve explosive ovenspring. This does not always work. If your oven and/or Dutch oven are too hot, you can impede the ovenspring of your loaf. In a super-hot baking environment, the crust sets up to quickly and entombs the loaf before it has time to fully spring. In these cases, the crust is fused to the crumb and the loaf will not open. Experiment with your oven temperatures and preheating times to determine the optimal time and temperature combination for your oven setup. In many cases lower temperatures (e.g., 425F/218C) will produce better ovenspring than high temperatures (e.g., 500F/260C).
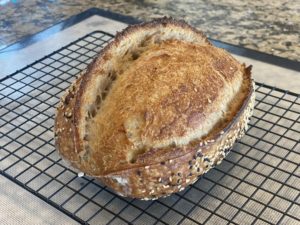
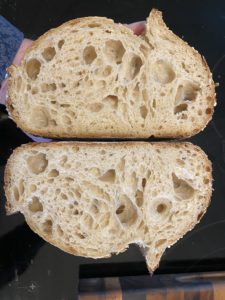
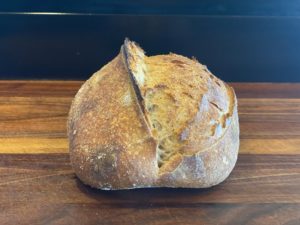
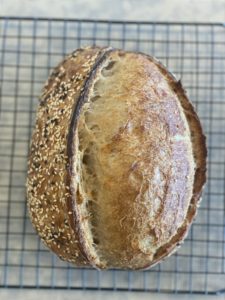
What Does Great Ovenspring Look Like?
Please support The Sourdough Journey at thesourdoughjourney.com/donate
