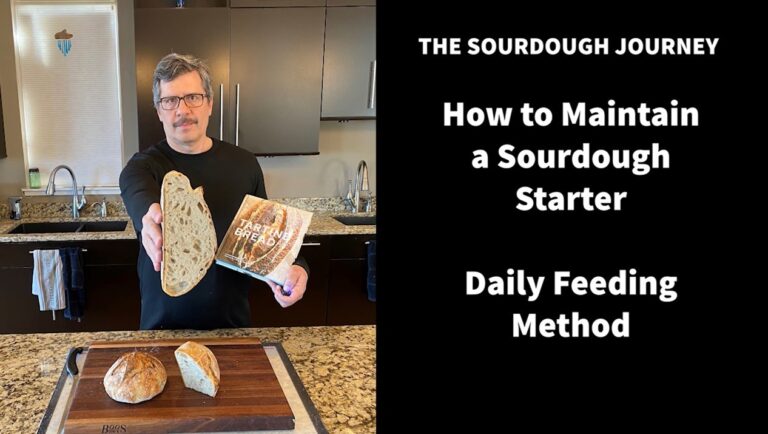
This is an auto-generated transcript of the video: “How to Maintain a Sourdough Starter” from The Sourdough Journey. Copyright 2020. All Rights Reserved
The video can be found https://youtu.be/bNgMdx5X7wgat https://youtu.be/_YBCogA32k0
hi I’m Tom coming to you from Cleveland
Ohio thank you for selecting this video
in today’s video we will talk about how
to maintain your starter there are
plenty of videos out there that talk
about how to create your starter but
there are very few that talk about once
it’s up and running how do you maintain
it so there are some little tricks and
tips that we’ll cover today to help you
efficiently maintain your star
so there are different ways to keep your
starter some people keep it in the
refrigerator and they feed it once a
week some people keep theirs on the
countertop and they feed it once a day
that’s the process that I follow I
actually keep mine on top of the
refrigerator it’s a little bit warmer up
there so let me grab my starter and
we’ll talk about how I maintain it each
day so as I said I keep my starter on
top of the refrigerator
it’s about 77 degrees Fahrenheit up
there that’s about 25 point three
degrees Celsius that’s really almost a
perfect temperature for a starter
typically I try to shoot for around 76
degrees if you can find a spot in your
house that’s the middle of winter here
in Cleveland so I keep it on top of the
refrigerator because it’s a few region
warmer up there than it is on my
countertop so that the first thing is
just figure out a spot to keep your
starter where you can be at the desire
temperature mine happens to be on the
refrigerator
the second thing you have to do is
figure out what kind of vessel do you
want to maintain your starter in some
people use plastic jars some people use
glass jars
I found these one pranked all canning
jars to be perfect for this I I maintain
50 grams of starter and then each day I
add 50 grams of flour and 50 grams of
water so I basically have 150 grams of
fresh starter in there every day that’s
where the blue rubber band is and then
it rises and falls each day with my
feeding but this fills your your vessel
up I don’t know about maybe a quarter to
a third of the way if I use this one
pint which i think is about 400
milliliters for using the metric system
which I also prefer so I use these Ball
jars these typically come with the
two-part metal cover which I don’t
really prefer you can buy these
separately these are plastic screwin
covers I love these I use this all the
time I keep things in my pan trick you
taught all kinds of dry goods in these
very handy and the nice thing about
these also is that because it’s a
straight jar it’s very easy to get your
sauce your spatula or spoon down in
there as opposed to the typical ball
canning jar which has the narrow neck
this is the wide neck version wide mouth
version I strongly recommend this some
people also use jars with the clasping
lid the metal clamps and the rubber seal
let me grab one of those this is another
option people used I used this for a
while when I first started I thought
this was a good idea I’m not crazy about
this because the mouth is smaller than
the size of the jar so it’s really tough
to kind of get down in here under that
neck when you’re mixing up your starter
just gets really messy around the lid
these are also somewhat convenient this
is a special phyto fermentation jar from
italy and these are nice because they
have this rubber seal on them or
silicone seal
you can actually seal this jar
completely using this clasp and when it
builds our pressure inside your it will
actually off gas the co2 through this
seal this gasket is specifically made to
do that these are for fermenting
sauerkraut which gives off tremendously
much more co2 and gas than your yeast
does and these do not explode under
pressure there it is specifically
engineered for that if you’re into that
type of thing these are okay I’m just
not crazy about it because they’re hard
to you know some people use plastic jars
or you’d if you’re keeping your starter
in a plastic jar I recommend using a
food safe jar or a bpa-free plastic so
that you’re not getting undesirable
chemicals are off note since the flavor
of your starter so I just use glass
that’s the vessel that I use and I use
this screw on lid that you can buy
separately
so I keep this on top of my foot
refrigerator I feed it every day as I
said I used the one one one feeding
ratio which is equal parts remaining
starter flour and water
so what type of flour do I use in this I
follow the recommendation and it’s our
team bread book this is kind of my go-to
recipe
it calls for maintaining a starter of
50% white flour and 50% wheat flour I
use king arthur unbleached white bread
flour and king arthur whole wheat flour
and we need 350 grams per week I like to
mix this up once a week you could do a
larger premix if you want to for me it’s
just a nice routine to do it
on the same day each week so the way I
do it is they just take one of these
plastic containers these are these I
don’t know what these are four cups
thousand milliliters basically plastic
containers so I used my scale I weigh
everything in grams I strongly recommend
weighing all of your ingredients and
grams don’t try to convert to cups don’t
try to use conversion tables or the
internet because they’re unreliable when
you’re trying to convert from cups to
grams or grams to cups
the only way you can really be exact is
by weighing your ingredients in grams I
go through this in detail in my other
video so we have exactly 175 grams of
white flour and to that we will add 175
of wheat which gives me 350 grams of
flour it’s exactly what I need for one
week and then you would say well why why
am I using this big container when I
only pulled it 2/3 of the way because I
need to mix this so I leave room in the
container and then I shake this up so I
don’t get weight on the bottom and wheat
on the top shake shake shake turn a
little bit like this I’m a perfectly
mixed blend of white and wheat flour 52
to get cutis on my counter and then I
feed my starter once a day with that and
replaced this once a week so that’s what
I do with my flower
the second ingredient in your starter
maintenance is your water I go through
in great detail in my other video about
what types of water to use in your
starter the main thing is you don’t want
to use chlorinated water so you ask
people what type of water they use
they’ll tell you they use tap water they
as well water they use distilled water
they use spring water they use bottled
water the main thing is whatever type of
water you use just take the chlorine out
of it so if you’re using tap water you
can either filter the water out or you
can boil it off if it’s chlorine
but be aware that there’s another type
of corene called chloramine that doesn’t
boil off your water you have to filter
that out so find out what’s in your
water and if there’s chlorine in it make
sure you take the chlorine out that’s
can anything
so I have my flower I have my water and
I have my starter using my three
ingredients for my daily feeding of one
one and one ratio so the three
ingredients I begin with my starter so
the first thing is I need 50 grams of
starter and because I feed this every
day
I have to discard because I’m not baking
every day so I discard two thirds of
this so I leave 50 grams behind and this
is often confusing I don’t know if it’s
confusing it’s just wrong in some of
these recipes that you’ll see about
maintaining your starter where they say
discard 80 percent of your starter each
day or discard half of your starter each
day if you’re doing a a one to one to
one feeding ratio you should discard two
thirds of your starter each day there’s
150 in here every day and if I want to
get back to 50 I take out 2/3 I don’t
know where the 80% comes from their
masters doesn’t work to me what people
use that all the time you discard two
thirds of your starter you do you
maintain 50 grams in the jar and that’s
what’s yours your starter for the next
day
so people often ask the question should
I use a clean jar every day should I
clean out my jar every day you have a
lot of options here the main thing is
you don’t want a lot of crust and gum
building up around the edges of your jar
because if you’re going to get mold
growing in your starter it will almost
always start around the edges where that
stuff is caked on the sides in this jar
I scrape it down every day this is
starting to get a little crusty around
the top I don’t like the way this looks
so I’m gonna do a fresh jar so I keep a
whole you know stock of these I don’t
know how many I have and that way I can
you know trade these down every day so
this is an easy one because I need 50
grams to go forward so I’m just going to
pour out you can see my starter is is
portable this just happens to be my
consistency results will vary with
different people’s starters but mine
after it sits for 24 hours or so
it is horrible but kind of like a batter
on how to days this little thinner
cooler bit it’s a little thicker so I’m
just pouring or in pouring exactly 50
grams of starter into my fresh clean jar
now this remaining starter is my discard
so what do you do with this there are a
million things you can do with this card
there are all kinds of recipes on the
internet you can make discard pancakes
and waffles and English muffins you can
fry this in a pan and just eat it as is
if you want to do do that you know
there’s all kinds of ideas in fact on
the king arthur bread website there are
a lot of recommendations on there for
what you can do with your starter
discard I tried some things like that
wasn’t crazy about them so I actually
discarded this every day I don’t wash it
down my sink you don’t want to do that
because it’s like cement what I do with
mine is I add it to compost so we grow
our own garden outside so we need a lot
of organic material so for me I have no
problem each day adding basically 50
grams of yesterday’s flour and then my
compost bin is just wheat and water adds
a little nutrient try to scrape that out
as best I can
that goes into my compost and people say
oh my gosh you’re wasting so much flour
by doing that you can reduce your
starter and you could do 25 grams a day
because somebody will do 15 grams a day
I really don’t I don’t really do this is
waste I’m viewing this as fertilizer for
my garden and this cost I don’t know
what a dollar a month or something like
that is what I’m discarding here so do
whatever you want I just happened to put
mine in the compost bin that works for
us
so I have 50 grams
that’s the first one in my ratio one
part starter the next thing I need to
add is water I just use filtered water
out of my refrigerator so this is
municipal tap water that’s filtered so
I’ve taken the chlorine out of it I
don’t warm this up to anything other
than how it comes out of the
refrigerator I just don’t think that’s
necessary some people could as you’re on
my scale and I add 50 grams of water and
I have 50 grams of start over 50 grams
of water some people like to mix these
two together I’ll do a little bit of
that and you make kind of this yeasty
starter milkshake drink that but that
mixes the starter in the water and then
the last thing I had is the flour if you
ran 2 starter 50 grams of water and then
50 grams of my 50/50 mix that I just
made as you’re on my scale 22:46 you get
pretty good at this 51 I’m gonna go with
that now that I have all three
ingredients added in here I’m gonna mix
this pretty vigorously so you want to
really I like to really stir this up you
know because you want the yeast and the
microbes lactic acid bacteria to make
contact with as much of that flour as
possible you don’t want come to them in
here so I mix that up pretty thick and
then this is the important part I have
this really cool spoon that’s like half
a spoon and half a spatula I think
that’s actually caught on or something
and then I can scrape down inside of my
jar really nicely keep that clean
scraping down the inside you don’t want
that dried stuff on the sides that’s
where trouble starts that’s where the
mold likes to if it’s gonna find a way
in
that’s exactly where it will find a way
is in those scrapings on the side and
then I like to take a towel or paper
towel and really wipe off the threads
around the lid also because that really
gets caked over so here’s my story the
only thing missing is my rubber band
which was on my old jar which I’m gonna
wash now I take my rubber band and I put
this I can see where I started I like to
use this blue rubber band or something
kind of dark colored so you can see it
from across the room because traditional
rubber bands are the exact same color as
your starter so here I can see
and then the last trick is do you seal
it or not it’s last question you should
seal your starter because you don’t want
fruit flies or other things that are in
the air getting in there but you don’t
want to seal it airtight you if you seal
your starter airtight number one it does
give off gas and if you have a metal lid
on here theoretically it could break the
glass but also if you let a little bit
of air in here all the album like
microbial activity is happening in here
is anaerobic it means that it doesn’t
need oxygen to do that but the lactic
acid bacteria loves an oxygen-free
environment so if you seal this lid
tightly it will favour the lactic acid
bacteria a little bit more than the East
so you want to leave a little bit of
airspace so you see people screw the lid
on it looks like they’re screwing it on
but what I do is I screw it on and I
back it up like one half of the term so
I do it again I’ll demonstrate put the
lid on screw it on so I’m just hand
tight halfway back leave some air so
nothing gets in air can get out that’s
how you wanna that’s ready to go this
whole process once I have this prepared
I get my water or the refrigerator
filter I can do this in like two minutes
a day well I’m you know making a cup of
coffee or something like that this is an
incredibly quick process it’s also much
cleaner than what I’ve done here this is
kind of a messy version of it but if you
really get this down you want to be able
to do it quickly you want to be able to
keep it clean you don’t want to have a
lot of you know dirty utensils around
you can really make this incredibly
short process so that’s how I maintain
my starter this goes back on top of the
refrigerator with its thermometer so I
always know it’s temperatures
okay took a long time to describe a
short process so now I’m actually going
to do the daily starter maintenance I
keep all my starter stuff in one place
so it’s all convenience so here we go
starters on top of the refrigerator I
always smell it this my compost bag I
pour out about 2/3 of it I’ve a pretty
good eye for that I also weigh it I know
the weight of my empty jar so I can tell
by weighing the jar with the starter in
it how much is in there so I have 65
grams I usually try to go for 50 but I
don’t try to be that exact so I know if
there’s 65 in there then I just reset
the scale and I do a 1 1:1 ratio
I add 65 grams of water 65 I have my
premix white bread flour and whole wheat
flour
reset my scale again
you
sixty-six stir things up in the video I
said I do have 50 grams of starter water
and flour I don’t try to be that exact I
just pour out about two-thirds and then
whatever is left I match that with the
flour and water so I have a little bit
more than 150 grams in here now
but over time I ever about 50 grams of
each component per day stir it up and
important scrape down the sides that’s
it
you
Tom Cucuzza
Video Transcript: How to Maintain a Sourdough Starter
Share:
Facebook
Twitter
Pinterest
Print
Email
On Key
Related Posts
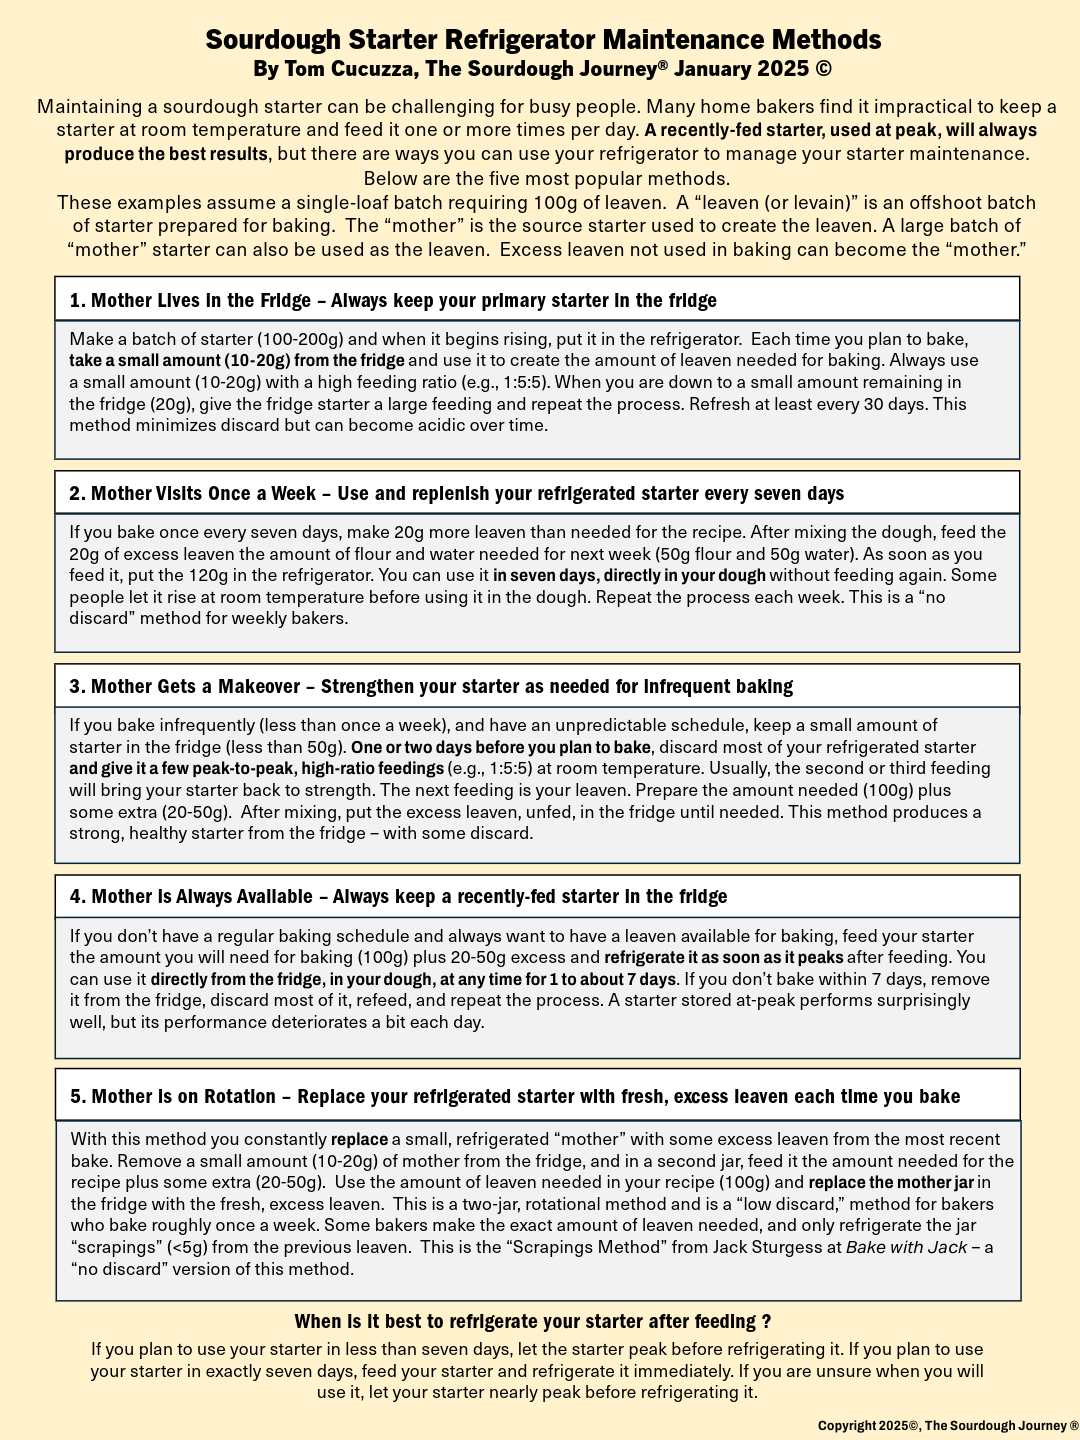
Sourdough Starter: Refrigeration Maintenance Methods
How can I maintain my sourdough starter in the refrigerator instead of at room temperature?
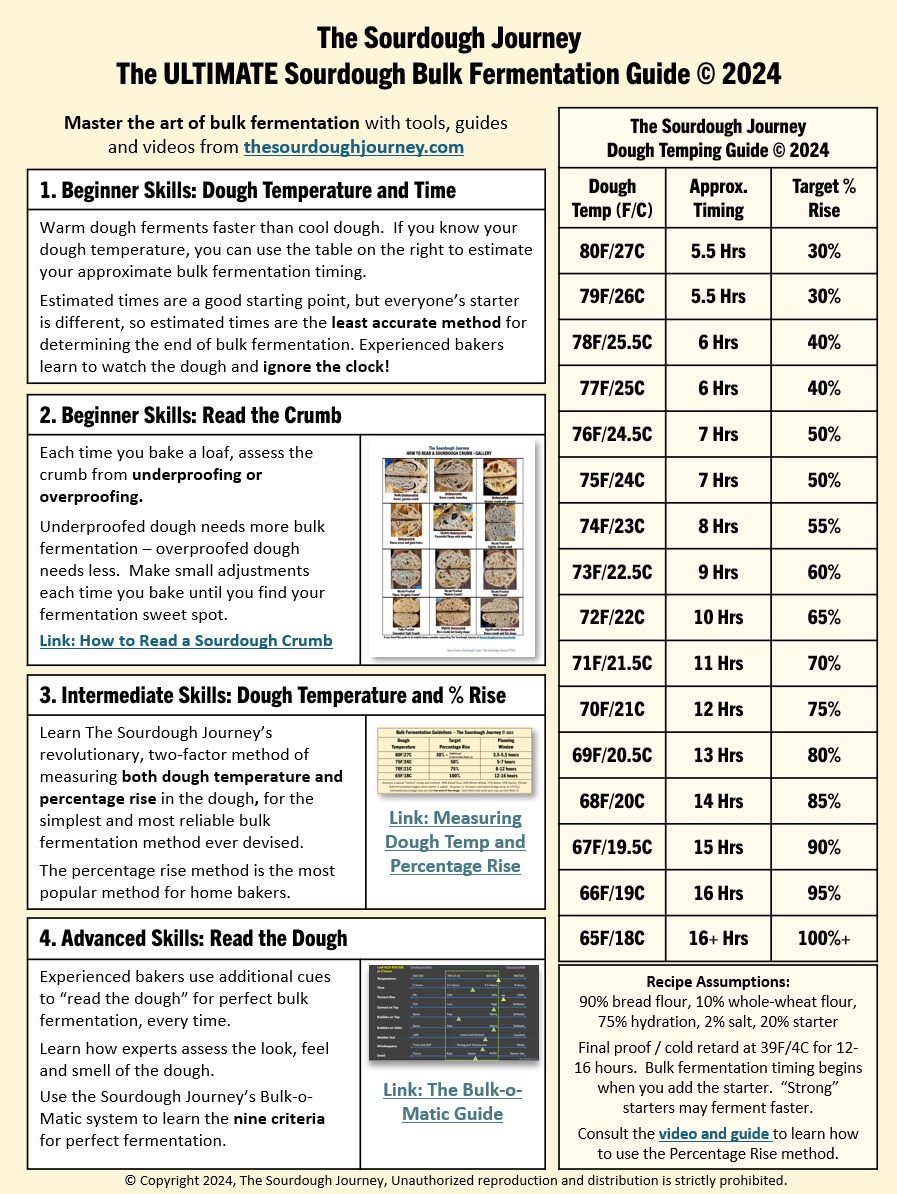
The ULTIMATE Sourdough Bulk Fermentation Guide
When is sourdough bulk fermentation finished?

Dough Temping for PERFECT Sourdough Fermentation
What is sourdough “dough temping,” and how does it work?
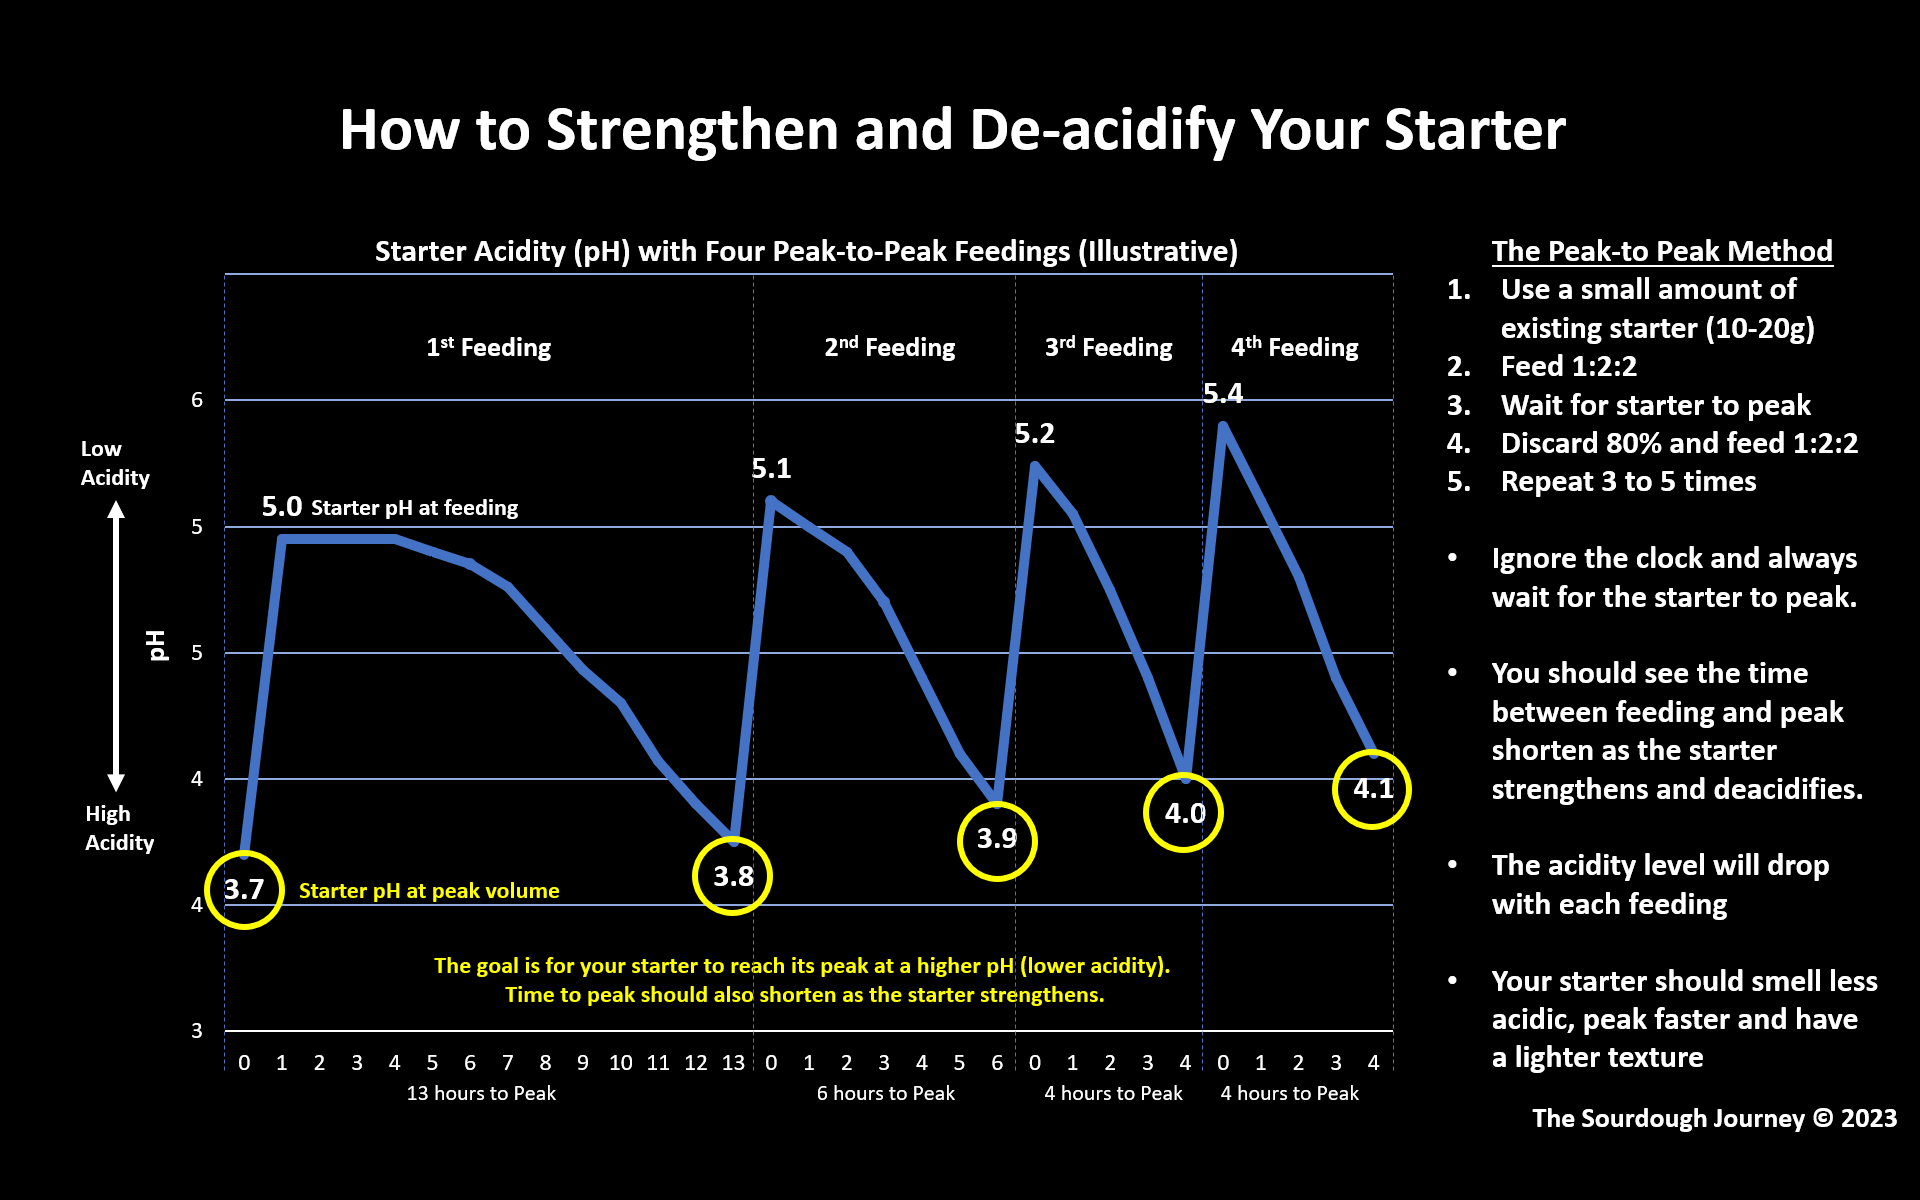
The Science of the Peak-to-Peak Method of Strengthening a Sourdough Starter
What is the Peak-to-Peak Method and how does it strengthen a weak sourdough starter?
How to Strengthen a Weak, Acidic Starter
Is your sourdough starter sluggish? How do you identify and fix a weak, acidic starter. This document is the companion guide to the popular video “How to Strengthen a Weak, Acidic Starter.”

