
This is an auto-generated transcript of the video: “Underproofed or Overproofed: A Tale of Four Loaves” from The Sourdough Journey. Copyright 2020. All Rights Reserved
The video can be found at https://youtu.be/_YBCogA32k0
hi I’m Tom coming to you from Cleveland Ohio thank you for selecting my video in
today’s video we’ll be focusing on a topic that is a mystery to many
beginning sourdough bread bakers and that is the idea of under proofing and
over proofing of your dough as a beginning sourdough bread baker this is one of the most difficult and
challenging aspects of understanding the recipe and the impact that the recipe
has on the final outcome of your bread
so what we’ll be doing today is a unique experiment where we’ll be baking for different loaves of sourdough bread and
in each one of those four loaves will be slightly varying the bulk fermentation
time and the final proofing time and we will be assessing what are the impacts
of small changes in those times on the final outcome of the bread as its baked
the way that we’ll be doing this experiment is so that we’ll be following the standard what’s called the basic
country loaf recipe in the Tartine bread book by Chad Robertson if you’re not familiar with this recipe or this
process I recommend that first you watch my other five-part video the sourdough
journey beginner mistakes and tips that video goes through the entire tart scene bread making process from start to
finish in great detail so I recommend you watch that first and then come back and watch this video once you’re
familiar with that process and want to do a deeper dive on these two specific areas bulk fermentation and final
proofing
so the way that we’re gonna do this is that we will bake four lobes of bread and the variables that will change will
be the bulk fermentation time which is recommended in the recipe to be between three and four hours and the final
proofing time which is also recommended to be three to four hours assuming that you’re doing the same day baked version
of the recipe not the overnight proofing version of the recipe so let me clarify
this first before we go into the details there are two different ways to follow the basic country loaf recipe in the
Tartine bread book in my other video we follow what’s called the overnight proof
or cold process where after a shaping final shaping of your dough you put it in the refrigerator for eight to
twelve hours and then you bake it the next day there’s a different version of the recipe which is the same day bake or
instead of the overnight proof we do a counter top proof for three to four hours and then we bake the low is the
same day that is the method that we’ll be using for today’s experiment is the same day bake with the counter top
proofing if you’re interested in the overnight proofing method I’ll do another video where we look at that
option but for today’s version all four of these lobes we’ll be using the same day bake method so for the four loaves
what will be varying is the bulk fermentation time and the final proofing time as I mentioned and the reason that
this is challenging for beginners is because the Tartine bread recipe like
many other recipes it gives ranges for how long these two processes should take so when you’re presented as a beginner
with the recipe that says bulk fermentation should take three to four hours your question is well three to
four what does that mean should I do it for three hours or should I do it for four hours or should I do it for three and a half hours so until you become an
experienced Baker it’s incredibly frustrating and incredibly challenging to deal with the ambiguity of some of
these recipes that provide arrange so what we’ll be doing today is experimenting with the different extreme
ends of the range to see what the impact is on the final outcome of your loaf so
we’ll do this by creating four different loaves and varying the bulk fermentation time between
three in four hours and the final proofing time between three and four hours and then one over the four loaves
will even go outside of the four-hour recommendation on both of those and will go up to five hours of bulk fermentation
and five hours of final proofing to see what impact that would have
so when you think about changing all these variables that sounds incredibly complicated so the way that I lay this
out is we’ll make these four different lobes and think of these as four different scenarios that you might see
if you decided to bake a loaf on a Saturday for example we’re gonna start all four of these loaves at 8 a.m.
they’re gonna follow the same process for all the steps except for bulk
fermentation and final proofing which are the only two variables that we will change and these four lobes could be
described as follows the first one is what I would call the as soon as possible loaf in this example we’ll be
basically looking at the ranges of times that are recommended and we need to get this loaf done as soon as possible so
we’re gonna pick the shortest end of the range recommended so that would mean three
hours of bog fermentation and three hours of final proofing and we’ll see how that loaf comes out if we do what I
call the as soon as possible loaf that one from start to finish takes ten hours and in all these times that I’m giving
I’ve added in 90 minutes at the end to ensure that we allow the loaf to cool so
these will this one would start at 8 a.m. 10 hours later this would be done at 6 p.m. the second loaf that we’ll do
is what I will call the dinner party loaf so this is a Saturday where you have people coming for dinner and you
want to be cutting into a cooled but slightly warm loaf of your home baked sourdough bread at exactly 7:00 p.m. so
what we’re gonna do in this example is we’ll start this one at 8 o’clock we’ll do 3 hours of bulk fermentation that’ll
be in the morning but then we’re gonna do four hours of final proofing because you want to let this dough sit in the
afternoon while you’re making other preparations and then this one will be ready as exactly 7:00 p.m. that’s an 11
hour process with the 3 hours of bulk and the four hours of flannel proofing the third example that we will do is
what I would call the slow and easy loaf this is where you have no time constraints you have no commitments you
have all the time in the world so we’re gonna follow the recipe but we’re going to pick the long end of all
ranges and basically make this loaf as slow as possible without going outside of the recommended times so that would
mean four hours of bulk fermentation and four hours of final proofing this is basically a 12 hour loaf we’ll start
this at 8 o’clock in the morning this would be ready to eat at 8 p.m. and then the fourth loaf that we will do in this
example is what I call the delayed loaf so this is where reality sets in life
happens you’re not able to be home or you’re not able to move the dough along
at the recommended times so we’re going to exceed the recommended bulk fermentation time of four hours and
actually go five hours on bulk fermentation and we will exceed the final proofing time maximum
recommendation of four hours and we’ll do five hours of final proofing and we’ll really start to push the envelope
and say when do I really start to over proof my bread what does that look like and is that is that what happens if I
start to exceed both of these times by one hour so that’s basically a 14-hour
process where again we’ll start at 8:00 a.m. with all the other loaves and that one would be ready to go at 10:00 p.m.
14 hours later so that’s the process that we’re going to follow we’ll do these four loaves varying the bulk
fermentation time and the final proofing time with the purpose of this experiment
to be let’s look at these loaves at the end of the process we have a 10 hour loaf an 11 hour loaf a 12 hour loaf and
a 14 hour loaf and when we’ll cut these open at the end and say based on these small variations in bulk fermentation
and final proofing time what was the impact on the final bake did the loaves look different did they taste different
were they what did the crumb look like what does the crust look like what does
the oven Rise look like so we’ll do a very controlled experiment here so that we can really accelerate the learning to
see the impact of changes in these times because as I said this is one of the most frustrating and mysterious parts of
following the the process as a beginner and the challenge that a lot of beginners have with with learning is
that we’re only baking once a week or once a month and you’re
changing a variable you’re changing one of these variables and you look at your loaf and you’re like oh my gosh I over
proofed and then you change another variable two weeks later and you’re like oh no I understand and then two weeks
later you change something else you’re like I over proofed again and this is a really inefficient kind of trial and
error method to really learn what the impact is of these two really critical parts of the process bulk fermentation
and final proofing so that’s the reason that we’re focusing on these today and I hope this works and I hope that it turns
out to be an educational experiment for all of us I’m also trying this for the first time myself today
so what I’ve done off-camera is basically started the process if you want to see the first few steps in the
process you can watch my other video of those through him in detail and I followed the exact same process here what I did was I made the leaven last
night I had a 200 grams of leaven to the water of 700 grams of water a thousand
grams of flour which was divided up between 900 grams of bread flour and 100
grams of whole wheat flour we mix all of that together we let it sit for 40 minutes that’s called the auto lease or
ferment Elise process then we had its salt and that’s where I am in the process right now so basically I’ve
mixed the dough the end of the salt it’s been sitting here a total of about an hour
and now we’re moving on the stretching full process I’ll be doing for stretch and fold starting now so we’ll do one at
nine o’clock one at 9:30 on at 10 o’clock and one at 10:30 so this is the
standard process of these structured folds with 30 minute breaks over the next hour and a half again I’ll do these
off-camera if you want to see how to do this stretch and fold process that’s covered in great detail in part 3 of my
other five-part video this hour they were churning so we’ll catch up back here after I finished the fourth
destruction fold and we will be one and a half hours into the bulk fermentation
process at that time
okay it’s 10:30 I’m doing stretching pulled number four so just to catch you
up on what I’ve done here is we’re doing for stretching fold to a 30 minute or intervals first one was at nine o’clock
second was at 9:30 third was at ten o’clock fourth is at 10:30 so we’re right on
schedule orders power and a half into bulk fermentation and I’m doing wertha stretching pulled again you watch my
other video for details exactly and how we do this reached out on the bottom pull it over
the top this looks really nice this is a really it’s soft kind of billowy warm
texture it’s keeping these indentations from reaching in there with my fingers
that’s a good sign that we’re building gluten it’s puffed up a little bit it’s pulling away from the sides of the
vessel and keeping more of a contiguous ball of dough in the middle so that
looks pretty good that’s our fourth stretching fold that’s all we’re going to do for this batch the recipe gives you the option to do more
after this I guess one thing we can do while we’re here is to a whole
windowpane test so the way we do this is we just grab the edge of the dough and
we pull it up stretch stretch stretch and we see if the dough is translucent
and it is I don’t know if you can see it on the video but I can see through this dough I can see daylight through it it rips a
little bit on the edges because I’m using whole wheat in the recipe and the wheat bran actually will cut through the
gluten strands and I’m getting really good stretching here really thin that’s
like a totally translucent skin I can see through that that’s a sign that we have a good gluten development I don’t
need to over handle this a lot the recipe calls for for stretching folds some people do five sometimes you look
at at this point it feels like you need to do one more because the window pane doesn’t quite give you that elasticity but we were just going to follow the
recipe strictly with four this time around so this is the point where we
going to diverge into our four different loaf processes so what have we done so
far did the leaven last night did the otto leaf / / mentally is this morning with
now we’re into bulk fermentation 90 minutes for stretch and folds so let’s
just check where we are in terms of temperature I’ve been measuring the dough temperature constantly through this whole process it’s incredibly
important to measure your dough temperature through the entire bulk fermentation process our target
temperature that we want is between 78 and 82 degrees Fahrenheit which is 25
point seven to twenty seven point five degrees Celsius
I’ve been running at internal dough temperature of right about 80 degrees so
right in the middle of their range so it’s been good I’m keeping the dough in my oven with the light turned on I used
it as a proofing chamber and again in my other video I go through this in tremendous detail the internal
temperature of the oven is about 86 degrees right now I try to keep it around 85 with the light on in there
that gives me a nice warm environment I’ve been running roughly 79 80 degrees
on this last turn my temperature is now 284 degrees Fahrenheit so I’m a little
bit over our target that we wanted to be at so I’m not going to put this back into the oven for additional proofing
and again I don’t know if the heat turned on I just have a light out of the oven later turn down in there so we’re
at 90 minutes through bulk fermentation and now we’re going to break this into our four separate recipes going forward
so for our four separate recipes going forward I’m going to divide this dough into four smaller containers because
we’re going to change the balance of the bulk fermentation time so we’re an hour and a half in it calls for anywhere from
three to four hours of bulk fermentation I’m going to do one of these at three hours two at four hours and one at five
hours and we’ll see what the difference is so this is not going to be a pretty
process because this dough is so sticky and normally you wouldn’t want to be
handling and cutting the dough and all that but in the interest of science we’re gonna take some liberties here and
I’m gonna divide this up as close as I can to equally I’m not going to weigh this I’m just gonna eyeball it because
we don’t need to be exactly the same size loaves and just weighing it would
cause more handling of the dough which I don’t really want to do so I’m cutting this I’m using a bench scraper slash
bench knife very handy tool that we’ll need later and this recipe the thirteen
recipe we started with a thousand grams of flour which typically makes two large
sized loaves or rules what I’m doing here is I’m cutting this into four so
we’re actually going to make four half-size lows these are essentially instead of the 500 gram flour weight
loaf that we normally get two of those out of the tarts and recipe we’re at four half size loaves I’ve made these
before they work really well and I can do four at once off of this
recipe so I’m just gonna dump these into our four containers carefully incredibly
sticky it goes down into the vessel
don’t let me touch each other or like I just
okay so going forward we have four
different recipes that we’re going to be following here going forward so I’m gonna let these settle down into these
containers a little bit I’m going to pause the video and then we’ll come back and we’re going to mark each one of
these containers with the current height so that we can measure how much rise we’re getting in each one of these going
forward because in addition to the bulk fermentation time there’s also guidance on the percentage increase that you
should see in the dough so we’ll talk about that when I come back momentarily okay so I just tap these down a little
bit to level them and they’re almost exactly the same way that actually did
weigh these in they’re roughly 500 grams of dough in each one of these four tubs
and I’ve put a rubber band on each one so that we can measure how much these rise over time so what I’m going to do
now we’re in the middle of all fermentation normally we wouldn’t be doing this step we would have just after stretch and fold would have left these
to rise I’m just going to quickly measure the dough temperature again not
because these have been exposed to the room temperature by cutting and dumping
these are still good these are a B two and a half degrees Fahrenheit which is a
great temperature so I’m going to leave these on the counter top now I’m not going to put those back in the proofing chamber which is my oven with light on
and we’re going to let these sit I’ll check back in every 30 minutes and see
what these are doing in terms of rising
I have been checking the temperature of
the four tubs of dough every half-hour and they’ve been running at roughly 81
to 82 degrees dough temperature which is a good temperature that we want to be at for bulk fermentation it was running in
the same range for the first 90 minutes when we were doing stretching fold it’s continuing in that range so I’m really
just letting these go it’s 11:30 a.m. so we’ve been in bulk fermentation now for two and a half
hours the recipe calls for on the low end three hours of bulk fermentation
where we should see the dough rise by at least 20% I’m just looking at where these are relative to the rubber band
we’re up maybe 10% but we’re not at 20 by far and we want to get this first
loaf the ASAP as soon as possible Loaf moving on at the end of the three our
recommended bulk fermentation time so I’ve been letting these sit on the countertop they’re roughly 81 degrees
I’m gonna move these back into my oven for the last 30 minutes the the temperature won’t change a lot in 30
minutes because the dough temperature is really slow to change but these are relatively thin walled containers that I
normally don’t use with this thin plastic so this dough may approach room temperature quicker than it would if it
was in the heavy glass container that I normally use so just to keep these going I’m going to put these back into my
proofing chamber which is my oven with the light on for another 30 minutes and then we’ll check back in
okay it’s noon we’ve just finished three hours of bulk fermentation that includes
the first 90 minutes which was stretch and fold on the second 90 minutes which was sitting at on the countertop for
most that time and in the last half hour of that 90 minutes I put these back into my proofing chamber which is the oven
with the light on so three hours is the minimum recommended time for bulk
fermentation under the Tartine recipe at the end of the bulk fermentation we
should see 20% rise in the dough so now I’m going to remove these covers and see
where we are or just do this for our first two recipes if you remember number one this is my as soon as possible
recipe we’re gonna try to get this done as quickly as we can and the second one this is my 7:00 p.m. dinner party so
I’ve got to keep moving on this one or I’m gonna miss my 7:00 p.m. cutting time
so these two were really pushing towards this end of the time range the three
hour time limit so let me just see where we are look at my rubber band it was at six
centimeters 20 percent increase should be seven point two centimeters were roughly at seven and a half this one’s
almost at eight so we’re just barely a twenty percent increase in size on these
which meets the criteria of moving on to the next step you can also look around the outside edge of these containers
there’s a lot of activity these are bubbling they’re fermenting these will continue to move and continue to grow
during the final proofing which we’re also going to do at room temperature so because I’m in a rush
I say I’m at 20 percent I’m at three hours I got a move on these two loaves this
was my plan three hours each word exactly three hours when I move forward these two my longer walk fermentation
this one the number three is going to go for four hours number four is gonna go for five hours I’m just gonna let these sit I tested
the internal dough temperature it’s still running between 80 and 81 degrees Fahrenheit that’s about 25 degrees
Celsius I’m not in any worry any rush with these I’m just gonna let them go I’m gonna leave them on the countertop
for because there’s still a lot of good temperature they don’t need to go back in the proofing box these two I need to
do my rough shaping and do a 30-minute bench rest so I’m going to do that now
so when we do our rough shaping of the loaves don’t we dump this out onto an
unflattering in all of these details are
in my other video if you’re really interested in the technique and and all that I recommend watching the other one
here I’m really just flying through the process so that we can focus on the variations of the time not all the
individual steps so I carefully pour
this out into a gab came out cleanly which is a good sign and for these four
lobes again these are half sized lobes these are 250 grams of flour weight and I’m going to instead of make making the
round wool shape I’m actually going to make these an oblong yeah that’s just
because I have these little loaf pans that I’m going to use for shaping so these will be what’s called the batard
shape dat ard it’s like a between an
oval and a rectangle so what do we do we
lightly flour the surface we’re establishing the top and the bottom of
what will be the loaf you don’t want to get flour on the bottom I’m just going
right up to the edge here and I’m trying to keep a lot of flour off of my work surface because I don’t want to
accidentally get it on the bottom I’m rubbing this in a little bit because I’m creating this surface which is going to
be the crust kind of shape that into something of a circle very carefully you
don’t want to de gas the loaf you don’t want to push the air bubbles out then I flip this over so now my floured side is
down my unflavored side is up and what I want to do now is just carefully fold
this on itself to start to build some surface tension I’m folding grabbing and
folding I’m stretching the dough to build surface tension this is my sticky
side I don’t want flour on my stick side because I want this to seal up tightly eventually I flip this back over
and now I start to shape this just into a round by using the bench scraper I’m
pushing the dough under and turning gently carefully it’s very sticky just
trying to build surface tension that means stretching the skin on the top
that’s what’s meant by surface tension so I’m using the front edge of this to
just grab the sticky part on the bottom of the loaf and pushing it towards the
center so it’s like stretching a balloon very sticky I just need a little flour
here you don’t want to introduce a lot of flour at this point that one’s pretty
good and then that’s going to sit let’s do our second one at some point you’re
doing more harm than good okay loaf number one local number two you sit for 30 minutes
okay it is 12:30 so we have been letting our rough shaped Lobos bench rest for 30
minutes as it’s called for in the recipe now we’re ready to do the final shaping ILO’s number one and to move this one
aside briefly okay so this is loaf number one we’re gonna do our final
shaping as I mentioned this will be a that’s hard shape and you can see in
that 30-minute bench rest this relax a little bit that’s typical spread out a little bit that’s exactly what we were
expected to do this looks like a pretty good loaf based on where we are right
now so when we do final shaping we’re
gonna flip this over and similarly we don’t want to handle this too much I’m
going to stretch this into somewhat of a rectangular shape and again in my other
video we go through this final shaping process in great detail so I’m going to do this fairly quickly we fold the
bottom third up we stretch the two sides out fold those over themselves
grab the top pull that sticky side over
and that seals the whole package we roll it onto itself really tighten that up to
build that surface tension so that looks pretty good now I’m going to flip this
over check the bottom we really want all these seams sealed up or else you’ll get
some odd shaping as steam rushes in through these seams so I just go around
and kind of pinch you seams together
so that’s upside-down right there and that goes into our shaping basket upside
down meaning the top side down now this
loaf number one we did pop fermentation of three hours and then this will do a
counter top final proof of three hours the target temperature for this step is
seventy-five to eighty degrees Fahrenheit that’s roughly 24 to twenty
six point six degrees Celsius my current room temperature is about 76 degrees a
little warm in here so I’m just gonna let these sit on the counter top I’ll cover them with these plastic elastic
food wraps they’ll keep their dough temperature for a while so that’s number one is done number two that’s a pretty
good loaf goes in the shaping basket now
this is my second loaf this is for my 7:00 p.m. dinner party loaf so I have a little bit more time to let this loaf go
so this had three hours of bulk fermentation but for final proofing on the countertop we will let this one go
for four hours versus the rush loaf which is three hours so we have a three
hour countertop crew and a four hour countertop group going side by side so
let’s check in on our other two lobes this was local number three this is our slow and easy loaf
no rush that’s still got another half hour to go on ball fermentation and then number four this is our delayed loaf
we’re out of the house we’re not even around we don’t know what’s happening with this one this one’s actually going to go for a total of five hours of bulk
fermentation so that’s still got another hour and a half to go
okay it’s one o’clock so our third loaf number three this is our slow and steady
loaf where we’re just going at the maximum recommended times this has been in buck fermentation for four hours if
you recall the recommended time for both fermentation is three or four hours the guidance is they should rise by 20%
based on where our rubber band is here were over 20% almost give that quick
measurement and we’re up about about I’d
say 35 to 40 percent increase so this is well on its way we’re done with walk
fermentation on low number three so now I’ll pour this on to the countertop here
and do the rough shaping so if we just
look at this dough this is the four hour about fermentation it’s definitely a little larger than the three hour about
fermentation loaves came out of this is mounded up a little bit more it’s a
little area a little more billowy looking flour this it’s standing up a
little higher off the countertop so you can definitely see the effect of roughly
let’s call forty percent increase in size versus the first loaves which work
just the minimum of twenty percent increase in size so we will flip this
over and do our rough shaping where we’re really just folding the loaf onto
itself this is a much looser dough I’m not getting any resistance really pulling this back it’s a puffier ball so
that’s my bottom I don’t want flour on the bottom flip this back over you can see this is
larger than the higher lobes that we had definitely more air in this loaf and now
we want to that surface tension pressing the bottom against the plate of the bench scraper
I’m stretching you can see the skin of
the crust really stretching this is a really nice-looking loaf this looks a little better to me than the prior –
it’s just much puffy or standing up much prouder and getting good the surface
tension on it it’s a little less sticky a little bit easier to work with there
we are so that’s our rough shape loaf this is going to bench rest for 30 minutes now
okay it’s 1:30 and we have been letting our loaf number three bench rests for 30
minutes so this is ready for final shaping you can see by this loaf it’s definitely a little larger than the
prior two lobes which only did bulk fermentation for three hours this has been had gone for four hours so there’s
definitely more fermentation more co2 activity in this loaf it’s standing up a little taller it didn’t flatten out as
much as the other loaf so just looking at these on the surface from bulk
fermentation this one looks like a little bit better looking loaf based on my experience so now we will flip the
flowered side down stretch this out a little bit this is definitely puffier in
the middle it’s a little bit taller if you want to call it that and we’ve
stretch and fold our bottom third this is actually it has a little bit more
tensile strength that’s pulling back against me a little bit more than the prior ones so there’s more gluten
development in this typically I grab the top roll that over and it’s how you know
that package the ends
pinch those closed it’s over it’s our bottom pinch the seams you can
see this is much more billowy looks more like a pillow compared to the prior two
so this has a lot more activity going on in it than the prior two you can also see many more bubbles pushing up against
the surface the skin so that’s our third
loaf going into it’s shaping basket and
that one’s good to go so this one will now do a bench rest come top proofing
for four hours so we did four hours of bulk fermentation and we’re going to do four hours of countertop proofing so
this one is really getting eight hours of essentially fermentation time this
one will likely really puff up
ok it’s 2 o’clock and we are on our fourth loaf fermentation this is our
delayed loaf this is where you could imagine we started bulk fermentation something came up we had to leave the
time recommended for this process is three to four hours and we’re actually
sitting at five hours we just couldn’t get back in time to do the next step so this is five our bulk fermentation this
one has risen about a little over 50%
I’m gonna say about 55% growth in this so not a lot more than the loaf that
that went for four hours so this might really be maxing out in terms of what
you would get out of all fermentation after five hours which is is quite a long time I’m also on this one now that
we’re done with bulk fermentation after this one I’m just going to take the internal dough temperature here I’ve had
this sitting on the counter top and our target range for bulk fermentation is 78
to 82 degrees Fahrenheit that’s 25 point 5 Celsius – twenty seven point seven
Celsius and this is sitting right at about 79 degrees so that’s a good
temperature good called fermentation temperature the reason I test that is because if that temperature were below
78 then that means you need to add more time to bulk fermentation if it’s above
82 or pushing 82 you take time away from bulk fermentation we remained right in
that target range between 78 and 82 through the entire process so these are representative of kind of an average
bulk fermentation at the appropriate temperature you can also see as I this
one this is really loose and jiggly that’s a good sign that there’s a lot of air building up inside of that one so
now let me pour this out onto our on floured countertop and we will do rough
shaping of loaf number four okay this is on our countertop now similarly to the
other one much larger in size because there’s just been more fermentation activity more co2 building up inside
you can see how tall this is standing up that is really a proud piece of dough
standing off two and a half inches or so off of the counter top so first we just
roughly shape this into a something kind of round we smooth the surface out I’m
getting that flour really on the sides but you don’t want flour underneath I get it on the sides just so I can pick
this up to flip it but you want to keep the bottom sticky just patting that so
you can see how much air is in that loaf there’s a lot in there that looks really good so we flip this over and then we
pull and fold this loaf is very loose compared to the others I’m getting
almost no resistance so that means we’re really pushing the bulk fermentation to the limit where this loaf is not really
able to hold its shape if it goes much longer than this in terms of the bulk fermentation so I’m doing a little bit
extra folding on this because it’s not giving me any resistance so I need to pull to create a little more surface
tension on the slope and we flip this
over and we use this technique of pushing with the bench scraper while
we’re turning the loaf and we’re doing two things building surface tension and
sealing the bottom so you can see I’m pushing that skin pushing and stretching
it looks pretty good right there
try to keep the round shape okay that
loaf looks pretty good that’s its then bench rest for 30 minutes now
okay it’s 2:30 p.m. so we’re doing the final shaping of loaf number four if you
recall this was our delayed loaf or we did five hours of bulk fermentation so
this is our last step before proofing the slope I just add a little flour
against the top smooth that out flip
that over
so similar to our prior loaf this is really puffed up there are a lot of air bubbles right under the surface you can
see them coming up through the skin I’m just gonna turn up hop some of those out
because you don’t want those giant bubbles right on the surface like that
it’ll impact your crust yeah this is really puffed up a lot of air bubbles a
lot of activities so we’ll see what happens with this this one went 5 hours against the guidance of 3 to 4 you just
seal up our seams on the bottom we have
our shaping basket prepared with rice flour that loaf it’s good to go you can
see if I just shake this how loose that loaf is that’s really pushing the limit
on fermentation when they loot when the loaf is that loose
okay we’re getting ready to bake loaf number one this was our fast loaf that
we accelerated through the process so we did three hours of bought fermentation and three hours of countertop final
proofing so this one is ready to go into the oven it is 3:30 p.m. the second loaf
we did three hours of bulk fermentation we’re going to let this one go for
another hour of countertop final proofing so this will be 3 + 4 7 hours
total this one we went for 4 hours loaf number 3 we went for four hours on
bulk fermentation and this will go for 4 hours on the countertop final proof and
the last loaf went for five hours of bulk fermentation and we’ll go for five
hours on the countertop you can just see by shaking these the the ones that went longer and bulk fermentation are much
much looser lobes this one’s in a little bit bigger pan so spread out a little bit more this one is definitely loose
and this one’s a little stiffer so loaf number one we dust with a little rice
flour to keep it from sticking this is the bottom of the loaf if you remember we put these in upside down or now we’re
ready to score a loaf number one so what I do is put a piece of parchment over this flip it out carefully remove the
shaping basket which happens to be a pan carefully remove the towel that one
stuck a little bit then I just scrape these big clumps of rice flour off of
the loaf and then these are bets hards which are kind of these long ovals I’m
not going to do decorative scoring on these I’m just going to keep this simple and I’m going to score these straight down the middle with a deep score that
goes all the way to the bottom over there and as I mentioned these really stick a little bit there we go
so that is ready to go in the oven you can see as soon as I scored that this
local really starts to flatten out and open up that’s what happens when you do the the same-day bakeware you’re not
doing the overnight proofing in the fridge if we had proofed this in the fridge it would stand up a little bit
more so you need to work pretty quickly with these
[Music]
okay I just took loaf number one the oven let’s take a look at it so this
was local number one if you recall this was three hours of bulk fermentation and
three hours of countertop final proofing this is and this cook baked for 20
minutes with the lid on at 450 20 minutes with the lid off and let’s see
what we have here the first thing that I notice is just this tremendous oven
spring this really you know puffed up we
got a beautiful ear here along the scoring we got the blistering around the
edges not quite as much blistering as I’ve seen on some other loaves the bottom is perfectly done sounds hollow
did not burn so that’s a really nice
looking loaf the color you can see this has a really kind of dark brown color
with this golden strip down the middle the dark brown color means that more of
the sugars came to the surface of the crust here during the countertop final
proofing and this little kind of burnt edge on the ear that’s all the sugars
right on the edge there as well that’s really a beautiful loaf we’re just gonna let that cool now for 90 minutes
this was our as soon as possible loaf so we started this as a date o’clock this morning it’s 4:15 4:20 right now that
means the rests about 90 minutes until it’s fully cool before I would recommend
cutting into it so that would be at roughly 5:45 5:50 p.m. that’s about as
fast as you can can make one of these loaves somewhere between nine and a half and ten hours
okay it is 4:30 it’s time to score and baked loaf number two so let’s look at
our three loaves that are still doing our countertop proofing so these all
look pretty similar loaf number two this one we did three hours of bulk
fermentation and four hours on the countertop loaf number three we did four
hours of each bulk fermentation and four hours on the countertop and loaf number
four we did five hours of bulk fermentation and this is maybe three hours through its countertop proof the
loaves all look pretty similar you know if I shake them you can see they still have a lot of flexibility a lot of
airiness in them you see more bubbles on the surface of these two than the first
one so this implies there’s a little bit less aeration inside or at least it didn’t come up to the surface as much as
Lobos number three and four so loaf number two this was our dinner party loaf we
started this at 8:00 a.m. and we want to be able to cut into this exactly at 7:00 p.m. so we’re right on schedule for that
I flipped this onto my parchment paper
remove the pan see how this one is
sticking a little bit not too bad just a hair there okay I scrape off the large
areas of press flour you can see this is already flattening out quite a bit at
room temperature once I take it out of the pan and on this one let’s do what is
called the Polka test so I’m just gonna put some flour on my fingertip I’m gonna
poke that loaf and you’ll see it comes back about half way that means that this
is sufficiently proofed that’s a pretty good looking poke test where it goes down and then comes back part way and
still leave some indentation after you’re done so let’s score this one and get it in
the oven I’ll do the same scoring here from the bottom over the top just keep
going don’t saw through it don’t stop
that’s pretty good okay loaf number two
is going in the oven
okay loaf number two is done I just took this out of the Dutch oven let’s just
brush off a little bit of the rice flour
this loaf looks really good it looks very similar to the first loaf the
bottom got a little darker on this loaf maybe because it’s the second one that I’ve done back-to-back in that Dutch
oven so the bottom of that pan is heating up a little bit but this one
looks very similar to the first one very dark color nice ear across the top that golden Ridge down the middle where I
split open on the outside this looks very similar to the first loaf not a
whole lot of difference here this one we did bulk fermentation for three hours and final proofing for four hours versus
the first loaf which was three and three so one extra hour and the counter top does not appear on the outside to be a
huge difference we’ll see when we cut these open
okay loaf number three is ready to go in the oven here’s the last two remaining three and four these look pretty similar
number four is a little larger number three this one had four hours of wok
fermentation and four hours of final proofing on the countertop that’s
nice-looking loaf this one’s keeping its shape a little bit better didn’t quite flatten out as much and as
quickly as the one prior to it did just scrape a little bit of this off and then
we’ll do our scoring same as before right down the middle yeah this one has
more air in it it’s even harder to score in a really tough time getting that blade through there just dip down a
little water really tough to score this one
there is a very loose loaf so this had four hours fermentation four hours on
the countertops that’s eight hours really pushing the limits it’s the two outside limits for the two steps in the
Tartine process bulk fermentation maximum of four and counter-attack proofing maximum of four so you can see
what happens this local tends to flatten out get really Airy it’s not bad we’ll
see how it bakes up
okay loaf number three is out of the oven carefully remove this from do we have
here very similar to the first two you
just brush this off really nice dark caramelized color that golden strip down
the middle almost burned down the ear the bottom looks really good this one is
not quite as dark on the bottom as the previous one so let’s compare this to
the first two so this was low number one
this is loaf number two and loaf number three these looked very similar I mean
almost impossible to tell the difference if I didn’t have these markers on these
two lobes and I mixed these up I don’t know if I could really identify which
was first second or third so on the outside these lobes are baking up almost
exactly the same so just to recap the first loaf was three hours of fermentation three hours
of final proofing on the countertop the second loaf was three hours of bulk fermentation four hours of final
proofing on the countertop and the third loaf was four hours of bulk fermentation
and four hours of final proofing on the countertop so basically six hours
combined seven hours combined eight hours combined there really look pretty similar if you look at the top down view
you can see that as we’re moving up here progressively to the right the loaves
are flattening out and getting a little fatter and that’s because the loaves were losing their shape a little bit the
ones that had proved a little bit longer start to lose their shape so you can see a little bit of a difference here this
first loaf has a little bit more height from the oven spring that we saw so as I
look at these a little bit longer it is a little bit more evident what is
happening here is that the longer proofed loaves lose their shape a little bit flatten out or not quite as
tall just by a hair and are a little bit fatter and whiter
okay we are on our last loaf this is loaf number four if you recall this was
what we called our delayed loaf because this was the loaf where we blew through
all the recommended times the bulk fermentation time of three to four hours we went five hours on bulk fermentation
and then for the countertop final proof that was recommended three to four hours
when we went five hours on that as well so to total of 10 hours so if any of our loaves are over proof this will be the
one let’s see where we are look this out that’s how that actually
still looks okay it didn’t flatten out like a pancake which is a good sign let’s do the poke
test here so I’ll just poke this lightly with my finger and that bounces back so
you know this one almost bounces back all the way I just hit that twice it’s
not bad so it’s still keeping some of the indentation coming back halfway so
there’s not really evidence that this is over proofed based on how the dough is
behaving it just looks a little bit flatter than the other ones and we’ll see how it bakes up and then we’ll cut
it open so let me just score number four
that blade really catches this one was
really tough to score it’s so soft okay
I’ll get this in the oven
okay loaf number four is done let’s take a look so I pulled this out of the oven
it looks very similar to the others really nice dark brown crust just that
little charring on the top of the ear a little blistering around the edges very
similar to the other lobes this one actually seemed like it was cooking a little faster than the others so I took
it out of the oven about two and a half to three minutes sooner than the prior ones so each one of these lobes baked
for about twenty minutes with the lid on and 20 minutes with the lid off the
first loaf went about I’d say twenty-one minutes with the lid off the second two
went exactly 20 minutes with the lid off and the third one went about 17 minutes
with the lid off and what happens with these loaves that have a little bit more of the proofing and bulk fermentation is
that more of the sugars come to the surface so they cook a little bit quicker and the crust wants to burn a
little bit quicker because it’s a little more sugary in the crust so if we look
at the four lobes and compare them really not a lot of discernible differences here so we will cut these
open and take a look at the inside see what the chrome looks like that’s really
the best way to tell if these were under or over proofed it’s very hard to tell just by looking at the the outside of
the loaves and we will also taste them to see if there’s taste difference among
the four lobes
okay all four of our lobes are done we’ll just do one last comparison here
before I slice into them so if you recall this was our as soon as possible
loaf three hours block fermentation three hours of proofing the second one was our 7:00 p.m. target dinner party
loaf this was three hours about fermentation four hours of countertop final proofing the third loaf was the
maximum recommended time for both the bulk fermentation and final proofing
four hours each and then the fourth loaf was where we exceeded the recommended time on both bulk and the final proof
and we went over by one hour each so this was five hours of bulk fermentation
and five hours of countertop final proof on the surface they don’t look very
different the first loaf definitely stood up a little bit more we had a little more
pronounced oven spring on the top here and then as we went through the four
bakes the color changed a little bit these these lobes three and four
definitely had a little more caramelization of the crust a little darker crust the ears started to char a
little sooner than the earlier lows because more the sugar comes out to the
surface when you do the longer fermentation and proofing this last loaf
I actually took out of the oven three minutes sooner than all the prior loaves these all went 20 minutes with the lid
on 20 minutes with the lid off at 450 degrees Fahrenheit with the exception of
the last one which I took out three minutes early earlier this last loaf also had a blowout here in addition to
this deep score it also blew through the crust here so there were some additional
pressure inside of that loaf and you could also see that the shaping of the
final two lobes flattened out a little bit I lost a little bit of the tight Oval shaping so as you go through these
and just look at the shaping this one remained very tight really as shaped this one flattened out a little bit this
one flattened out and got a little misshapen this corner bulged out here side bulged out there and the last one
similarly these two sides bulged out this corner bulged out so the longer proofing that you do the more you’re
kind of sacrificing in terms of the ability of the loaf to retain its shape that’s a fairly subtle difference that
you really wouldn’t notice unless you really lined these up side by side like that so that’s our assessment of the
four loaves prior to cutting so now let’s cut into the loaves and see what
they look like on the inside so let’s take a look at loaf number one so loaf
number one this was our as soon as possible loaf we really pushed the x on this to be as
short as possible three hours of fall fermentation and three hours of countertop proofing and this has the
tell-tale signs of under proofing that giant open tunnel that you see on the
top of this side right here the giant open tunnel that’s an indication of
under proofing this loaf is not horrible because the other side of under proofing
is you would see a very dense layer on the bottom and then all these giant air
bubbles on the top this actually opened up fairly nicely and the texture of the crumb is actually quite airy and you see
these translucent edges or sides of the holes which actually is an indication of
fairly good proofing so this is right on the edge it was very close other than
that giant hole that appeared in there that giant tunnel a little bit on the
under proofed side but really not too bad that’s a pretty good-looking loaf the other thing to note is because these
are half size loaves the holes that you’re looking at our exaggerator it’s a little bit of an optical
illusion because you’re used to seeing the distribution of the holes in the crumb on a full-size loaf so you also
have to just kind of reset your mind and say okay this is half the size so the holes are naturally going to look bigger
relative to the size of the crust but this one giant one is unmistakable that would be a big hole on any sized loaf
so let’s look number one that’s not too bad pretty pleased with that so let’s
take a look at local number two loaf number two if you recall this was three hours of bulk fermentation so the salt
same as local number one but we did four hours of our countertop final proof so
this had one extra hour compared to the prior one this was a total bake time of
eleven hours start to finish all these big times include ninety minutes of cooling at the end so let’s compare loaf
number two so this one looks much better
you can see there’s a better distribution of the holes there you
don’t have the giant tunnel through the middle fairly airy crumb this still
looks slightly on the under proofed side again because I see this kind of long
row of a little bit more dense crumb at the bottom and a lot of the air holes up
on the top and a little bit bigger more like tunnels than than actual bubbles if
you will learn they’re not like a a circular completely circular bubble
they’re more like a tongue the tunnels are an indication they had a lot of co2 activity they’re rising up which is a
indication of slightly under proofing but again that is not that is not a bad
loaf at all number two I would be happy serving that at my 7:00 p.m. dinner
party and it came out right on time so that’s loaf number two so these are
moving in the direction as you would expect from kind of the continuum of
under proofing it’s over proofing let’s take a look at loaf number three
okay loaf number three this one looks excellent of all three that we’ve seen
so far this is by far the best-looking one you see a much more even distribution of the holes in the crumb
and you don’t see the giant tunnels or the giant holes near the top of the
crumb really noticeable difference between this loaf and the prior two
loaves that makes a lot of sense so this one we did four hours of bulk fermentation and four hours of the
countertop proof this one looks really good if I had to you know pick the
best-looking one so far this is very nice we also had the nice ear on there
you get the little bunny rabbit profile which is desirable I guess you do them
this way because the bunnies are kissing now so that’s loaf number three
very nice crumb on number three and then loaf number four this one is our delayed
loaf where we missed our target time of maximum recommended time of four hours
about fermentation four hours of countertop proofing we blew through both of those by one hour so we did five
hours of bulk fermentation and five hours of the countertop final proof that
happens from time to time sometimes you just can’t be around when you need to move these lobes through through the
schedule we’re going to see what happens with the extra proofing time on local number four
this one is not bad but not quite as good as number three so what you see
here is we did have a more even distribution of holes in the crumb similar to loaf number three but not
like not loaf number four but what you see is these big air holes around the edges now which means that the dough
kind of took off on me the dough because there are so much air in here the dough
started to kind of do its own thing and it just stretched out a little bit more and started to lose some of the
structure and what I mean by losing the structure is that because the gluten was
starting to meet meet its kind of maximum point of extensibility and and
tensile strength the the whole loaf just starts to lose its structure so then
when you start to get the expansion of steam in the oven the steam is going to go wherever it wants to go because the
loaf can’t hold it together so this is just barely starting to push the edges of over proofing I mean if I if I saw a
picture of this and you said is this overproofed most people would say no that’s a pretty good-looking loaf but
relative to the other lobes you can see that this is different because we’re starting to get these big holes now
around the edges and unlike the first ones the holes are not solely around the
top edge you see these holes around the bottom edges as well which means that I
lost that tensile strength have lost that structure of the loaf a little bit and it couldn’t handle the steam in the
oven but this is just barely on the edge of over proofing again if you asked 10 people is this over proofed nine of them
would say no so that’s another good-looking loaf and this one we really blew through the times both in terms of
the fermentation time we went an hour extra and the final proofing time we
went an hour extra
but it’s not all about what the lows look like we also want to know what they
taste like so I’ve started a little taste test here so I just did a quick
taste test of the four lobes they’re all very similar I think the
main difference is just comparing these same day bakes to the overnight return
which we did not do in this recipe but I do that in my other video these are
incredibly mild tasting you don’t really taste much of the sour flavor at all these just have this beautiful light
French country loaf flavor which is the preferred flavor the Chad Robertson goes
for in the Tartine recipe these are really fantastic if you want a mild
flavor even comparing the combined six
hours of all fermentation and proofing to a combined 10 hours this 10 hour loaf
is not significantly more sour tasting than the one that we fermented for six hours
you really don’t start to get that real pungent sour taste until you start to
get into the overnight cold roots however that will overnight proofing in the refrigerator so these are all very
narrow or kind of within the taste profile as I knew from number one to number four what’d he do taste
differently as particularly in this number four which we went for five hours and the bulk fermentation in five hours
under kind of top proofing is you taste the carmelization there’s definitely more sugar in the crust the crust is a
little bit thicker the crust is a little bit darker the ears a little bit darker so you’re definitely tasting more of
that sugary caramelized flavor particularly in that fourth loaf the
other three I have to say we’re pretty indiscernible if we rearrange these things with my number of flags off of
them and you asked me to to do a taste test and put them in the order of one through four I probably couldn’t tell
the difference one two and three but I probably could tell the difference between our four
so how do we summarize what we’ve seen here the first takeaway from this the is
just undeniable is you have to give credit to the book the recipe works I
mean we followed this it gives the ranges of three to four hours of bought
fermentation three is just barely on the low end four turned out a little bit
more perfectly if you start to go over four you start to see that the loaf loses some structure so this is
unbelievable validation that if you follow the recipe and in in this book in
particular but I think a lot of these books they work these are tried-and-true methods and if you really stick to the
guidance these are fairly reliable recipes the second thing is that on the
outside of the loaf just by looking at the outside it’s very difficult to tell what’s going on these baked up incredibly similarly I mean I’m just
looking at these now if I mixed all these up and took my little number of flags off of them it would be nearly
impossible for me to reassemble these just based on looking at the crust so
almost all of the impact of the bulk fermentation and proofing time is more
evident on the inside of the loaf than the outside of the loaf and then the third point is that the crumb followed
exactly the pattern that we would have expected is number one showed the signs
of under proofing with the giant tunnel in the middle number two showed a little
bit less under proofing smaller poles but still those giant poles kind of
riding up towards the top of the loaf and a little bit more dense crumb towards the bottom of the loaf do these
this way number three this was really
kind of our sweet spot of all three loaves that crumb looks perfect to mix a
kind of even distribution of small and large holes in the crumb and then number
four still really not bad but you can see that the the holes and
from our a little bit more erratic much bigger holes kind of around the edges
and a few of the medium-sized holes and then some areas just have dense crust in
the middle because we we over prove started to over proof that a little bit
again I don’t want to call loaf number four over proof most people look at that and say it looks fantastic but I’m being
overly critical on myself so that’s a great comparison of the process and what
happens and I hope that you found this video helpful I’ve tried to make these
videos specifically for beginners because it just takes so much time to
build up experience and be able to kind of read the dough and listen to the dough and these other things that that
experts say and for beginners you know you really struggle I struggle with with
that so I try to do experiments like this to really kind of prove out changing one variable at a time you know
what works and what doesn’t if you watch my other video the sourdough journey the beginner mistakes
and tips I go through this entire process in detail there are a lot more tips in there if you are a beginner
bread baker I strongly recommend that you watch that video and as I say at the
end of that video if you really follow the guidance that I provide in that
tutorial you can bake great bread even as a beginner and and how do i how do I
know that because I’m a beginner I just started baking bread less than three
months ago and I keep track of all of my bakes I keep these cheat sheets in here of every big that I’ve done I’ve
followed the Tartine recipe for about the last eight or nine weeks and I’ve
kept track of all of my bakes including today’s bake this is exactly the eighth
time I’ve tried this recipe and I mean we got four fantastic loaves here so if
you like what you see here and you’re a beginner and you really want to learn I thank you for watching this video and I
encourage you to watch some of my other videos thank you
you
English (auto-generated)

Tom Cucuzza
Video Transcript: Underproofed or Overproofed: A Tale of Four Loaves
Share:
Facebook
Twitter
Pinterest
Print
Email
On Key
Related Posts

Review: Sourdough Proofers and Temperature Control Devices (2025 Update)
What are the best sourdough temperature control devices?
2025 Gift Guide for Sourdough Bakers
Looking for gift ideas for a special sourdough baker? Check out my 2025 gift guide!
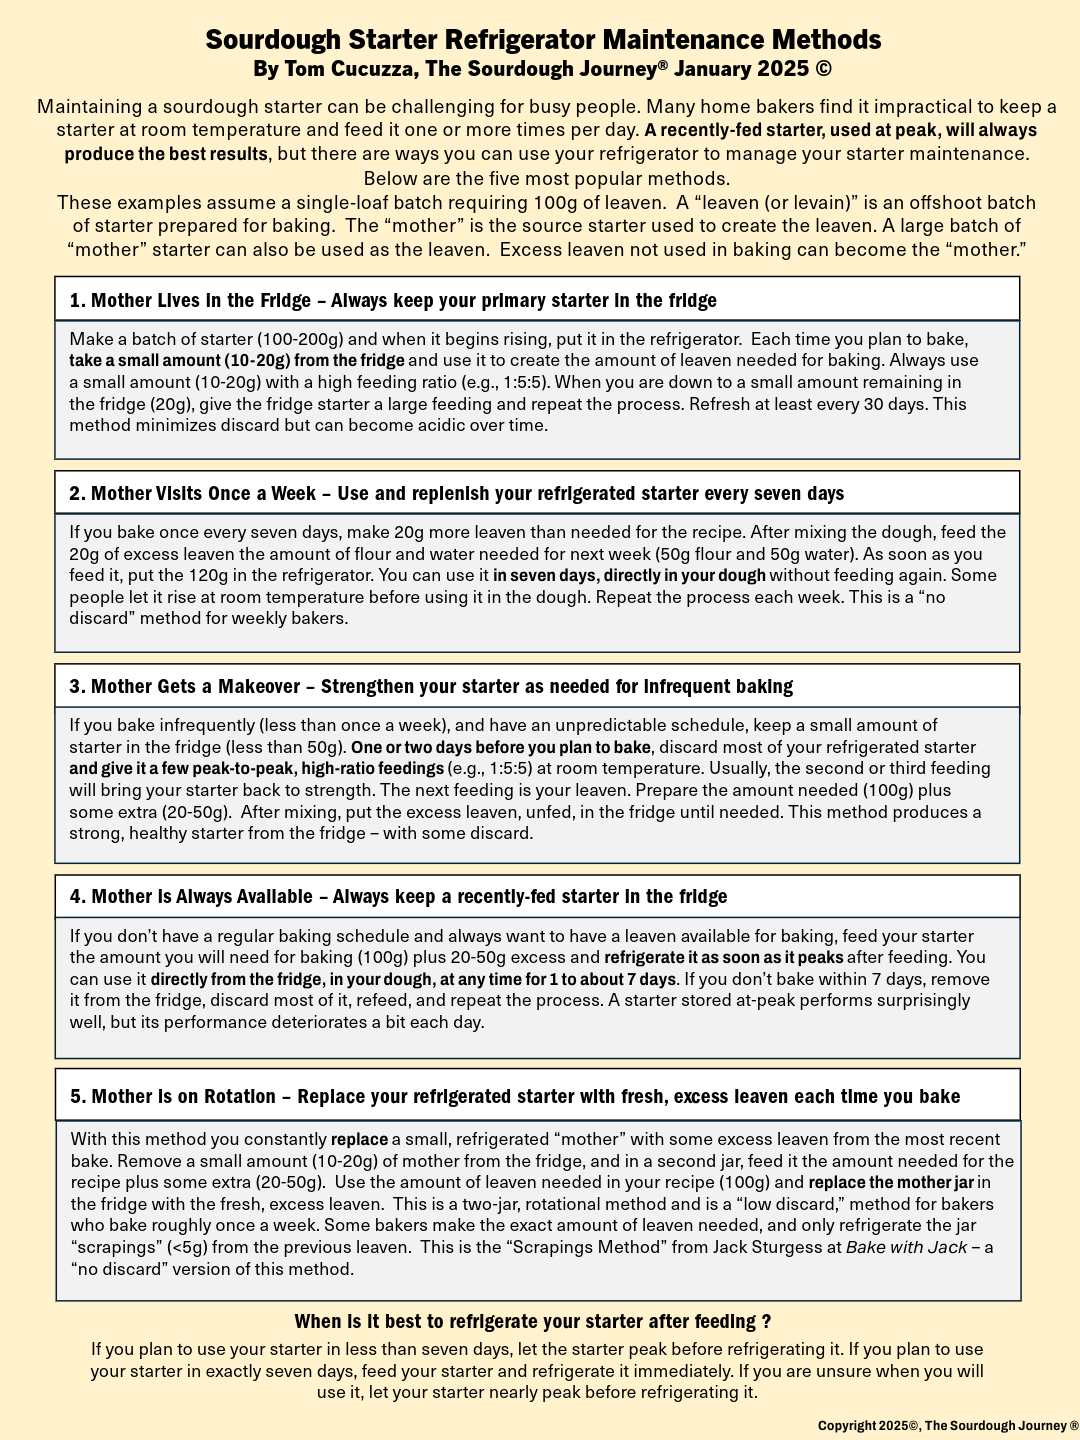
Sourdough Starter: Refrigeration Maintenance Methods
How can I maintain my sourdough starter in the refrigerator instead of at room temperature?
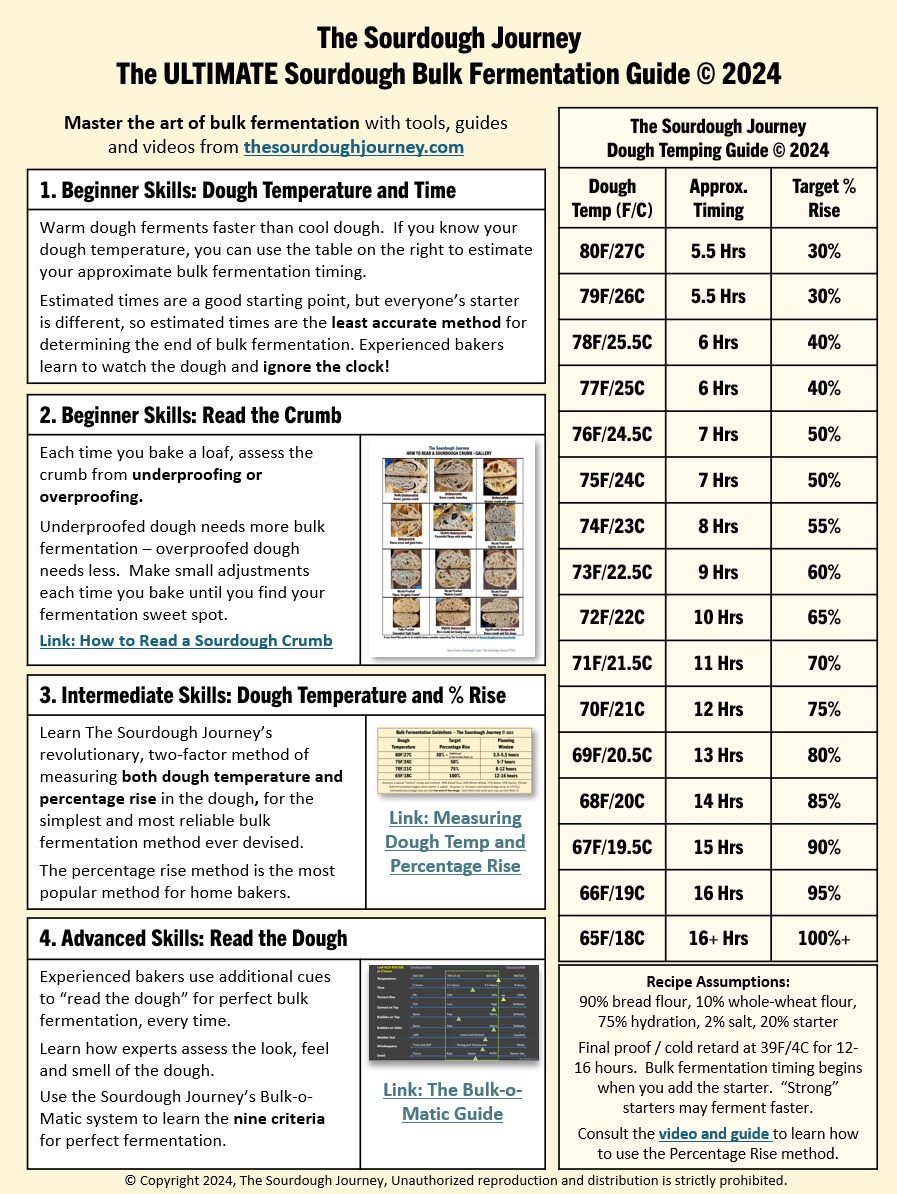
The ULTIMATE Sourdough Bulk Fermentation Guide
When is sourdough bulk fermentation finished?

Dough Temping for PERFECT Sourdough Fermentation
What is sourdough “dough temping,” and how does it work?