
Tom Cucuzza, April 2023 | The Sourdough Journey
Most sourdough recipes recommend bulk fermenting your dough at a specific temperature, such as 80F/27C in the popular Tartine method by Chad Robertson, or 70F/21C in many popular overnight methods.
Two-Stage Bulk Fermentation is a method using two different dough temperatures during the bulk fermentation process:
– Start bulk fermentation at a warm dough temperature (~78F/26C) for 2.5 to 3 hours
– Finish bulk fermentation at a cool dough temperature (~39F/4C) for 12 to 24 hours
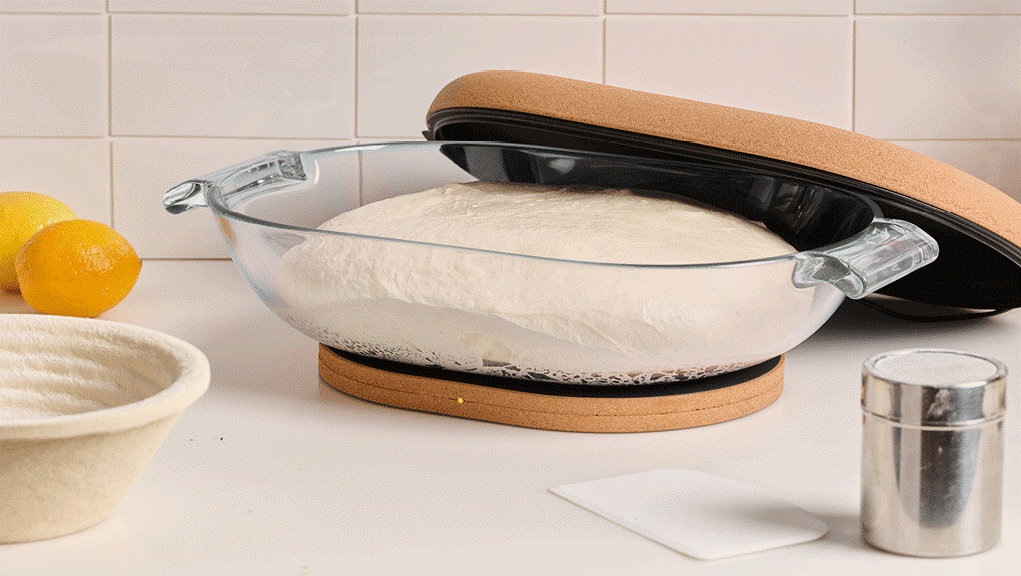
Some bakers look at this method and mistake the second stage for the cold retard / final proof found in many recipes. Note, the refrigerator step here is a continuation of bulk fermentation of unshaped dough – not the final shaped loaves in bannetons.
In this method we use a cold retard for both bulk fermentation and for final proofing which essentially makes this a double cold retard method.
This versatile method works with most popular sourdough recipes. During the 3-hour first stage of bulk fermentation you can employ whatever handling steps you prefer (e.g., stretch and folds, coil folds, or no folds). You can utilize any popular shaping, final proofing and baking methods you prefer. You could opt for a countertop final proof at room temperature. This method is simply a flexible timing alternative for the bulk fermentation step.
The Video
This method is featured in the YouTube video, Sourdough Breakthrough: Two-Stage Bulk Fermentation. If you are interested in this method, I recommend that video which includes much more detail than what you will find here.
What are the Benefits of Two-Stage Bulk Fermentation?
There are five benefits of this method:
1) Ending bulk fermentation on “auto-pilot”
One of the trickiest parts of sourdough baking is determining when to cut off bulk fermentation. With warm dough (e.g., 80F/27C in Tartine), that cutoff point is critically important, and the optimal window may be as short as 30-minutes. With the Two-Stage method, the cutoff of bulk fermentation happens automatically in the refrigerator. It is as if you are putting the dough on autopilot, and it perfectly bulk ferments your dough every time.
2) Less time monitoring the dough
Because you are only monitoring your dough for about the first three hours of bulk fermentation, you can spend much less time in the kitchen. The classic Tartine method requires close monitoring of the dough for almost six hours before the shaped dough goes into the refrigerator.
3) Schedule flexibility
By cold retarding the bulk fermenting dough in the refrigerator, you can space out your sourdough process over multiple days. This method opens up tremendous schedule flexibility for busy bakers trying to make sourdough on weeknights after work. In addition to breaking up the kitchen time into shorter intervals, the exact cutoff of the 12-24 hour second stage in the refrigerator is very forgiving and gives bakers wide flexibility to determine when you want to shape the dough and move to the next step.
4) A warm weather method
This method is tailormade for warm weather bakers or bakers with warm kitchens. Many sourdough bakers quit baking in the summer because their kitchens are too warm, and the dough runs away during bulk fermentation – especially when using overnight countertop bulk fermentation methods. With the Two-Stage method, a very warm kitchen is ideal for the first stage of the process where you are mixing and maintaining a dough temperature of approximately 78F/26C.
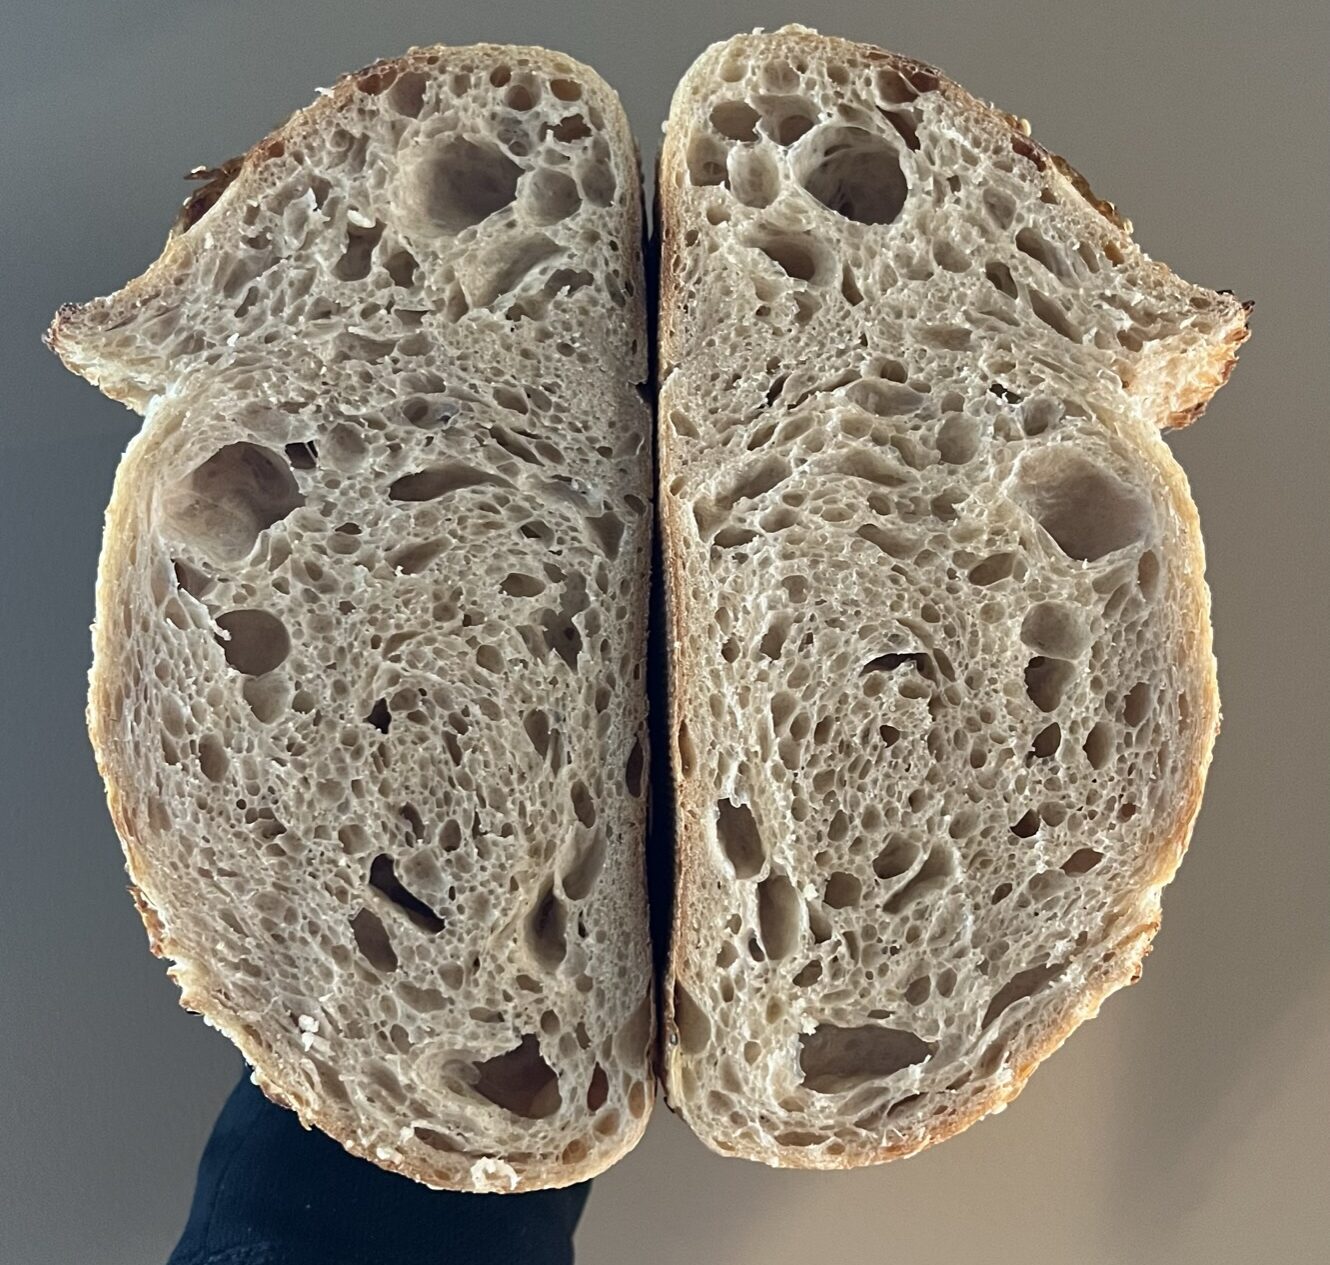
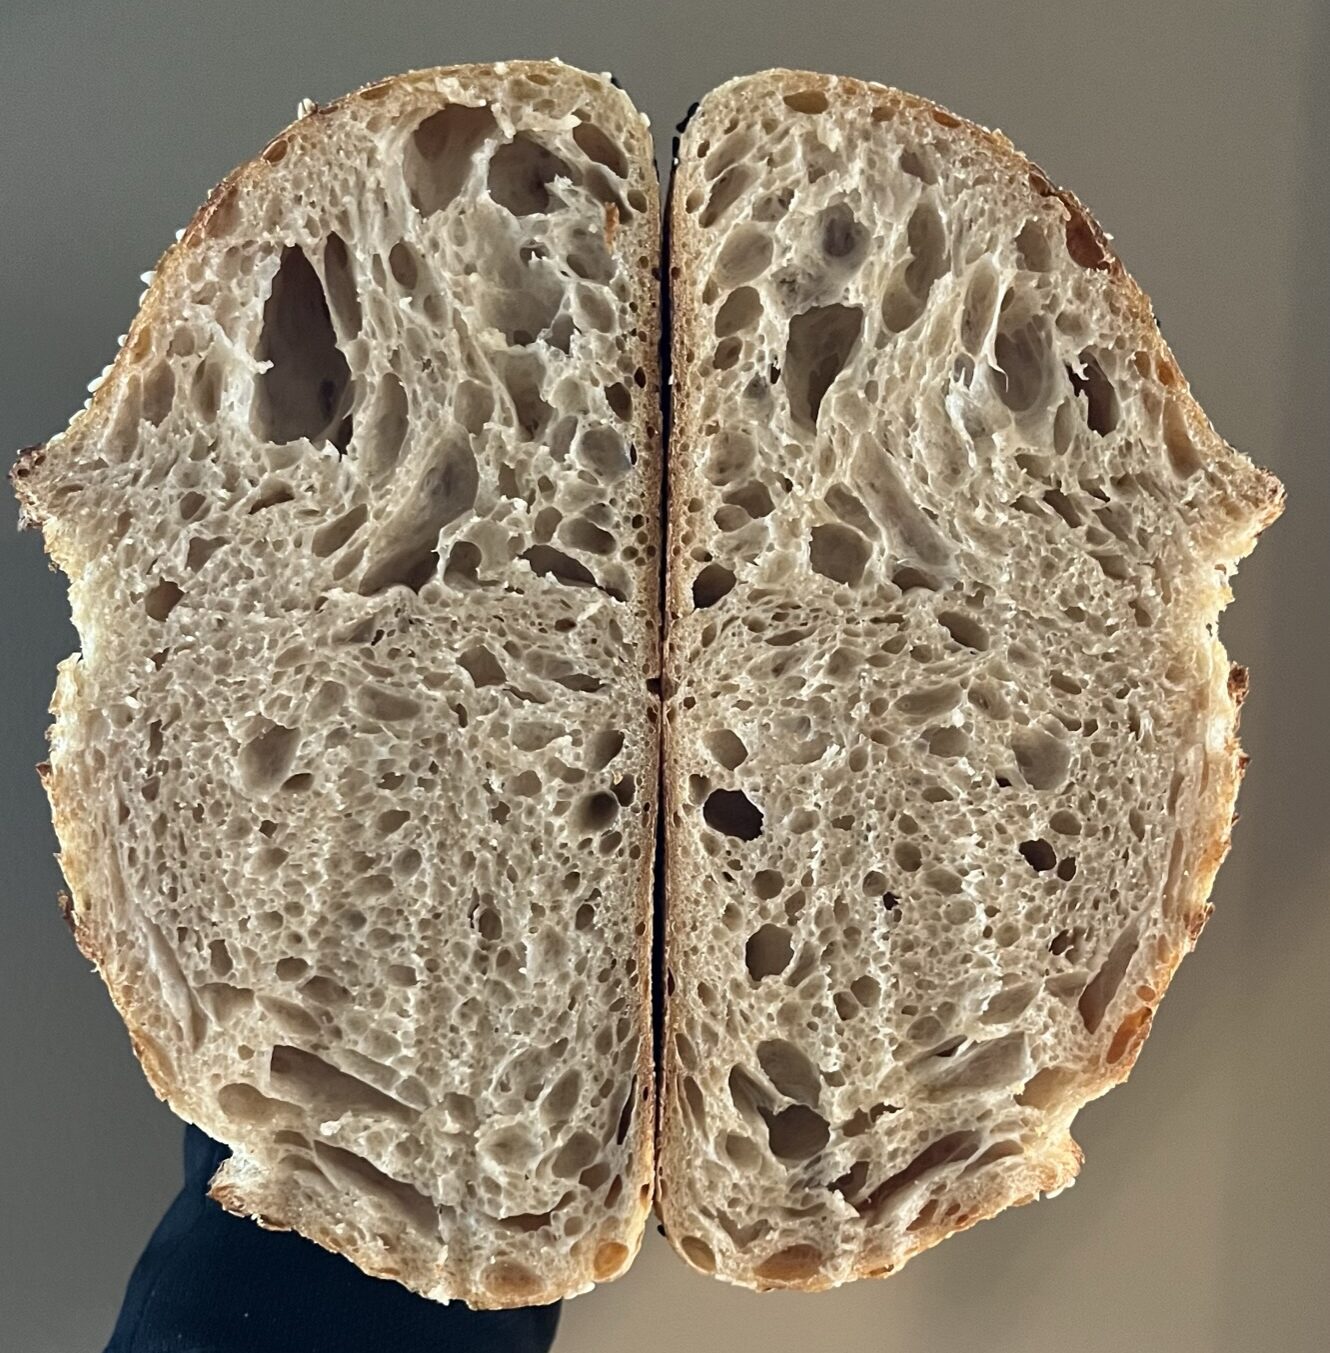
5) Incredible texture and flavor
Once you try this method, you may never go back to other approaches. The long, cool bulk fermentation creates a wonderfully complex flavor with a very tender crumb. Many bakers are shocked at the difference in the flavor and texture created by this method.
How Does It Work?
When I began using this method, I was skeptical that it could actually work. I had been baking sourdough for many years and assumed it was impossible to finish bulk fermentation in the refrigerator. I was wrong. I learned about this method from Michael Kalanty’s book, “How to Bake More Bread,” and I strongly recommend Michael’s book. He advised me on the creation of the video and he has been wonderfully helpful.
The following chart shows how and why this method works.
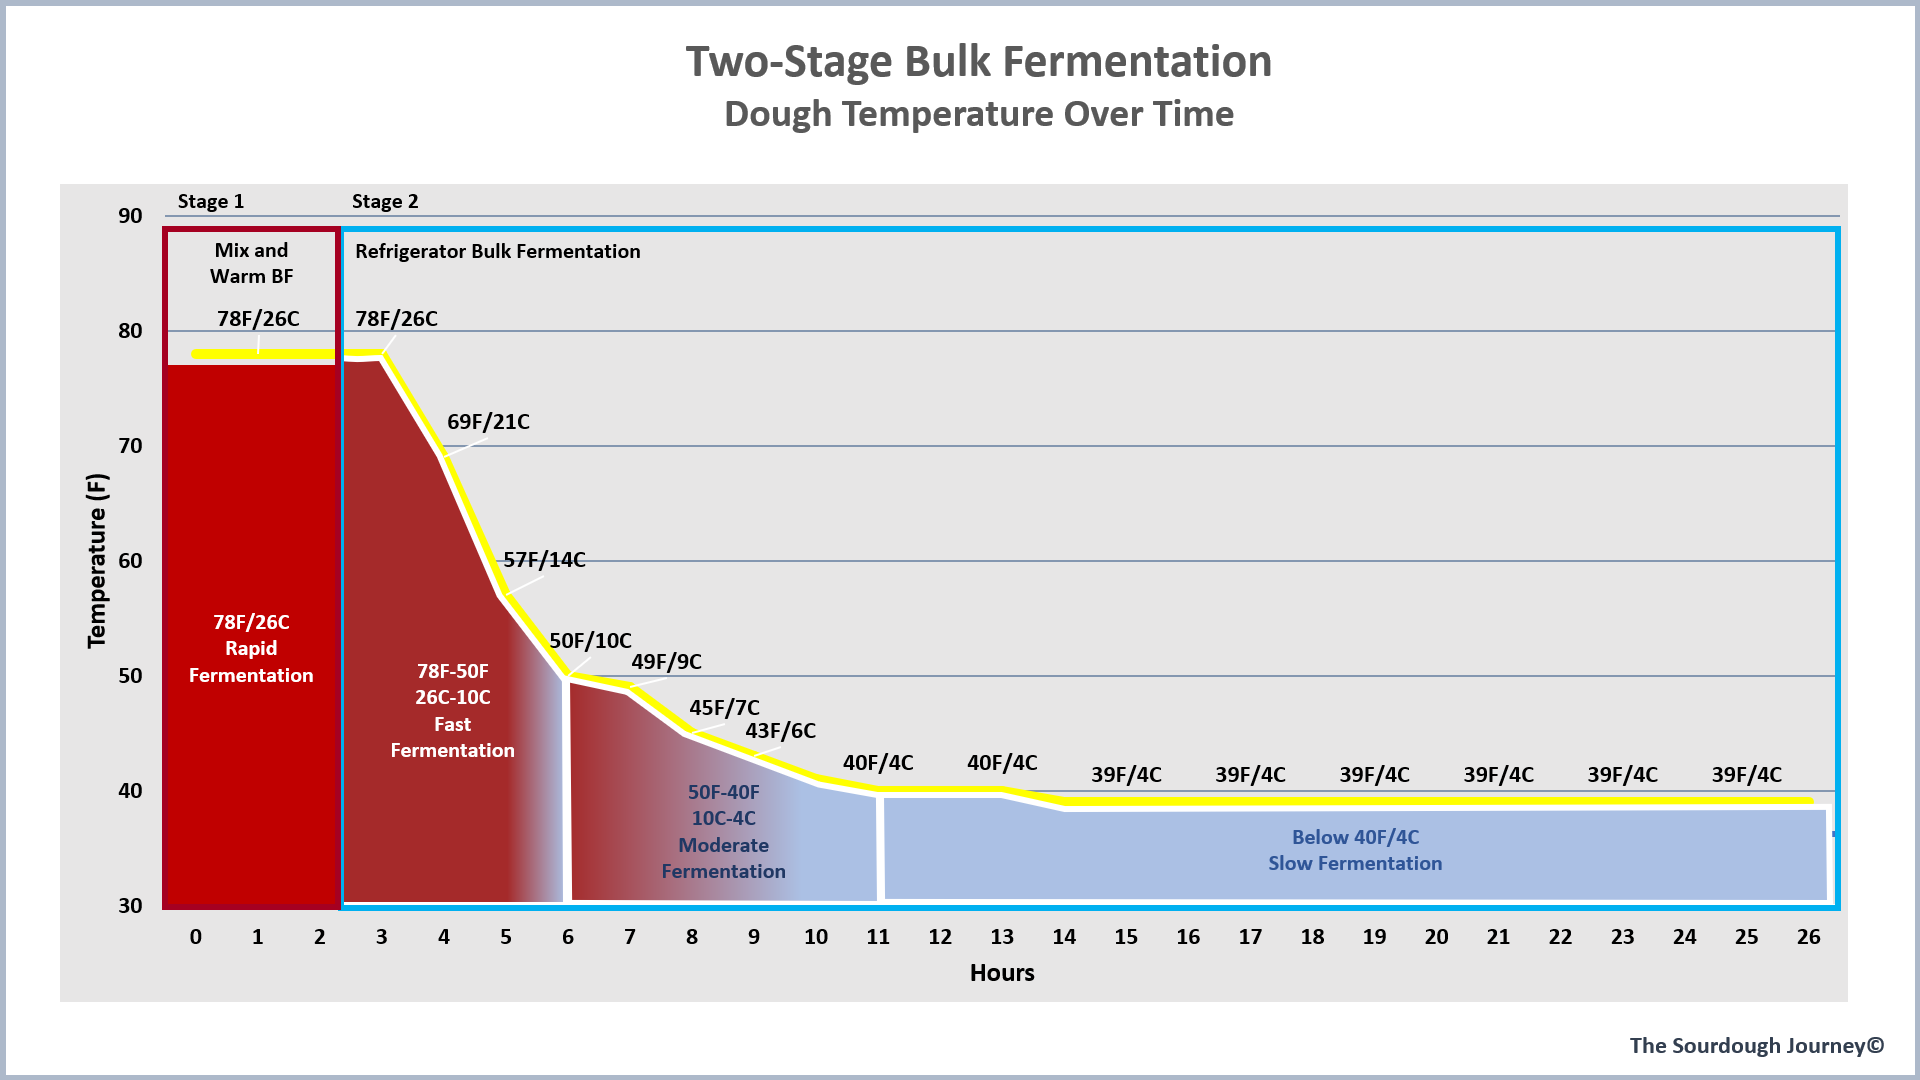
When you move the warm dough into the refrigerator for the second stage of bulk fermentation it takes a long time to get down to refrigerator temperature. During that time, the dough is still rapidly fermenting.
By getting the dough into the refrigerator with a fast, warm start to the fermentation process, it continues on a glide path down to refrigerator temperature (in about 12 hours) and comes in for a perfect soft landing at the end of bulk fermentation. The ending timing is quite flexible once the dough gets down to the refrigerator temperature of 39F/4C. I recommend starting with 24 hours as your Stage Two baseline, then experiment with removing the dough from the refrigerator earlier based on scheduling requirements, if needed.
The Importance of Initial Dough Temperature
The key to making this method work is mixing and maintaining the initial dough temperature to ensure the dough gets off to a strong start to bulk fermentation before it goes into the refrigerator for Stage Two. You’ll want to familiarize yourself with the Desired Dough Temperature Calculation (here is a good example) and develop your skills at adjusting the water temperature to hit the initial target.
In addition to hitting the initial dough temperature, it is also important to maintain the dough temperature, so the dough goes into the refrigerator at 78F/26C for Stage Two. Many bakers use a proofing chamber such as using their oven with the light on, or an electric dough proofer if your kitchen is too cool.
Shaping, Final Proofing and Baking
At the end of Stage Two, you’ll want to bring the refrigerated dough up to room temperature before shaping it. You don’t want to shape cold dough. You can either put your dough in your proofer (78F/26C) for about an hour or leave it on your countertop for about two hours. After the dough warms up, follow your standard method of pre-shaping and final shaping the dough.
After the dough is shaped you have the option of doing a countertop final proof, or a refrigerator cold retard / final proof. If you choose to do a countertop final proof, use the “poke test” to determine when the dough is ready to bake. If you are doing a refrigerator cold retard / final proof, you can leave the dough in the refrigerator for 12 to 24 hours (sometimes longer if your refrigerator temperature is 37F/3C).
Troubleshooting
The guidance described here and in the instructional video is for a typical “country loaf” made with 90% bread flour, 10% whole wheat, 75% hydration, 20% starter, and 2% salt. Everyone’s starters and flour choices may ferment faster or slower than others. Your results may differ.
Underproofing
If your dough is underproofed (which is uncommon with this method), your dough needs more time or a warmer temperature in Stage One of the bulk fermentation. Try adding an extra hour in Stage One or mixing the dough at a warmer dough temperature. Also ensure that you are maintaining the target dough temperature throughout Stage One. The target temperature as the dough goes into the refrigerator is critically important. If you undershoot the target dough temperature in Stage One, you cannot make up for it by adding more time to Stage Two. All the action happens in Stage One and in the first few hours of Stage Two.
Overproofing
If your dough overproofs, it is typically because your refrigerator is too warm. Place a few cups of water on different shelves in your refrigerator and test the water temperature after 12 and 24 hours. That water temperature is essentially what your dough temperature will be in that location in your refrigerator. A cup of water is a loaf of dough without the flour! If your dough is overproofing, find a colder spot in your refrigerator. If you are in the coldest spot in your refrigerator and the dough is still overproofing, consider cutting back on your Stage One bulk fermentation time (e.g., 2.5 hours instead of 3 hours), or reduce your initial dough temperature (e.g., 74F/23C).
Typical Schedule Options
The thing I love most about this method is the schedule flexibility. Here are some of my favorite schedules:
Weeknight Baking – 3-day schedule
· Wednesday night – Mix the dough and Stage One bulk ferment at 78F/26C for 3 hours. Dough goes into the refrigerator by 10 pm.
· Thursday night – Bring dough up to temperature. Shape the dough. Place shaped dough back into the refrigerator.
· Friday afternoon/evening – Bake the dough.
Weekend Loaves – 3-5 day schedule
· Follow the same steps as above on Wednesday and Thursday, but bake the loaves any time on Saturday or Sunday.
Daily Bread
· Saturday morning – Mix triple batch of dough. Stage 1 Bulk Ferment at 78F/26C for 3 hours. Dough goes into refrigerator.
· Sunday morning – Bring dough up to room temp and shape the dough. Two loaves go into the refrigerator for cold final proof. Once loaf final proofs on the countertop. Bake the loaf on Sunday.
· Monday anytime – Bake Loaf #2 from fridge.
· Tuesday anytime – Bake Loaf #3 from fridge.
Results of Experimental Bakes
Below are the results of three experimental bakes featured in the video, “Sourdough Breakthrough: Two-Stage Bulk Fermentation.” All three loaves used the same recipe: 90% Bread Flour, 10% Whole Wheat, 75% Hydration, 20% Starter, 2% Salt. Consult the video for full details.
Loaf #1
Stage 1 BF: 3 hrs @ 80F/27C
Stage 2 BF: 12 hrs in fridge (39F/4C)
Final Proof: 24 hrs in fridge |
|
Loaf #2
Stage 1 BF: 2.5 hrs @78F/26C
Stage 2 BF: 18 hrs in proofer at 50F/10C
Final Proof: 24 hrs in fridge |
|
Loaf #3
Stage 1 BF: 2.5 hrs @78F/26C
Stage 2 BF: 24 hrs in fridge (39F/4C)
Final Proof: 24 hrs in fridge |
|

Results
The results of the three loaves were surprisingly similar. This experiment demonstrates the effectiveness and flexibility of this method. The initial dough temperature of 78-80F/26-27C and 2.5 to 3 hours at that temperature are the most critical element of this method. Wide variations in Stage Two times and temperatures resulted in minimal impact on the final outcome of the loaf.
The flavor of all three loaves were similar. The longer cold bulk fermentation does not create a more sour loaf as one may expect. The flavor is more “complex” but not really more sour. The long cold retard is what creates the sourness in the loaf. If you prefer a less sour loaf, cut the final proof shorter.
How to Learn More About These Methods
To learn more about how to adjust your methods for over or underproofing, check out the second half of this video, “Post Pandemic Sourdough for Busy People: The Low and Slow Method.”
To learn more about controlling dough temperatures, check out this video, “Bulk Fermentation: Mastering Temperature and Time.”
Also, check out my website at thesourdoughjourney.com for lots more helpful information and tools.

Review: Sourdough Proofers and Temperature Control Devices (2025 Update)
What are the best sourdough temperature control devices?
2025 Gift Guide for Sourdough Bakers
Looking for gift ideas for a special sourdough baker? Check out my 2025 gift guide!
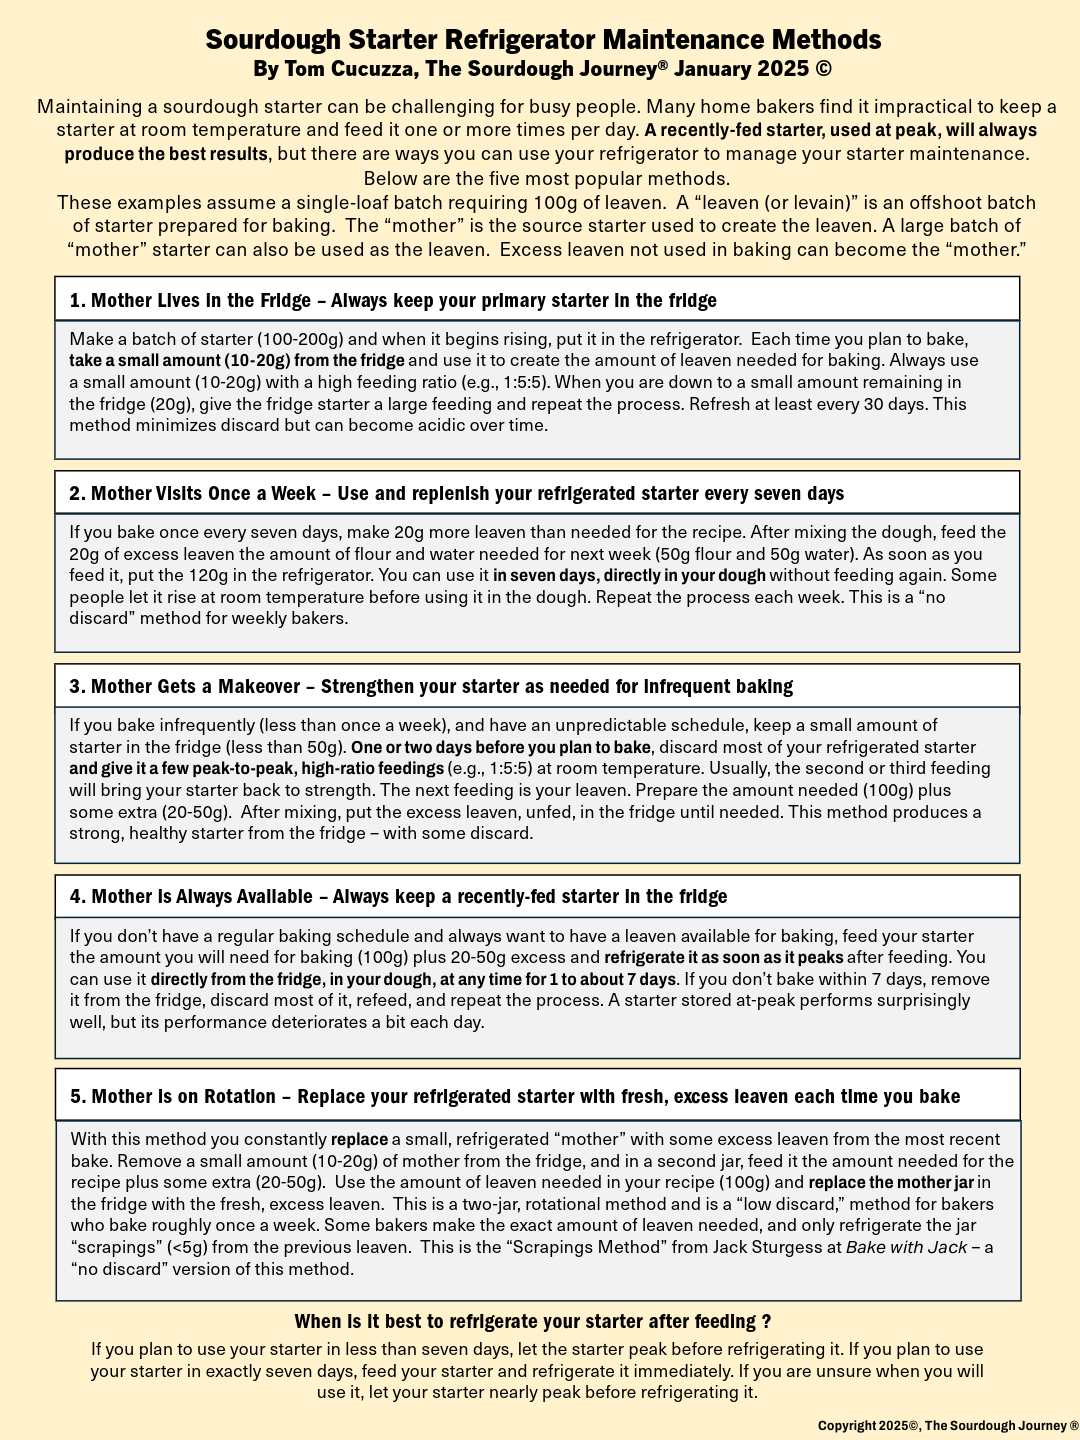
Sourdough Starter: Refrigeration Maintenance Methods
How can I maintain my sourdough starter in the refrigerator instead of at room temperature?
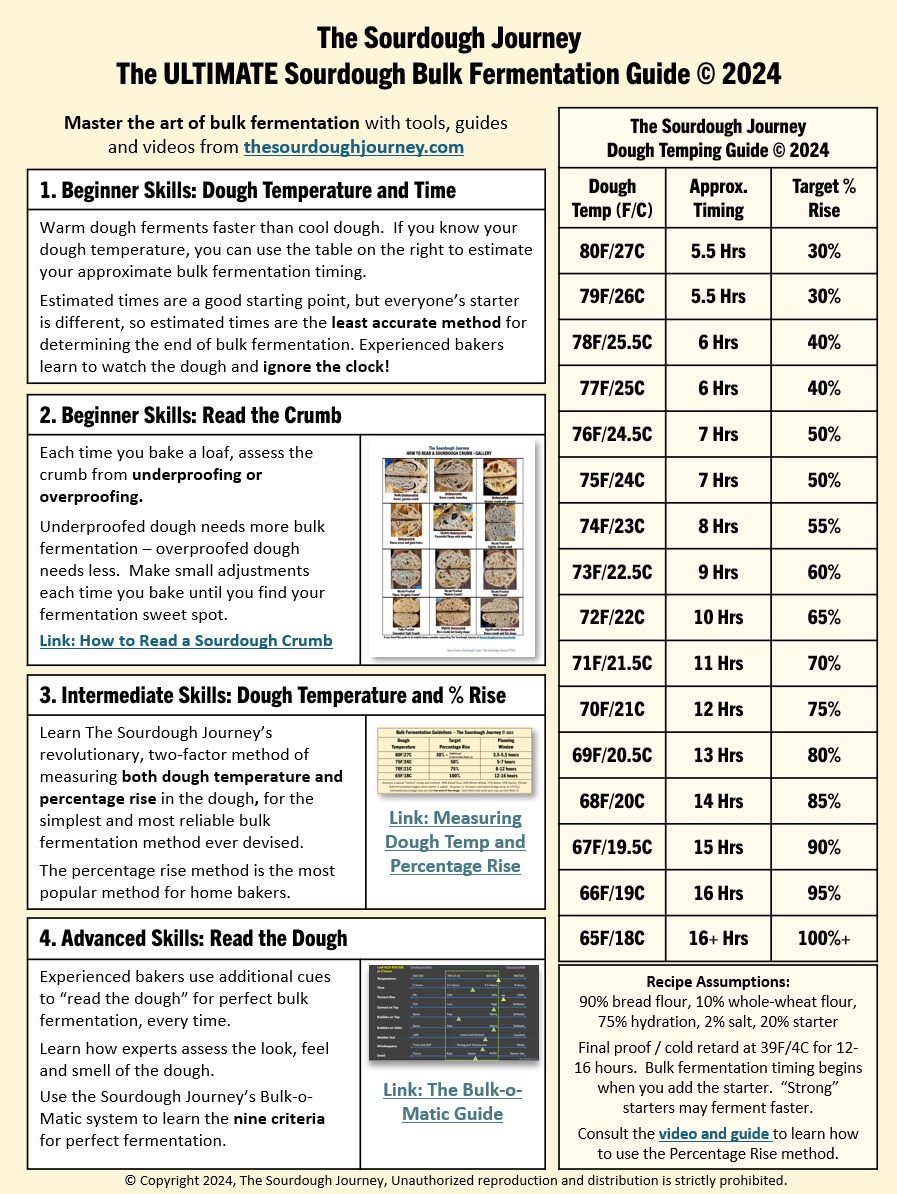
The ULTIMATE Sourdough Bulk Fermentation Guide
When is sourdough bulk fermentation finished?

Dough Temping for PERFECT Sourdough Fermentation
What is sourdough “dough temping,” and how does it work?