How to Create a New Sourdough Starter in 10 Days
By Tom Cucuzza, The Sourdough Journey, October 2023
You should be able to create a new sourdough starter in 10-14 days by following this method. Your results may differ, as every bag of flour contains a different microbial population. But this is a very reliable method, and all new starters follow the growth cycle.
Step-by-Step Videos
This document is a companion to my popular YouTube video “How to Create a New Sourdough Starter: Step-by-Step. I highly recommend watching and following that video. It includes much more detail than this document. Also, check out my new follow-up video The First 10 Days of Your New Sourdough Starter.
What do you need?
I recommend using 50% whole wheat flour and 50% bread flour (or all-purpose flour). Contrary to what you may hear elsewhere, it is very difficult to get a new starter established with 100% all-purpose flour or 100% bread flour. You can also use 25% rye flour with 75% all-purpose or bread flour.
Use non-chlorinated water. You can use filtered tap water, bottled water, etc. Do not use distilled water.
Prepare your flour blend for feeding
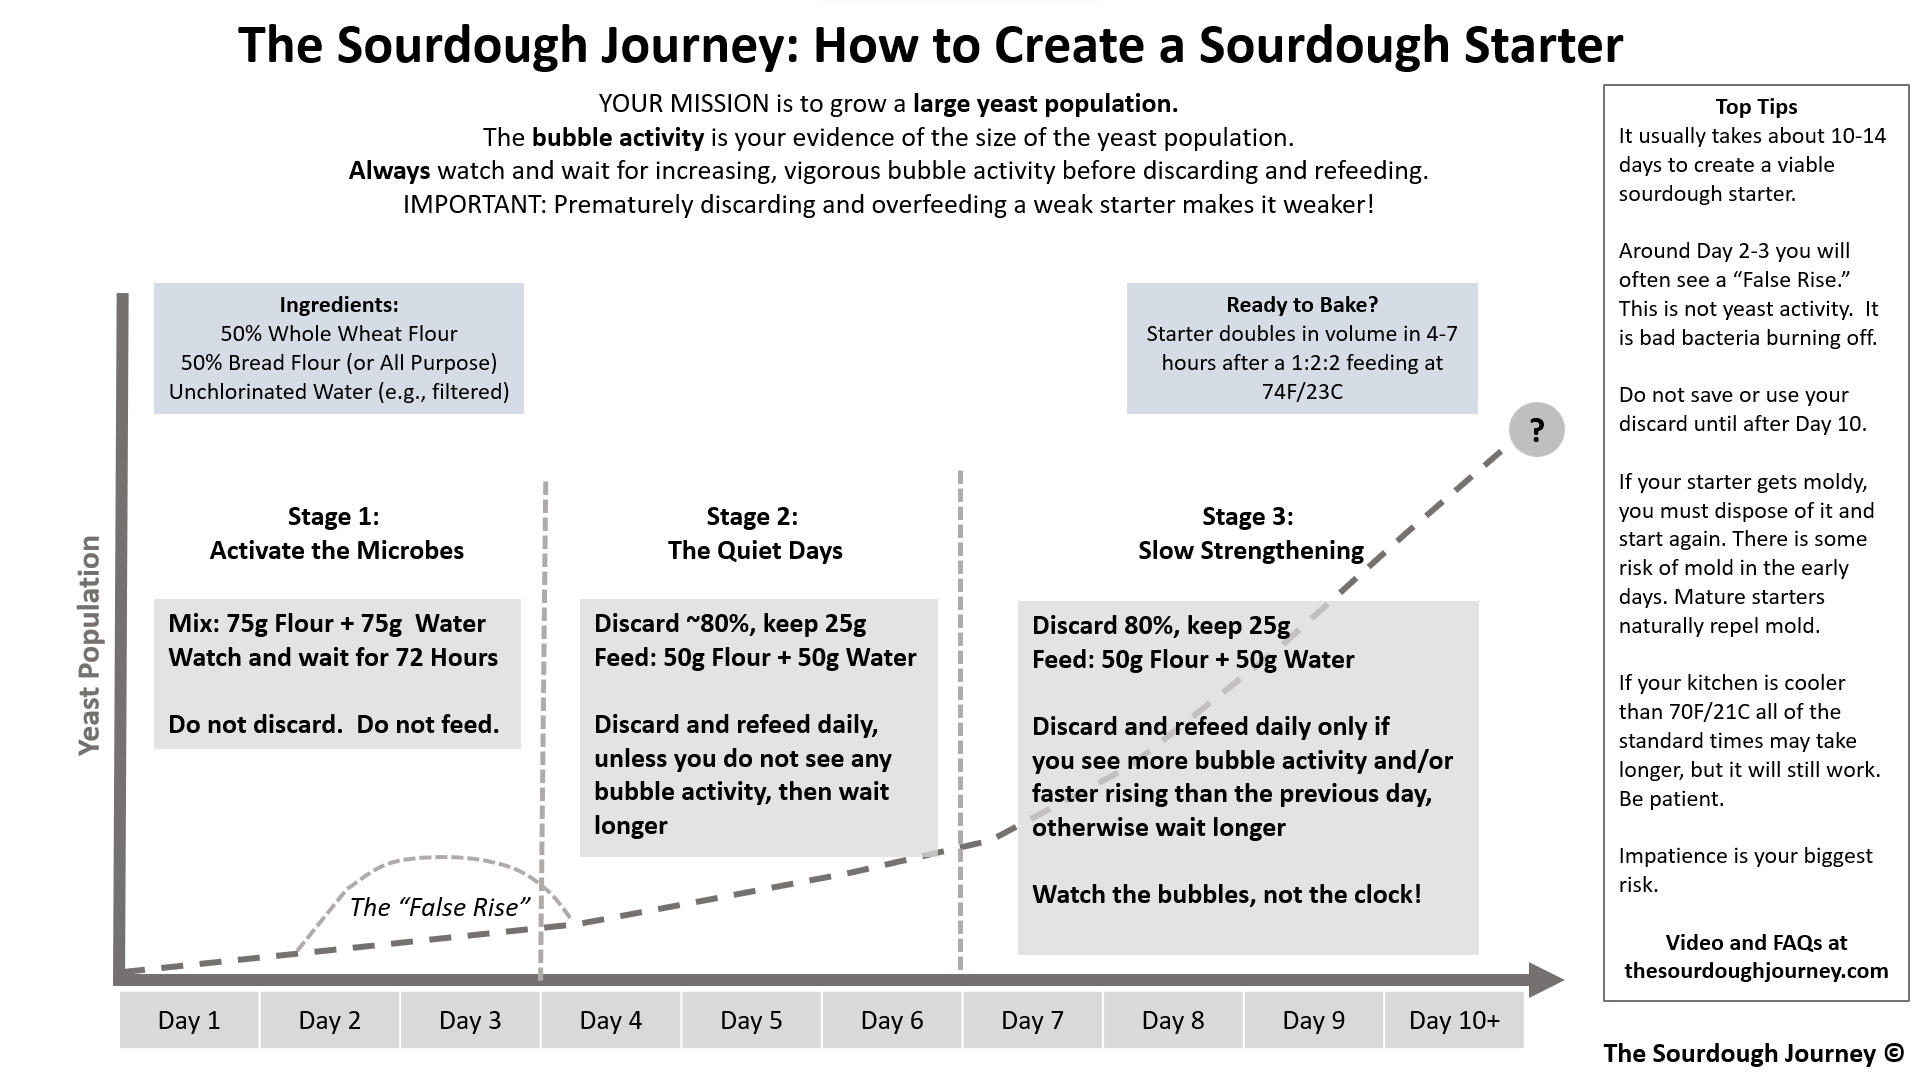
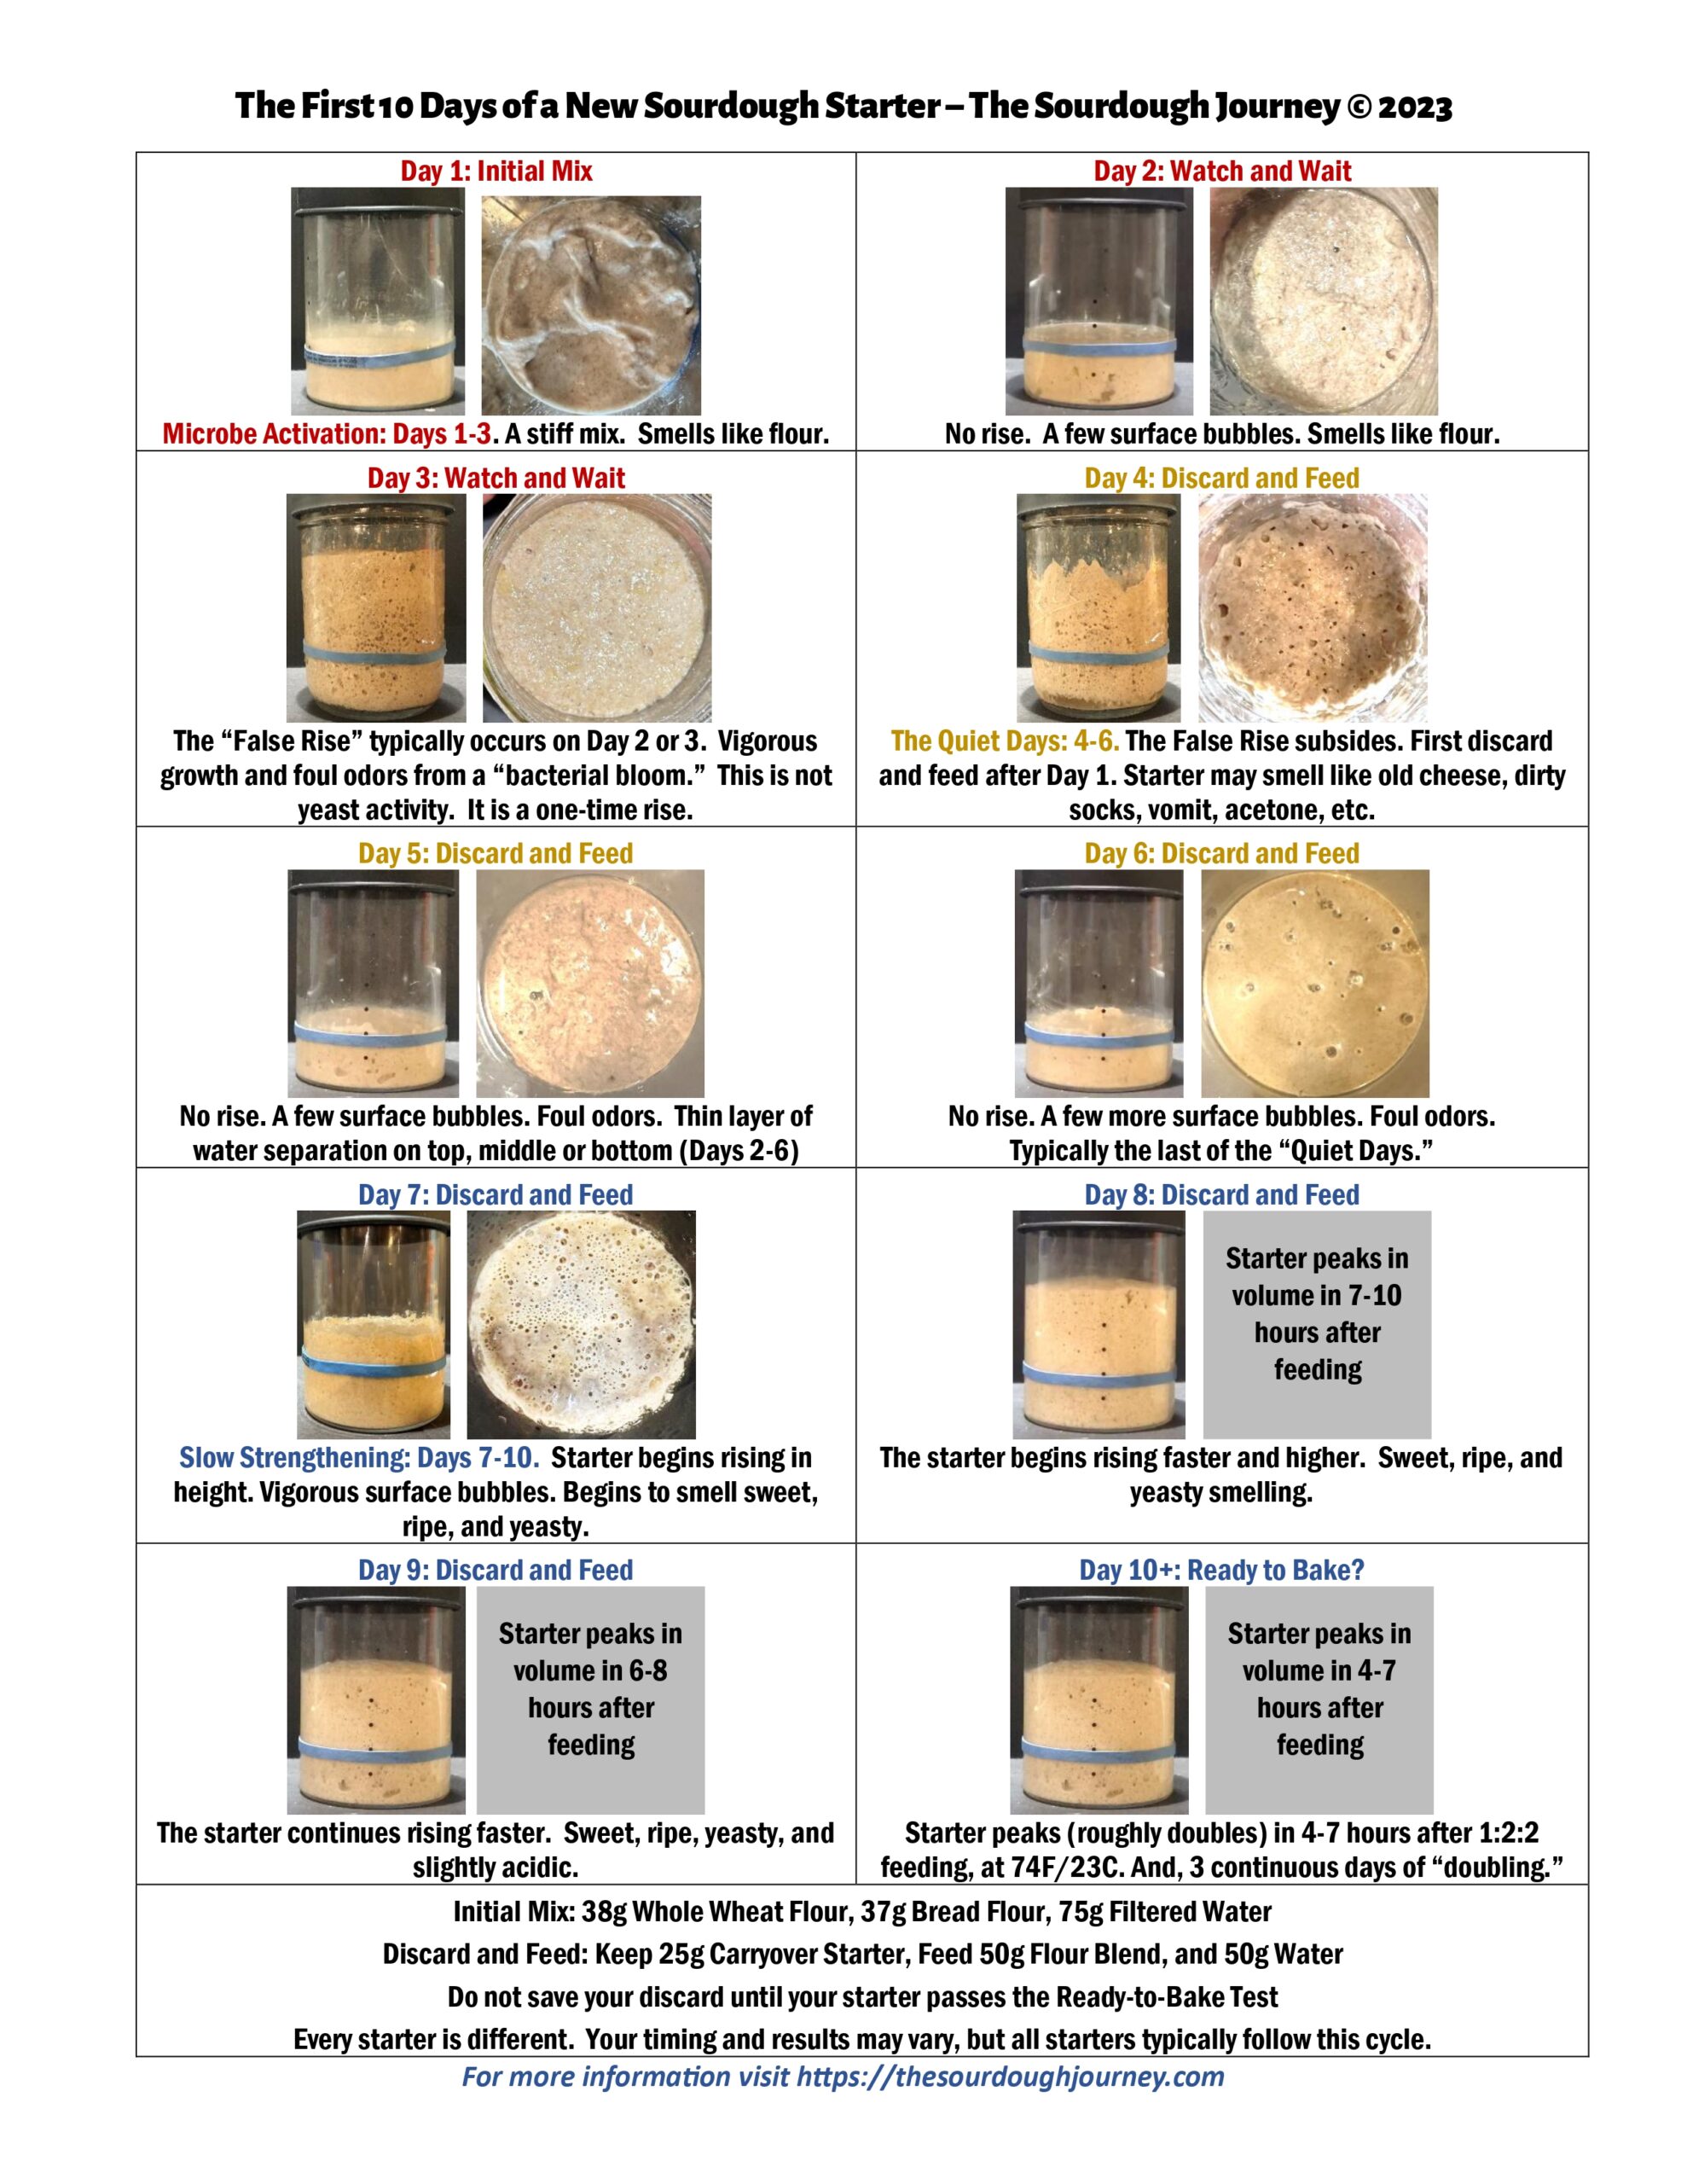
Phase 1: Days 1-3 – Activating the Microbes
Day 1: Mix 75g of your flour blend (38g Whole Wheat Flour, 37g Bread Flour if you didn’t pre-blend them), and 75g Water (filtered tap water)
Day 2: Do not feed or discard. Stir at least once a day. Stir in a spoonful of water if dry on top.
Day 3: Do not feed or discard . Stir at least once a day. Stir in a spoonful of water if dry on top.
On Day 2 or Day 3 you will typically see vigorous bubble activity and a rapid rise in your starter. This is commonly known as the “False Rise.” It is not yeast activity. It is a bacterial bloom as all of the nasty bacteria in the flour burn off of your starter. It can also smell pretty foul. That is normal.
On Day 2 or 3, if your starter looks like it is drying out on top, stir it up every 12 or 24 hours. If you see water separation on the top, middle or bottom of your starter, stir it up.
When creating a new sourdough starter, it is also at risk of developing mold (there are mold spores everywhere, including in many bags of flour!) Be on the lookout for mold, but it is very uncommon.
Phase 2: Days 4-6 – The Quiet Days
Day 4: Discard all but 25g. Feed 50g Flour Blend and 50g Water
On Day 4, your starter will usually not rise, and you may see a few bubbles on the surface of your starter, and it may smell like old cheese or other strange odors.
Day 5: Discard all but 25g. Feed 50g Flour Blend and 50g Water
On Day 5, your starter will usually not rise, and you should see a few more bubbles than you saw on Day 4. It will be slow and can smell foul.
Day 6: Discard all but 25g. Feed 50g Flour Blend and 50g Water
On Day 6, your starter may rise, and you should see a few more bubbles than you saw on Day 5. Your starter may smell like old cheese, dirty socks, baby vomit and/or acetone. These smells are normal, and they will go away in the next few days.
Your starter will seem very quiet these three days, especially after seeing the False Rise on Day 2 or 3. It is perfectly normal. Stick with the plan. Resist the temptation to try something different or seek out other information. There is a lot of information on social media about sourdough starters, and most of it is wrong.
Phase 3: Days 7-10 – Slow Strengthening
Day 7: Discard all but 25g. Feed 50g Flour Blend and 50g Water
On Day 7, your starter should begin bubbling more vigorously and rising. It will begin to smell sweet, ripe and acidic.
Day 8: Discard all but 25g. Feed 50g Flour Blend and 50g Water
On Day 8, your starter should begin vigorously rising after feeding. It may rise and peak in about 6-8 hours after feeding. It should smell sweet, ripe, yeasty and slighly acidic.
Day 9: Discard all but 25g. Feed 50g Flour Blend and 50g Water
On Day 9, your starter should peak (roughly double in height), in 4-7 hours after feeding. It should smell sweet, ripe, yeasty and slightly acidic.
Day 10+: Discard all but 25g. Feed 50g Flour Blend and 50g Water
On Day 10, your starter should continue peaking (roughly double in height) in 4.-7 hours after feeding. It should smell sweet, ripe, yeasty and slightly acidic.
When is my starter ready to bake?
If you follow these steps, it normally takes about 10-14 days for your starter to be ready to bake. The “Ready-to-Bake” test is your starter should peak (roughly double in height) 4-7 hours after a 1:2:2 feeding at 74F/23C. It should do this for three consecutive days.
Here is an example of what this starter should look and smell like in Days 1-10. Every starter is different, but you’ll likely see this pattern, possibly faster or slower than what is shown here.
Troubleshooting
If your starter is not following the cycle outlined above, check out these troubleshooting tips. Sourdough Starter Troubleshooting Tips – 10 Pro Tips | The Sourdough Journey
See the FAQ page for more details at https://thesourdoughjourney.com/faq-starter-creation/
Once your starter is ready to bake, you can also begin saving your discard and using that in discard recipes if you prefer. There are also many methods to reduce or eliminate discarding on an ongoing basis. You can learn more on my website at https://thesourdoughjourney.com/faq-starter-maintenance/

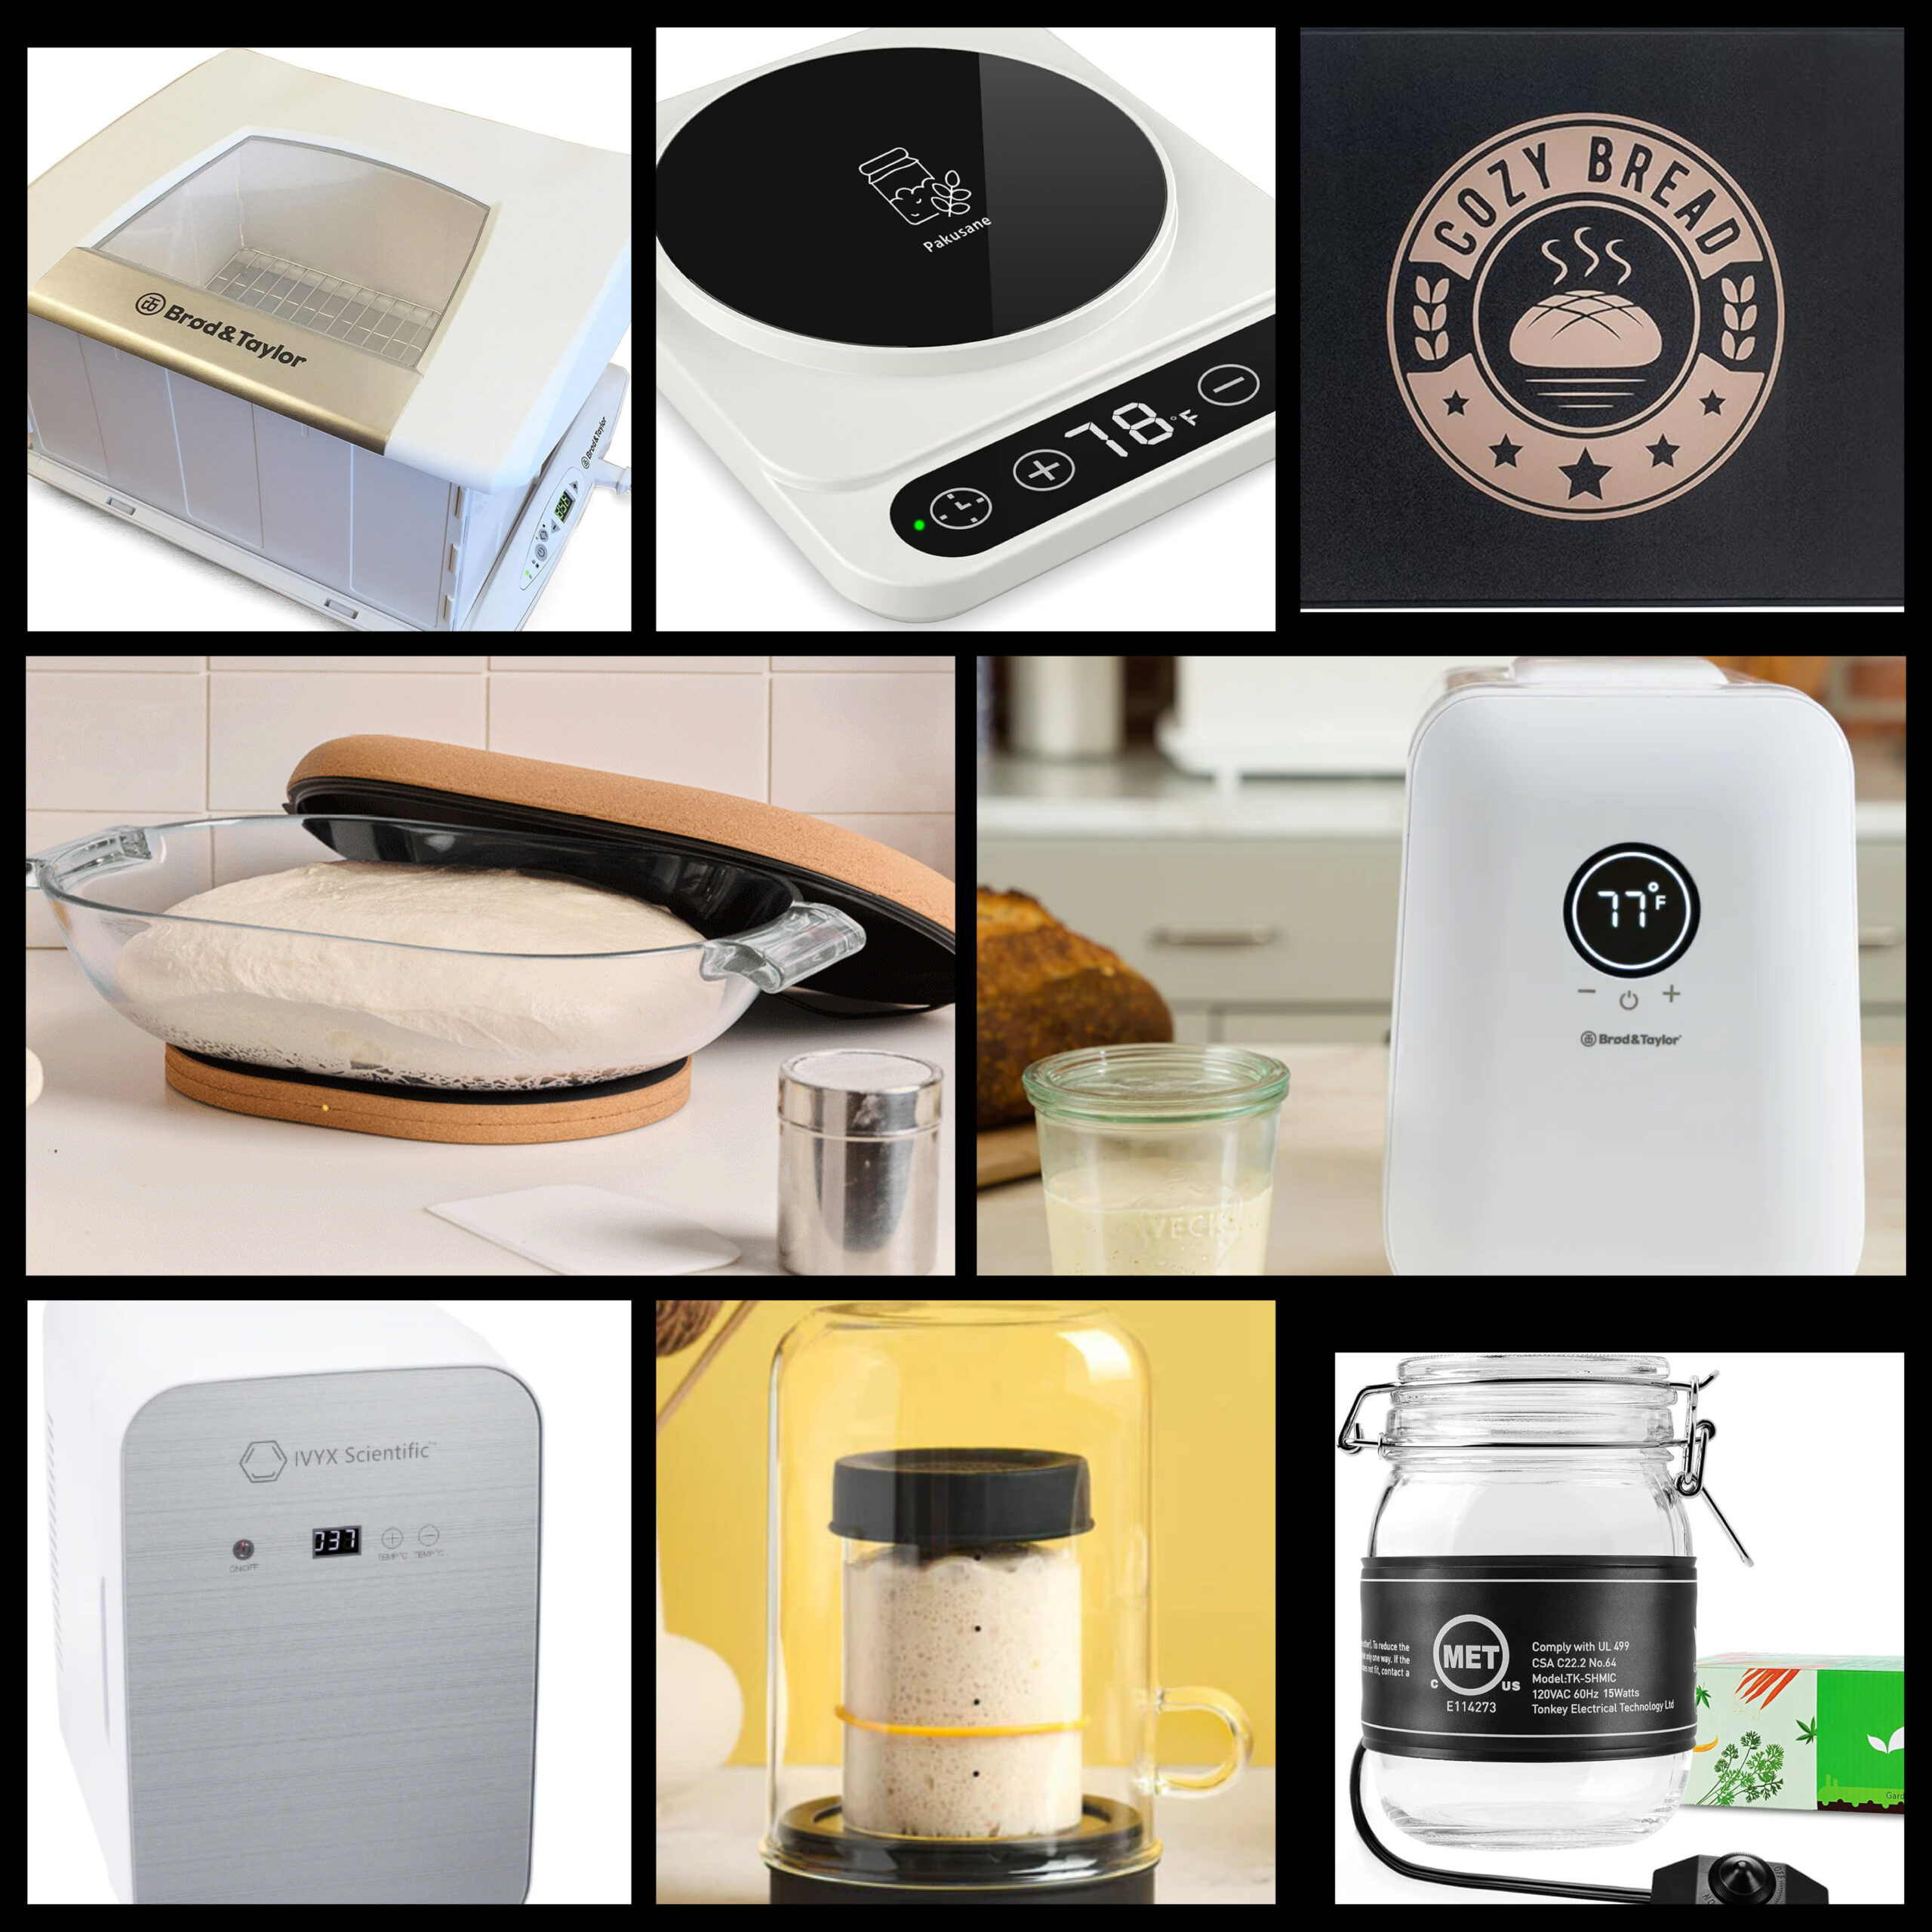
Review: Sourdough Proofers and Temperature Control Devices (2025 Update)
What are the best sourdough temperature control devices?
2025 Gift Guide for Sourdough Bakers
Looking for gift ideas for a special sourdough baker? Check out my 2025 gift guide!
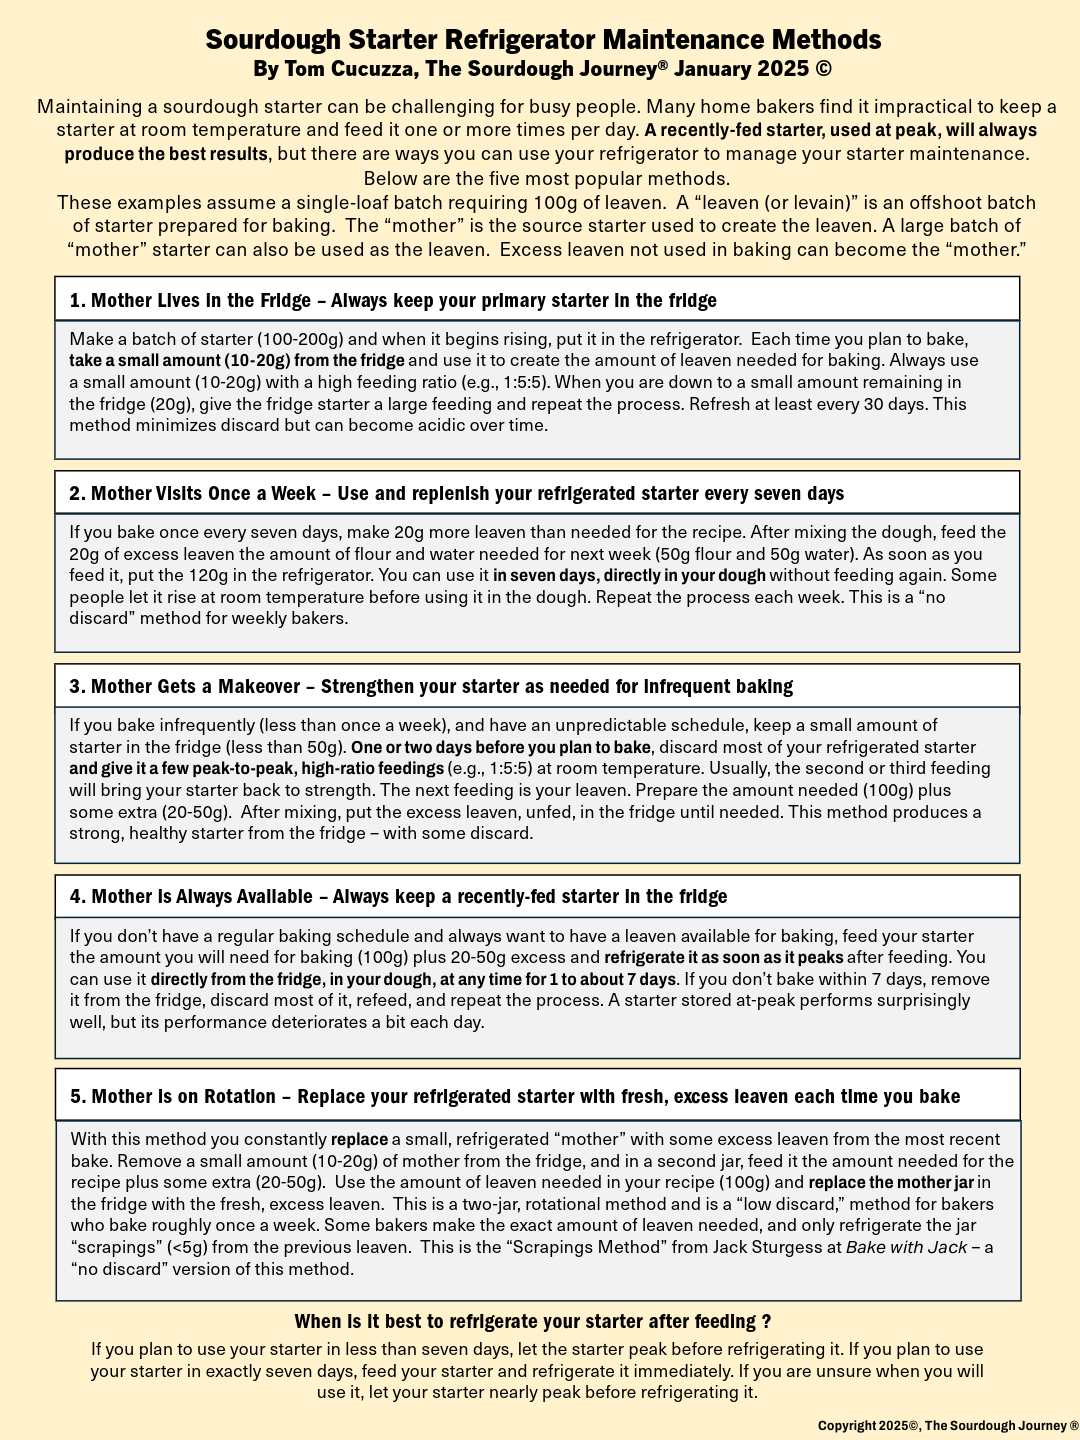
Sourdough Starter: Refrigeration Maintenance Methods
How can I maintain my sourdough starter in the refrigerator instead of at room temperature?
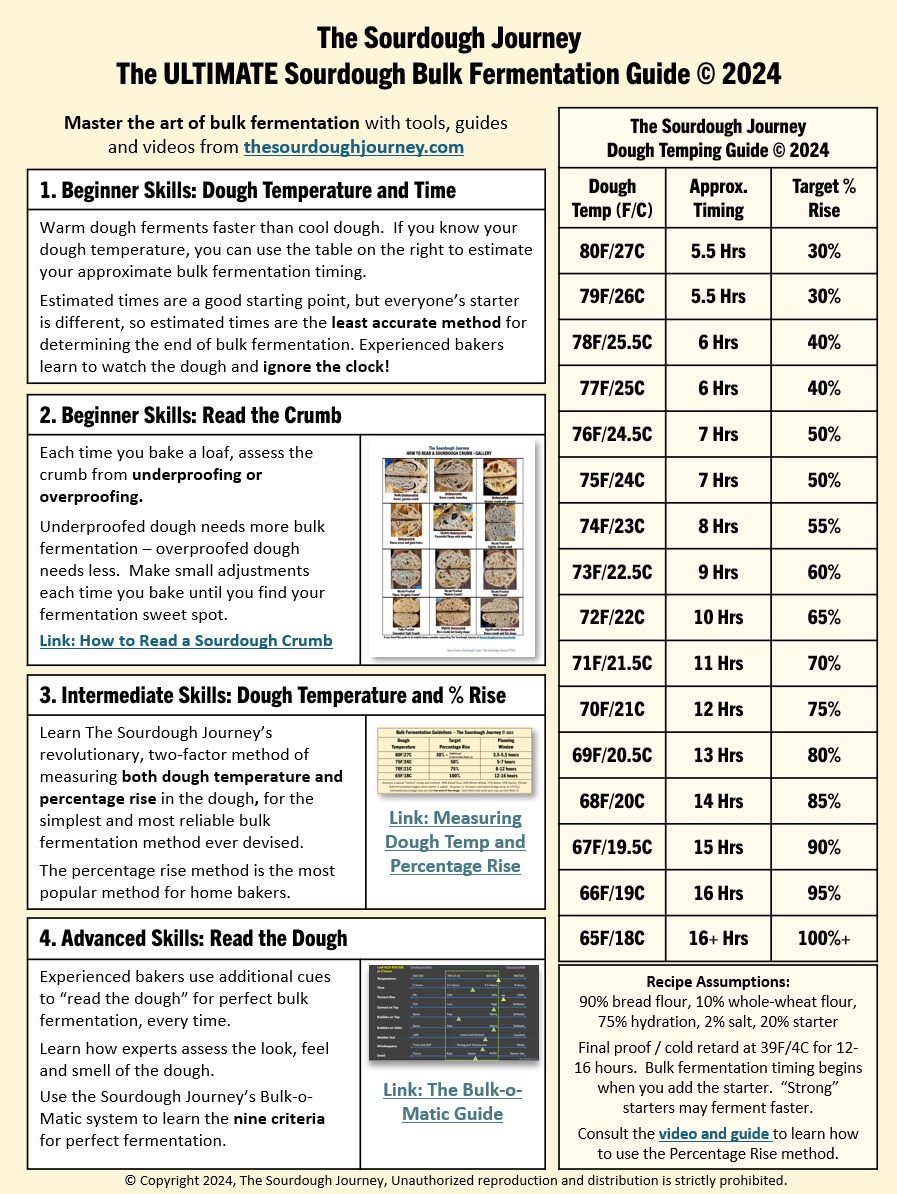
The ULTIMATE Sourdough Bulk Fermentation Guide
When is sourdough bulk fermentation finished?

Dough Temping for PERFECT Sourdough Fermentation
What is sourdough “dough temping,” and how does it work?