Creating a new sourdough starter seems simple, but it can actually be challenging. There is a certain amount of luck involved, because the dormant microbes (yeast and lactic acid bacteria) come from each unique bag of flour. Some flours are more microbe-rich than others.
You can acquire a sourdough starter online (e.g., the King Arthur website), you can sometimes buy one from a local bakery, or you can acquire one from a sourdough baker in your area.
But if you are up for the challenge of creating your own starter, you will find all of the tools here. I’ve created many over the years and have had good luck, but many new bakers struggle.
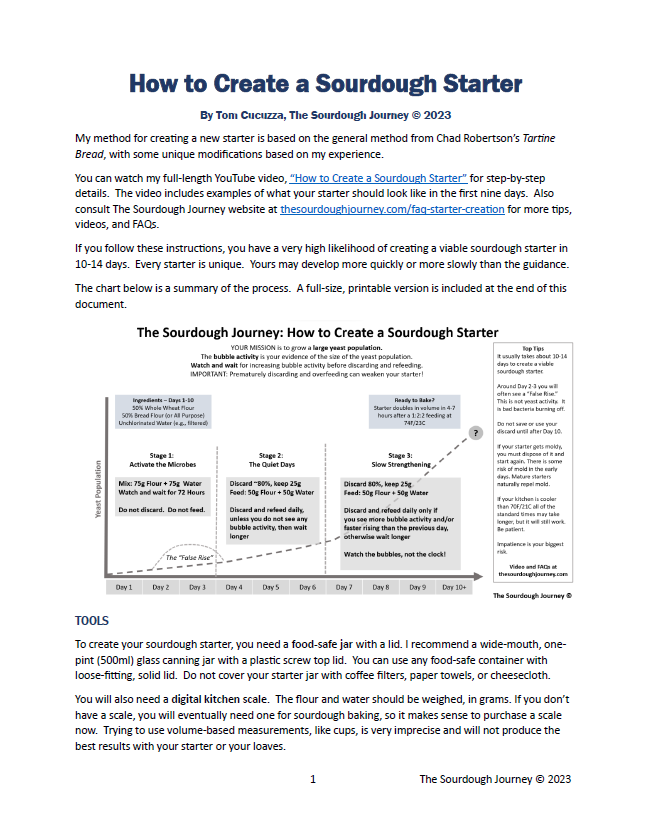
If you are interested in creating a new sourdough starter, I highly recommend watching the video posted below. It goes into all of the details needed to understand the process.
You can create a sourdough starter by just combining flour and water. However, it will take about 10-14 days. You need patience, but once you create your sourdough starter it will literally outlive you and you can pass it on to future generations.
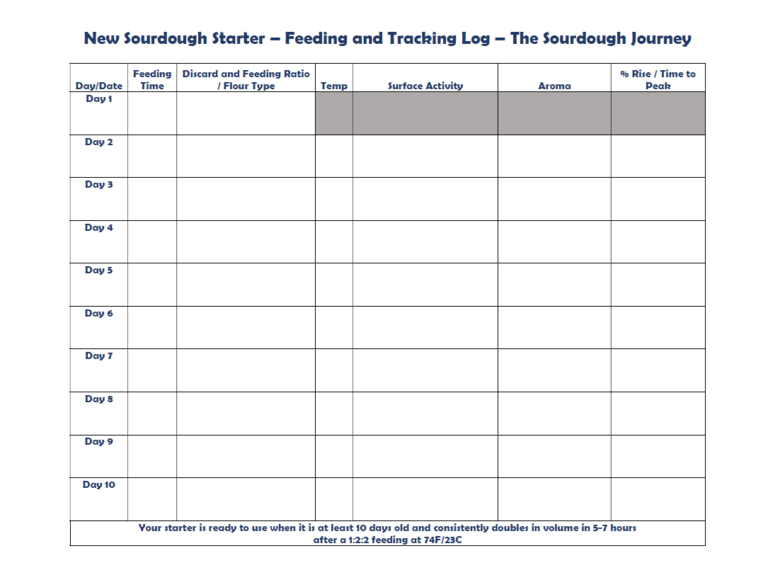
Consult the video below for all of the details, but the basic process involves:
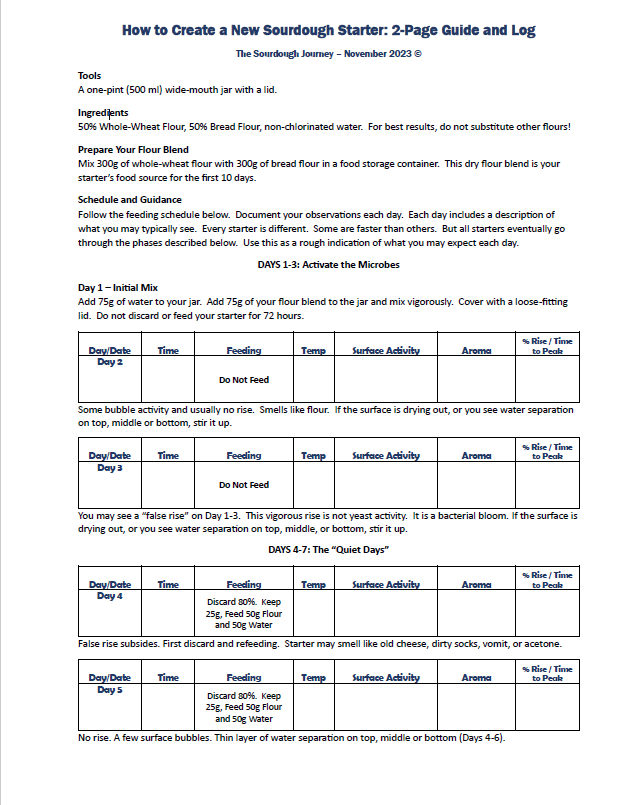
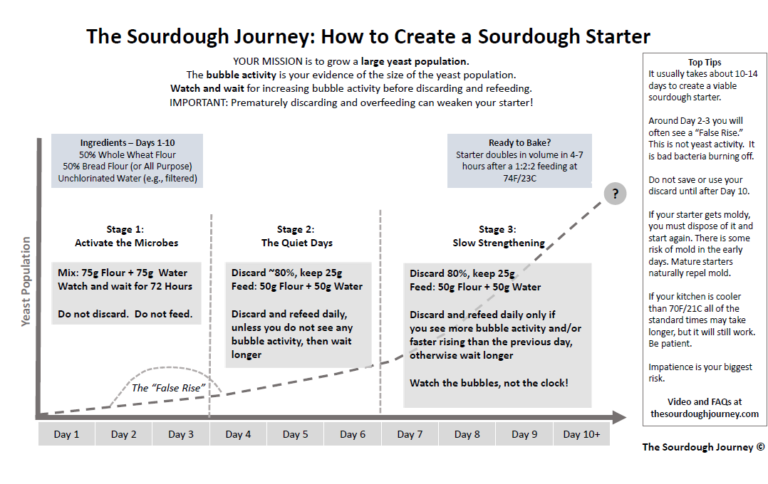
- Combine a 50/50 mix of whole wheat flour and bread flour. This will be the food for your starter for the first 10 days.
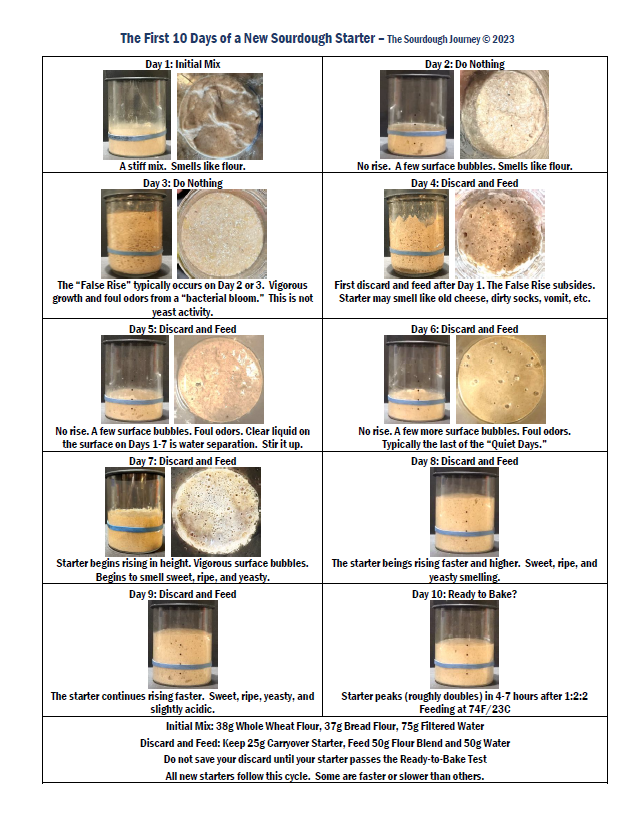
- On Day 1, mix 75g of your flour blend with 75g of water. Let it sit untouched for 3 days. You may see a lot of activity in this time. The is the “false rise” or bacterial bloom. It is often mistaken for yeast activity, but it is not.
- On Days 4-6 (the Quiet Days), you will discard all but 25g of the previous day’s starter and feed it 50g of your flour blend and 50g water. You will see slow activity each day, but should see increasing bubbles on the surface before you discard and feed each day.
- On Days 7-10 (Slow Strengthening), the starter should begin rising after it is fed. The time it takes to rise and peak should shorten each day. You want to see a faster and faster rise time as the starter strenghtens.
- Days 10-14 (Ready to Bake?): On Days 10-14 you should asses your starter each day to see if it is ready to bake. Your starter is ready when it roughly doubles in volume in 4-7 hours after the daily feeding at a temperature of about 74F/23C (cooler starters will rise more slowly).
There are many more important details to understand in the process. Consult the video and the FAQs below before diving in.
The general rule of thumb is that it takes about 10-14 days to develop a starter strong enough to rise a loaf. Experienced sourdough aficionados may be able to bake with a new starter in as few as five days. And, for less experienced bakers who struggle with the process, it may take up to 30 days.
If you follow a proven method, you should be able to bake a loaf around Day 10, and your starter will continue to noticeably strengthen over the first 30 days.
Your starter will continue to mature over time and small but noticeable differences continue to emerge over the first one to five years of starter’s life.
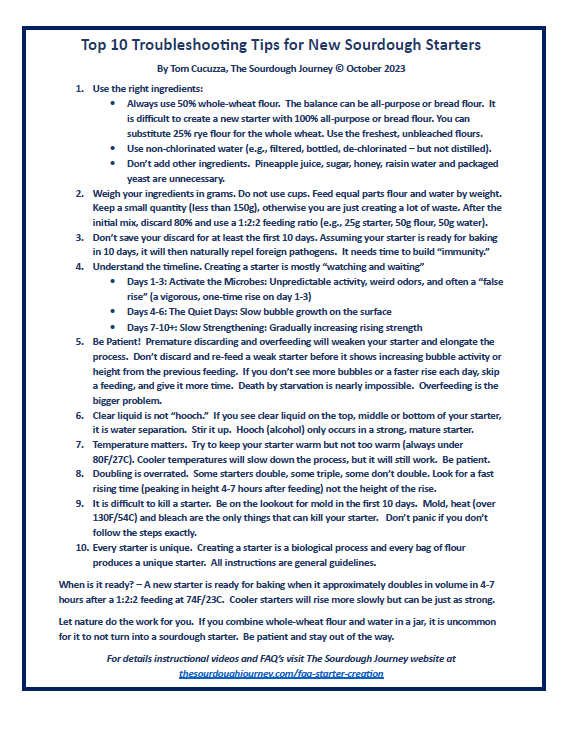
If you have been working on your starter for more than 14 days and it still appears to be very weak or inactive, check out the Top 10 Troubleshooting Tips for New Sourdough Starters for some idea.
If you’ve been working on a new starter for more than two weeks and it is not showing signs of life, you should start over again.
No. It typically takes 10-14 days to create a new starter. The activity you see in the first few days of creating a starter is actually bad bacteria and pathogens burning off of the flour. You definitely do not want to use this for baking. Most starters will show a lot of activity on days 1 and 2, then will go quiet on day 3, then start gradually strengthening each day after that.
No. It is very common for a new starter to go through this cycle. It will be very bubbly and active in the first two to three days. This is actually not yeast activity, it is bad bacteria burning off. Once that bacteria has died off by day 4, or so, the starter will slowly start to favor the yeast and it will gradually increase in strength each day.
Be patient. Many beginners make a mistake at this time of becoming impatient. Some will start discarding and re-feeding twice a day to try to speed it up.
VERY IMPORTANT: Discarding and re-feeding a weak starter before it peaks MAKES IT WEAKER. This is the most common mistake beginners make with their starters. Your starter will unequivocally tell you when it needs a feeding. It will show you post-peak activity. In general, you should always let your starter peak in activity (covered with bubbles, or at peak volume and falling), before discarding and refeeding.
When creating a brand new starter, “peak activity” may only be a few bubbles, but the activity will clearly peak and subside. If you see 20 bubbles and then you see 15 bubbles, it has peaked and subsided.
If you do not see any bubbles, that is NEVER the peak. Do not discard and refeed until you see peak activity.
I have seen hundreds of new bakers unnecessarily prolong their starter creating by becoming impatient and prematurely discarding and refeeding in a misguided effort to speed up the process. It actually slows it down.
Some people will question my guidance and seek another opinion. Other opinions will tell you to start discarding and re-feeding your new starter twice a day to strengthen it. This advice is 100% wrong. I cannot be more clear on this topic.
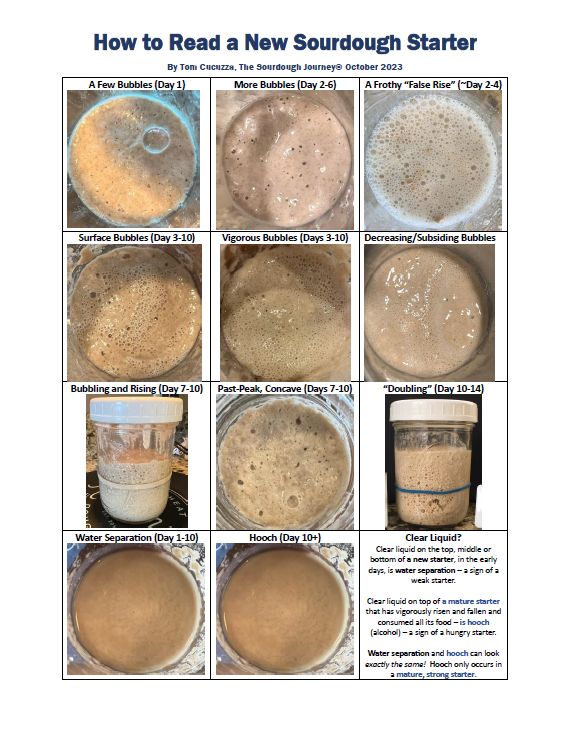
It is nearly impossible for a new starter to be covered with hooch on Day 3.
Hooch is a type of liquid alcohol that forms on top of your starter. However, this only happens with a strong starter that has consumed the entire food supply, has clearly risen and fallen, and is “starving” for a new feeding. If your starter has not risen and fallen, it is impossible for your starter to be starving and covered in hooch.
What you may be seeing is actually water separation. This is very common with a new starter and is often mistaken for hooch.
How can you tell the difference between hooch and water separation? Hooch only occurs after a strong starter has vigorously risen and fallen.
If you are seeing water separation in your starter (which is 99% of what you will see in the first 1-5 days), simply stir it in and wait. It needs more time to strengthen.
If you doubt my advice, you can seek out other opinions and many people will say that the clear liquid on top of your two or three-day-old starter is hooch and your starter is starving and you should discard and refeed (maybe even twice a day). These people are 100% wrong and they will only help you ruin your starter.
Wild yeast is everywhere in nature. It is on your hands. It is on your countertop. It is in the air. But it is found in high concentration on wheat berries. Wheat and wild yeast have a thing for each other. When wheat is milled into flour, the wild yeast from the wheat fields is on the flour in low concentrations. When you create a starter, this is why you only need to add flour and water without adding anything else and the yeast attached to the flour will start to propagate. It takes time to propagate a wild yeast starter because the yeast population is quite small, but present on all flour.
No. If you add packaged yeast, then you are not making a “wild yeast” starter. The strain of yeast used in commercial packaged yeast is a very dominant strain and it will crowd out other wild yeasts. Adding packaged yeast to a sourdough starter defeats the purpose of creating one.
The most common blend of flours recommended for creating a sourdough starter is a blend of 50% whole wheat flour and 50% bread flour. Many bakers have success with this blend.
You can use a higher proportion of whole wheat flour. For example, some bakers prefer to use 100% whole wheat. But you should never go lower than 50% whole wheat in your blend. Whole grain flours have more available nutrients and proteins which your starter needs.
It is possible to create a starter using 100% bread flour or 100% all-purpose flour, but it will take much longer to get established, and generally will not be as strong as a blend which includes whole wheat.
Many bakers also use rye flour in their starters and some bakers keep separate starters made with 100% rye flour. You can add a small percentage of rye (e.g., 10%) to your flour blend. Or you can make a 100% rye flour starter. Rye is tricky to work with and I recommend not using rye flour until you first try the 50/50 blend of bread flour and whole wheat flour.
I don’t recommend it. I’ve seen best results using at least 50% whole wheat flour and 50% bread flour. You could probably substitute all-purpose flour for the bread flour, but never go below 50% whole wheat flour when creating a new starter.
When you are creating a new starter, the wild yeast that you are trying to cultivate is found on the exterior hull of a wheat berry. If you use highly refined, all-purpose flour, the vast majority of the hull (the bran) is removed from the flour, and the flour is subject to lots of other processing which removes and or damages the yeast cells. Refined flours, like all-purpose flour, simply have fewer yeast cells in the bag.
It is also beneficial, when creating a new starter, to have some biodiversity in your initial mix of flours. Using a blend of two types of flours is better than using a single type of flour.
Important: Once your starter is mature and established, it is possible to migrate away from feeding it 50% whole wheat flour. A mature starter is basically converting the flour to sugars and it is less important to have whole-grain or high-protein flour for ongoing basic maintenance.
I prefer to feed my starter the 50/50 blend, for ongoing maintenance, but other bakers have success with other feeding methods.
Always use unchlorinated water to create your starter. Some people will say they’ve successfully used “tap water,” but everyone’s tap water may be different. Some tap water is chlorinated and some is not. Some tap water comes from a reverse osmosis filtered well. Some tap water comes from a mountain spring. Some tap water contains chloramine. Some contains chlorine. Use unchlorinated water. It is possible to use distilled water, but it is not recommended because it has been stripped of minerals that can be beneficial to your starter.
Not necessarily. For the first two days of creating a new starter, it is best to keep it below 70F/21C. After that, the yeast prefers a temperature around 78F/25C, but it is not required. You can create a new starter at lower temperatures (e.g., 70F/21C) but it will just take a little longer and will rise a little more slowly.
A slow-rising starter is not necessarily weaker if the temperature is lower. It is just cooler. Fermentation activity is temperature sensitive, so you always need to adjust your expectations based on the temperature. Warmer starters rise more quickly. Cooler starters rise more slowly. But they may be the exact same “strength.” The temperature governs the rise time as much (or more) than the starter’s strength.
No. You cannot force-feed a starter. And if you are discarding and refeeding too frequently, you are actually diluting and weakening your starter.
No. Throw it away and start over. Mold has tendrils that penetrate deep below the surface so there is no such thing as “surface mold.”
After the first few days, your starter will develop a pH level (acidity level) that is a hostile environment for pathogens. A mature, healthy starter will always resist mold growth. Also keep the sides of your starter jar clean. This is usually where the mold gets a foothold.
The most common problem is impatience. Creating a new starter takes time and you cannot rush it. If you try to rush it, you can actually make it weaker. Also, the microbes in your starter are temperature-sensitive. They prefer a temperature around 78F/26C. If your starter is too cool it will take a long time to establish itself. It will eventually get there, but people often get impatient.
You can certainly buy one. Many sourdough bakers will also gladly give you some of their starter. Some bakeries will give you (or sell) some of their starter. Some will not. Ask politely and be considerate if they decline. Some bakers are very protective of their starters as it is their “secret ingredient.”
Only for a short time. Over time, the microbes in your starter will take on properties of its environment, primarily due to the type of flour it is being fed, and secondarily, from microbes in the air and water from the location where it is being fed.
Check out this fascinating video about a Sourdough Starter “Library” where they maintain original strain starters from all over the world. You can see the process that would be required to keep a starter unchanged over time. Video: The Sourdough Library with Karl De Smedt.
It’s complicated. Yeast replicates two ways: 1) asexual division, and 2) hybridization. In asexual division, yeast cells are creating an exact replica. In hybridized reproduction they are taking attributes of the parent cells. If you have a starter that has been consistently fed and passed down for 100 years, it is certainly possible that there are still exact replica descendants of the original starter in your starter. However, every time you feed a starter, you are introducing new microorganisms from your flour and water, so the original strains of yeast theoretically get crowded out as more time passes. But if you had to prove, in a court of law, that someone’s 100-year old starter did not contain any of the original yeast strains, that assertion would be incredibly difficult (or impossible) to prove.
No. A dehydrated starter comes from a fully mature starter culture. It can usually be rehydrated and ready for baking in a few days. Here is a helpful guide describing how to rehydrate a dried starter. How to Rehydrate a Dried Sourdough Starter.
Some people save their “discard” (the day-old starter removed from your batch each day before refeeding) and use this in various sourdough discard recipes. Generally, when you are making a new starter, you should not save or use your discard for at least the first seven days. A new starter can contain pathogens from the raw flour and until the pH level of the starter equalizes, as it matures, the discard could still be the same as eating raw flour, which is not recommended.
Mix equal parts flour and water on Day 1, then do not discard or feed until Day 4. When you start discarding and feeding, I recommend a 1:2:2 ratio. That means, for example, keep 25g of starter, and feed it 50g flour and 50g water.
Continue this feeding until it has matured (typically 10-14 days), then you can re-assess your preferred feeding and maintenance schedule. See the section in the Encyclopedia — “Starter Maintenance”
I strongly recommend weighing your ingredients in grams. If you do not own a scale, now is a good time to make the investment. You will need a basic kitchen scale for sourdough baking. You can find a reliable scale for under $20 USD.
Recipes that call for creating your starter by using equal cup measurements (e.g., one cup flour and one cup water) will overhydrated your starter. It will be a very wet mix and it may not rise as readily as expected.
You can create a new starter in a warm kitchen or a cold kitchen. It will take longer at cooler temperatures, but it can be just as strong as one created in a warm environment.
If you want to keep your starter warm, do not let it get warmer than 80F/27C for long periods of time. 75-80F/25-27C is about as warm as you want to go.
Some people keep their starters in the oven with the light on. Always test your starter temperature to ensure it is not overheating. And, more importantly, it is very common for people to accidentally bake their starter by keeping it in the oven with the light on when, for example, a family member preheats the oven with your starter in it. Don’t let this happen to you. It is incredibly common. Put a visible sign over the oven controls if your starter is in the oven.
There are other warming options such as seed warming mats and kombucha warmers that you can purchase to keep your starter warm. Also look into the new line of warm/cold proofers like the Sourdough Home from Brod and Taylor.
These recipes are a huge red flag.
Many new starter recipes recommend “discarding half and feeding equal parts in cups” as the daily feeding method for a new starter.
Some people try to “keep it simple,” by using this method, but there are some issues with this guidance that can cause lots of problems for new starters.
Red Flag #1: “Feed Equal Part in Cups”
Recipes that recommend feeding equal parts by volume (e.g., 1/2 cup flour and 1/2 cup water) will overhydrate your starter. Flour and water have different weights by volume and feeding equal parts in cups makes a very wet mix. Wet mixes will not rise as readily, so you may think your starter is weaker than it actually is. This can then lead to all kinds of problems if you try to fix a problem that doesn’t exist.
Some people don’t want to make the investment in a kitchen scale, but if you are going to bake sourdough, you will eventually need a scale for reliable results.
Red Flag #2: “Discard Half…”
Discarding “half” of your starter before feeding is another oversimplification that does not produce the best results.
When creating a new sourdough starter, you need to discard a portion of the starter to, 1) flush out bad bacteria that forms in the first few days of a new starter, 2) remove normal fermentation waste products (acid and alcohol), and 3) make room for fresh flour and water so the size of your starter can remain constant and does not grow out of control.
By “discarding half” you are failing on all three counts. Discarding half does not remove enough of the waste products and does not make enough room for fresh water and flour.
The minimum you want to feed a new starter is a 1:1:1 feeding, that is equal parts carryover starter, fresh flour and fresh water. To make the math work you need to discard 2/3 and keep 1/3 of your previous starter, otherwise you will underfeed it and/or your quantity will grow uncontrollably.
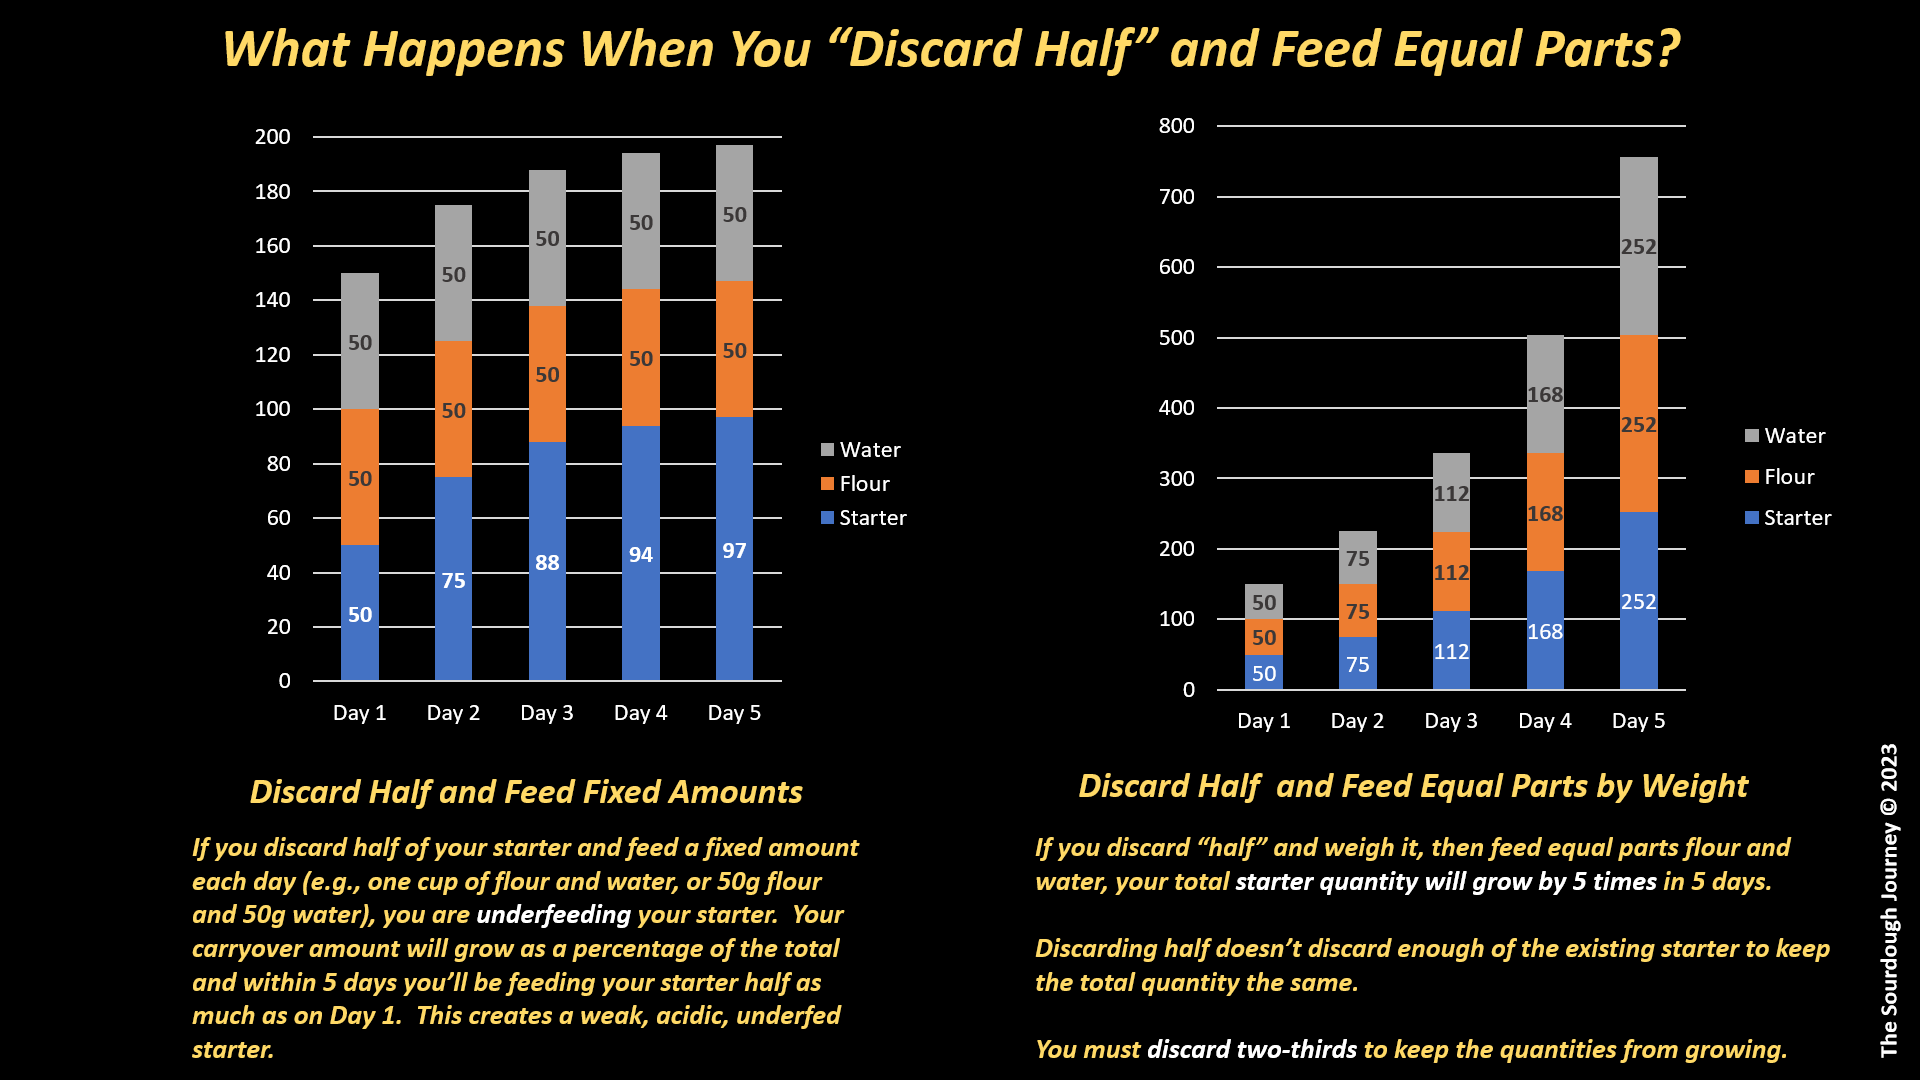
See the two examples in the chart.
Example #1
If you discard half and feed a fixed, equal amount (for example 50g flour and 50g water each day), your carryover amount will grow (because you need to be discarding 2/3, not 1/2) and within 5 days, your total starter will have grown by 25%.
More importantly, you will be seriously underfeeding your starter by Day 5. You are only feeding it half as much (as a ratio of the carryover) as you were feeding it on Day 1. This leads to an acidic, weak starter. Instead of 1:1:1 you are actually feeding 1: 1/2 : 1/2 by Day 5.
Example #2
Another method shown in the second chart is to discard half and weigh the remaining amount. Then adjust your flour and water quantity each day to the weight of that carryover amount. However, if you do this while discarding half, your starter will grow to 7 times its size in 5 days.
By only discarding half, then feeding equal parts, your total starter quantity will keep growing each day. You need to discard 2/3 and feed equal parts by weight to keep your starter from growing uncontrollably.
THE BOTTOM LINE
1) Always weigh your ingredients in grams, not cups, and
2) Discard 2/3, keep 1/3 (by weight) then feed equal parts flour and water to the weight of the 1/3 starter you are keeping. This will keep your total amount the same and will keep your starter happy.
I recommend keeping a very small quantity of starter until you are ready to bake. Then determine how much you need for your recipe, and you can bulk up your starter in one big feeding. There is no need to gradually ramp up to a larger quantity. That method creates a lot of waste and discard.
In fact, you can increase your starter quantity by 20 times overnight in one large feeding. There is never a need grow your starter quantity in advance of baking, until the last minute.
For example, if you keep 100g of starter and you need 2,000 grams of starter (for 20 loaves for example), you can do this in one night. The evening before you plan to mix your dough, feed your 100g starter with 1,000g flour and 1,000g water (a 1:10:10 feeding). At room temperature of approximately 70F/21C, your starter will grow to 2,100g by morning. You can then use 2,000g in your recipe, and keep your 100g going as your main starter.
Yes! You can create and maintain a sourdough starter at any temperature between 50F/10C and 90F/32C.
However, you starter will be on a different timeline than you seen other recipes, posts or proceses.
For example, many methods for creating a new sourdough starter suggest discarding and feeding your starter every 24 hours. That assumes your starter is kept at a temperature around 70F/21C. If your kitchen is cooler, your starter will consume flour more slowly and you will need to stretch out your feeding times to give the starter time to eat between discarding and refeeding.
The general rule of thumb with sourdough fermentation is that with each 15F/8C-degree change in temperature, the fermentation speed doubles (for temperature increases) or halves (for temperature decreases).
For example, if a starter doubles in volume in 4 hours after a 1:1:1 feeding at 70F/21C, that same starter would take 8 hours to double at 55F/13C (15F/8C cooler).
If another starter doubles in volume in 8 hours at 65F/18C, that same starter would double in 4 hours at 80F/27C (15F/9C warmer).
You can create and maintaina a starter at almost any temperature, but you need to syncrhonize your expectations and feeding times to match the temperature.
Many people look at all the tools, videos and recipes developed to create a new sourdough starter and they ask the question, “How did our ancestors possibly create sourdough starters (e.g., with no scales or temperature control devices) if it is this difficult.”
That is a great question, but the reality is — until about 200 years ago everyone made sourdough bread. It was the only way to make leavened bread before the advent of packaged commercial yeast in 1822.
Because sourdough baking was so prevalent, sourdough starters were also everywhere. Everyone had a sourdough starter. And because sourdough starters are so simple to share and replicate, everyone shared sourdough starters.
It would have been incredibly unlikely to see a person actually creating a new sourdough starter from scratch. In fact, I would speculate that generations of people could thrive as bakers without ever knowing a single person who created a new sourdough starter from scratch!
Think of sourdough starters of the past like lawnmowers of the present. Most everyone with a lawn owns a lawnmower. And also imagine that if you borrowed someone else’s lawnmower for one day, it would magically turn into a second lawnmower.
If your lawnmower broke down, you wouldn’t build a new lawnmower. You would borrow one. It would be unthinkable to build your own lawnmower if all of your neighbors owned one and it would magically replicate if you used it one time.
This is the same way people would have thought about sourdough starters in the past.
I would speculate that in any given year in current times, more people are creating new sourdough starters than all the sourdough starters ever created by all the humans on earth from the beginning of time until 200 years ago.
I recommend a 1-point (half liter) wide-mouthed canning jar with a plastic screw top lid.
You can also use any food-safe container. Pickle jars, peanut butter jars, deli containers, and Talenti ice cream jars, are all popular choices.
If you use a glass jar, always keep a backup of your starter in case you drop and break your jar.
Your starter jar should have a solid, loose-fitting lid (not sealed airtight). Some people recommend covering your starter with a porous material like a coffee filter, paper towel, cheese cloth, or kitchen towel. Don’t do this. These types of covers allow the surface of your starter to dry out, and they collect and attract mold spores.
No. If your starter is growing slowly with a 1:1:1 feeding, changing to a 1:2:2 feeding will make it worse. With a 1:2:2 feeding you are discarding 80% of your existing yeast population every time you discard and feed. This can weaken your starter if you then discard again before it peaks.
Overfeeding and premature discarding are the most common reasons for new starter failures.
Sometimes. It depends on the flour combinations.
If you create a starter with bread flour or all-purpose flour, these are usually interchangeable, and you can easily switch from one to the other once your starter is established.
If you’ve created a starter with all-purpose or bread flour, you can often transition these starters to feed them some portion of whole wheat or rye flour. It is common to feed a starter with 25-50% whole grain flours. This often strengthens a weak starter.
If you’ve created a sourdough starter with whole wheat flour or rye flour and you want to transition it to feeding with all-purpose or bread flour, sometimes it works and sometimes it does not. Starters become accustomed to certain types of flour. If you want to make the transition, gradually wean your starter off of the whole grain flours slowly, over a few weeks. It generally will work, but sometimes starters cannot make the transition.
When creating a new starter, sometimes it helps to keep it warm, but many people keep their new starters too warm.
Your starter generally will do well with temperatures between 75-80F/24-28C, but you don’t want to keep your starter at 80F/27C or higher for long periods of time. It will become acidic, and this can weaken your starter.
You won’t kill your starter until the temperature reaches 140F/60C. But a warm starter (over 80F/27C) can become acidic which chokes off the yeast.